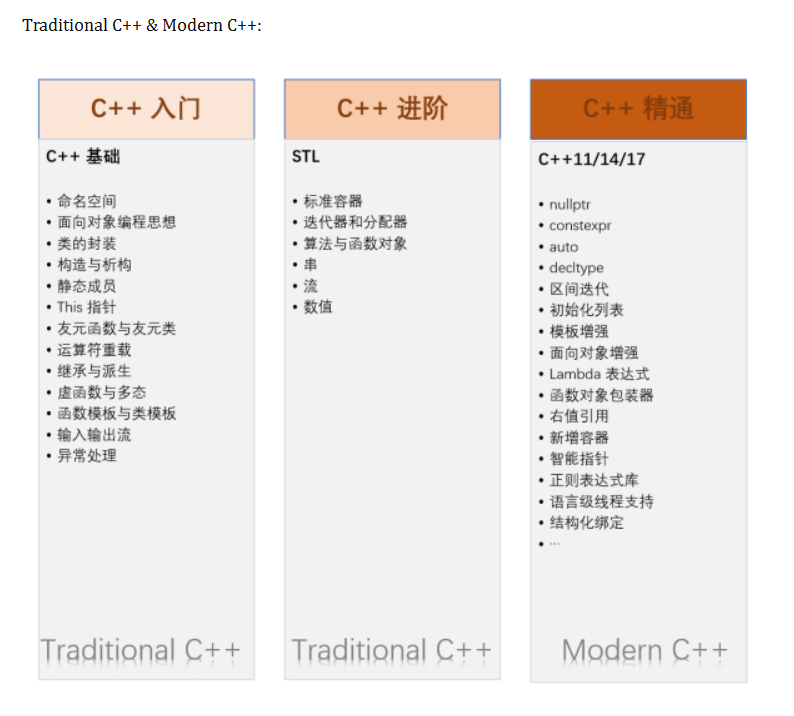
14.新标准C加加程序设计
内存分区模型
内存代码区的意义:程序代码放在不同的区域,有程序自动管理的代码,也有程序员管理的代码,灵活管理;
一、程序执行前
1.代码区
存放二进制指令,就是代码,特点:
共享:多个进程的代码区是共享的,因为代码是相同的,所以只需要加载一份到内存中即可,节省内存空间。
只读:代码是只读的,防止程序意外地修改了代码。
2.全局区
全局变量和静态变量存储在全局区,还包括常量区、字符串常量和其他常量(如:const),特点:
全局区是程序结束后由系统释放。
全局变量和静态变量在程序结束后系统会自动释放,而局部变量在函数结束后由系统自动释放。
例子:
#include <iostream>
using namespace std;
//全局变量
int g_a = 10 ;
int g_b;
//const 修饰的全局变量
const int c_g_a = 10 ;
int main (int argc,char * argv[]){
//局部变量
int a = 10 ;
int b = 20 ;
//静态变量
static int s_a = 10 ;
static int s_b;
//字符串常量
char * P = "hello world" ;
//const修饰的局部变量
const int c_l_a = 10 ;
cout<< "局部变量a的地址:" <<& a<< endl;
cout<< "局部变量b的地址:" <<& b<< endl;
cout<< "全局变量a的地址:" <<& g_a<< endl;
cout<< "全局变量b的地址:" <<& g_b<< endl;
cout<< "静态变量a的地址:" <<& s_a<< endl;
cout<< "静态变量b的地址:" <<& s_b<< endl;
cout<< "字符串常量P的地址:" << P<< endl;
cout<< "const修饰的局部变量c_l_a的地址:" <<& c_l_a<< endl;
cout<< "const修饰的全局变量c_g_a的地址:" <<& c_g_a<< endl;
return 0 ;
} 3.总结
代码区:存放二进制指令,共享,只读。
全局区:存放全局变量和静态变量,程序结束后由系统释放。
二、程序运行后
1.栈区
由编译器自动分配释放,存放函数的参数值,局部变量等。
注意: 不要返回局部变量的地址,因为局部变量在函数结束后会被系统释放,再次访问会导致程序崩溃。
例子:
#include <iostream>
using namespace std;
int * GetAddr (int b){//形参数据也放在栈区
= 10 ;
int a = 10 ;
return & a;//返回局部变量的地址
int main (){
int * p = GetAddr();
cout<<* p<< endl;//第一次可以打印正确的数据,是因为编译器做了保留,
<<* p<< endl;// 但是第二次访问将不再保留
return 0 ;
} 2.堆区
由程序员分配释放,如果程序员不释放,程序结束时由系统回收。
在C++中主要利用new和delete操作符进行动态内存管理。
例子1-在堆上开辟空间:
#include <iostream>
using namespace std;
int * getAddr (){
//在堆上开辟空间,并初始化为10
int * p = new int (10 );//new出来的数据返回的是一个指针
//使用存在栈区的局部指针指向堆区的数据,栈区的内容会被程序自动释放,但是指向堆区的数据不会被释放
return p;
}
int main (){
int * p = getAddr();
cout<<* p<< endl;//输出10
delete p;//释放空间
return 0 ;
} 图解:
例子2-堆区上的数据开辟与释放
#include <iostream>
using namespace std;
void test (){
int * P = new int (10 );
cout<<* P<< endl;
delete P;
}
void test2 (){
int * arr = new int [10 ];
for (int i = 0 ;i< 10 ;i++ ){
arr[i] = i+ 10 ;
}
for (int i = 0 ;i< 10 ;i++ ){
cout<< arr[i]<< " " ;
}
delete [] arr;
}
int main (){
test();
} 引用
给变量取别名。
一、变量引用
引用注意事项:
引用必须初始化,int &b;//这样是不正确的
引用初始化后不能改变
通过引用参数产生的效果与指针地址传递效果一样,引用语法更清楚;
测试代码:
//值传递
void test1 (int a,int b) {
}
//地址传递
void test2 (int * a,int * b) {
int temp = * a;
* a = * b;
* b = temp;
}
//引用传递
void test3 (int & a,int & b) {
int temp = a;
a = b;
b = temp;
} 二、应用做函数的返回值
不要返回局部变量的引用
函数返回值是引用,那么这个函数调用可以作为左值
测试代码:
// 二、引用做函数返回值
//1.不能返回应用返回值
int & test04()//以引用的方式返回b,相当于给这个b起了一个别名
int b = 10 ;//局部变量存放在栈区,函数结束后会被释放
return b;
}
//2. 函数的调用可以作为左值
int & test05()
{
static int b = 10 ;//静态变量存放在全局区,程序结束后由系统自动释放
return b;
}
int main ()
{
int & ret04 = test04();
int & ret05 = test05();
std:: cout << "ret04= " << ret04 << std:: endl;
std:: cout << "ret04= " << ret04 << std:: endl;//第二次访问返回的是乱码
:: cout << "ret05= " << ret05 << std:: endl;
test05() = 130 ;//函数的返回是引用,函数的调用可以作为左值
:: cout << "ret05= " << ret05 << std:: endl;
system("pause" );
return 0 ;
} 测试代码结果
三、引用的本质
引用的本质在C++内部实现是一个指针常量,引用类型必须和引用实体是同类型。
四、常量引用
作用:用来修饰形参,防止误操作。
代码说明:
//四、常量引用
//int &ref = 10; 这样的操作是不被允许的,因为赋值给引用的是一个字面量,引用需要一个合法的空间,
// 程序运行时没有专门为其分配可修改的内存空间
// 但是如果在前面在上const,这条代码就通过
// const int &ref = 10;
//用来修饰形参,防止误操作
void test06 (const int & val)
{
//val = 100;不被允许修改
:: cout << "val = " << val << std:: endl;
} 函数进阶
一、函数默认参数
返回值 函数名(参数 = 默认值){}
注意事项:
1.如果某个位置已经有了默认参数,那么该位置往后都必须有默认参数
//函数默认参数
void test (int a ,int b = 20 ,int c = 30 )
{
std:: cout << "a = " << a << std:: endl;
std:: cout << "b = " << b << std:: endl;
std:: cout << "c = " << c << std:: endl;
} 2.函数的声明有默认参数,函数实现不能有默认参数,声明和实现只能有一个有默认值
#include <iostream>
//函数声明
void test (int a= 10 ,int b = 20 );//
//函数实现
void test (int a ,int b)
{
std:: cout << "a = " << a << std:: endl;
std:: cout << "b = " << b << std:: endl;
} 二、函数占位参数
作用:为了函数声明和定义的统一
语法:返回类型 函数名(数据类型){}
//函数占位参数
void test (int a,int )//第二个参数为占位参数
std:: cout << "a = " << a << std:: endl;
}
int main () {
test(10 ,10 );//占位参数必须填补,否则无法运行
注意:占位参数可以有默认参数,此时调用时就不用在传值
//函数占位参数
void test (int a,int = 10 )//第二个参数为占位参数,含默认值
std:: cout << "a = " << a << std:: endl;
}
int main () {
test(10 );//不需要传站位参数
三、函数重载
满足条件:
在同一个作用域下。
函数名相同,
参数类型不同,
参数个数不同,
参数顺序不同。
作用: 提高复用性
注意:
1.返回值不能作为重载的条件
2.引用作为重载的条件
加const和不加是可以重载的
void fun (int & a){
std:: cout<< "fun(int &a)" << std:: endl;
}
void fun (const int & a){
std:: cout<< "fun(const int &a)" << std:: endl;
}
int main (){
int a = 10 ;
const int & b = 20 ;
fun(a);//调用fun(int &a)
//调用fun(const int &a)
10 );//调用fun(const int &a)
return 0 ;
} 3.函数重载遇到默认参数
void fun2 (int a,int b = 10 ){
std:: cout<< "fun(int &a)" << std:: endl;
}
void fun2 (int a){
std:: cout<< "fun(const int &a)" << std:: endl;
}
int main (){
fun2(10 );//此时程序出现二义性,无法确定调用哪个函数
return 0 ;
} 类和对象的基本概念
C++的特性:封装、多态、继承
一、基本概念
抽象:将事物所能进行的的行为归纳出来,形成函数,这些函数可以操作事物归纳后的数据结构。
类: 、
封装
将事物归纳的数据结构和操作该数据结构的算法呈现显而易见的紧密关系,叫封装。
一、 封装的意义
1.将属性和行为作为一个整体,表现生活中的事物。
namespace test_class
{
//设计一个圆的类
#define PI 3.14
class Circle
{
//访问权限
public :
//属性
int m_r;
//行为
double calculateZC ()
{
return 2 * PI * m_r;
}
};
void test () {
Circle c1;
c1.m_r = 10 ;
cout << "圆的周长 = " << c1.calculateZC() << endl;
}
} 2.访问权限
public 公共权限
protected 保护权限
private 私有权限
二、访问权限说明
public修饰的成员,可以在类内或者类外直接访问
protected修饰的成员,只能在类内和子类中访问
private修饰的成员,只能在类内访问
三、struct 与 Class 的区别
默认访问权限不同
struct 默认权限为 public
class 默认权限为 private
四、设置访问权限
一般对于变量设置为private,当要访问private的变量时,通过public的函数来访问。
namespace test_class
{
class Person
{
private :
//姓名
//年龄
int m_Age;
public :
void setAge(int age)
{
m_Age = age;
}
};
int main (){
Person p;
p.setAge(18 );
return 0 ;
}
} 对象特性
一、初始化和清零
如果我们不提供构造函数,编译器会自动提供默认构造函数,但两个函数是空实现。
1.作用
构造函数:主要作用在于粗昂见对象那个时为对象成员属性赋值,
析构函数:主要作用在于对象销毁前系统自动调用析构函数,执行一些清理工作。
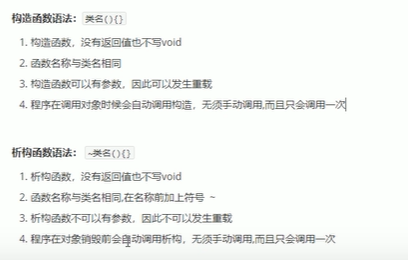
2.语法
二、构造函数的分类及调用
按参数分类:有参构造和无参构造(默认构造函数)
按类型分类:普通构造和拷贝构造
3.调用规则
如果定义了有参构造,最好显示定义无参构造
如果定义了拷贝构造,最好显示定义赋值构造
namespace test
{
//构造函数的分类及调用
//分类 按照参数分:有参构造函数和无参构造函数(默认构造函数)
// 按照类型分:普通构造和拷贝构造
class Person
{
public :
Person() {
cout << "调用无参构造函数" << endl;
}
Person(int Age)
{
age = Age;
cout << "调用有参构造函数" << endl;
}
Person(const Person & p)
{
age = p.age;
cout << "调用拷贝构造函数" << endl;
}
~ Person() {
cout << "调用析构函数" << endl;
}
private :
int age;
};
//调用
void test () {
//1.括号法
Person p2(18 );
Person p3(p2);
//注意事项
// 如果写的是 Person p1();那么编译器会认为是函数声明,而不会调用默认构造函数
//2.显示法
Person p2 = Person(10 );
Person p3 = Person(p2);
//匿名对象:只写Person (10)的形式,特点是当前行执行结束后,系统会立即回收
// 注意2:
// 不要使用拷贝构造函数初始化匿名对象、编译器会认为Person (p3) === Person p3;即对象声明
//3.隐式调用
= 10 ;//隐式转换为Person p4 = Person(10);
} 三、拷贝构造函数调用时机
1.使用一个已经创建完毕的对象来初始化一个新对象
2.值传递的方式给函数参数传值
3.值方式返回局部对象
namespace test_copy
{
//拷贝构造函数调用时机
class Person
{
public :
Person() {
cout << "调用无参构造函数" << endl;
}
Person(int Age)
{
age = Age;
cout << "调用有参构造函数" << endl;
}
Person(const Person& p)
{
age = p.age;
cout << "调用拷贝构造函数" << endl;
}
int getAge () {
return age;
}
~ Person() {
cout << "调用析构函数" << endl;
}
private :
int age;
};
//1.使用一个创建好的对象初始化一个新的对象
void test01 () {
Person p(19 );
Person p2(p);
}
//2.值传递方式传给函数参数传值
void doWork01 (Person p){
cout << "值传递方式调用拷贝构造函数" << endl;
}
//3.以返回值的方式返回
doWork02 () {
Person p1;
cout << (int * )& p1 << endl;
return p1;//返回时不直接返回p而是通过拷贝构造函数,拷贝一份返回给外面。当然,也有存在被编译器优化的情况
//这个时候就不会调用拷贝构造函数
void test02 () {
Person p = doWork02();
cout << (int * )& p << endl;
//cout << p.getAge() << endl;
} 四、构造函数调用规则
1.默认情况下,c++编译器至少给一个类添加3个函数
默认构造函数(无参,函数体为空)
默认析构函数(无参,函数体为空)
默认拷贝构造函数,对属性值进行拷贝
2.如果我们提供了有参构造函数,编译器就不会提供默认构造函数,但会提供默认拷贝构造函数
3.如果我们提供了拷贝构造函数,编译器就不会提供其他构造函数
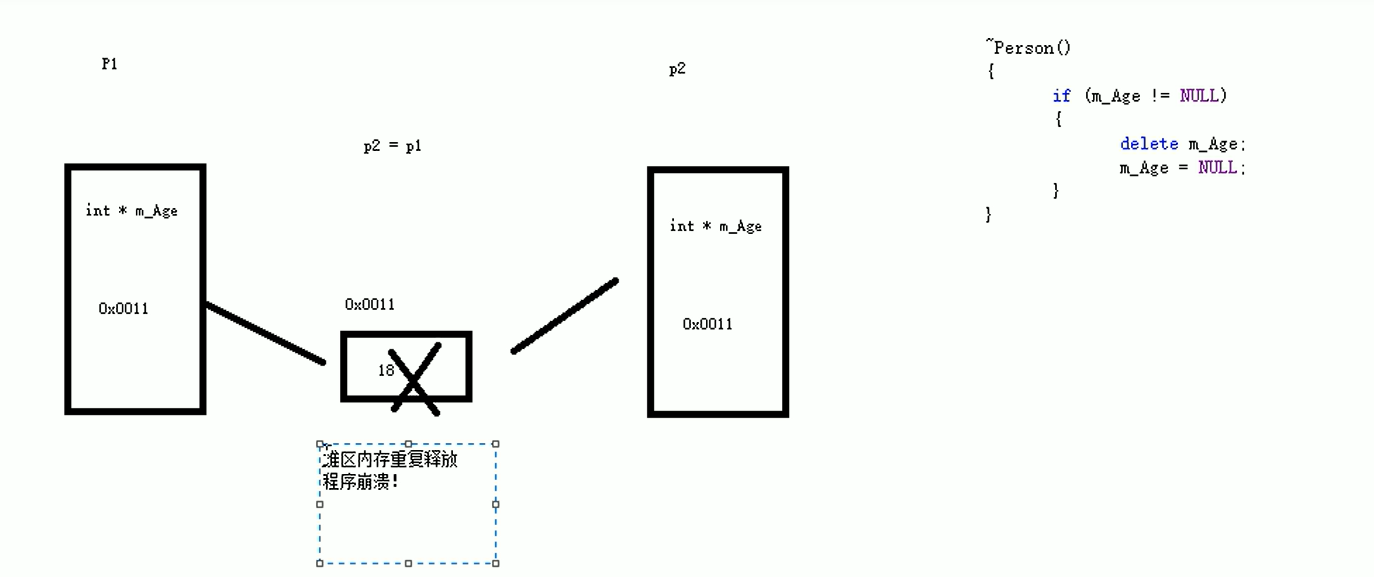
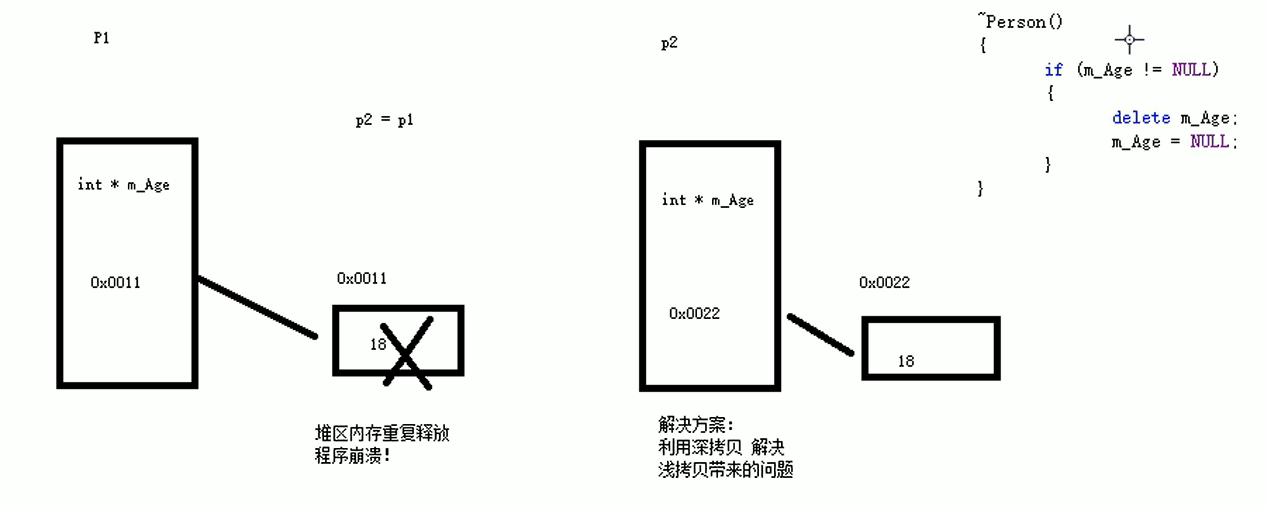
五、深拷贝与浅拷贝
1.浅拷贝:简单的赋值拷贝操作
2.深拷贝:在堆区重新申请空间,进行拷贝操作
namespace test_deepcopy
{
class Person
{
public :
Person(int age,int height);
Person(const Person& p);
~ Person();
int m_Age;
int * m_Height;
};
Person:: Person(int age,int height)
{
m_Age = age;
m_Height = new int (height);//在堆区申请一块内存空间用于存储身高
<< "调用构有参造函数" << endl;
}
Person:: Person(const Person& p)
{
m_Age = p.m_Age;
//m_Height = p.m_Height;//这段代码就是浅拷贝操作
= new int (* p.m_Height);//这段代码就是在堆区另申请内存空间,存储赋值过来的身高值
Person::~ Person()
{
if (m_Height != NULL)
{
delete m_Height;
m_Height = NULL;//避免野指针出现置空
cout << "调用析构函数" << endl;
}
void test ()
{
Person p(18 , 180 );
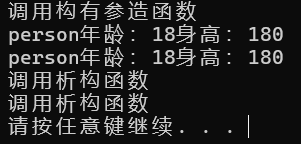
cout << "person年龄:" << p.m_Age << "身高:" << * p.m_Height << endl;
// 为测试浅拷贝与深拷贝写如下代码
//在没有写拷贝构造函数中的申请内存空间情况下,程序会报错,原因是程序是浅拷贝,导致第二次调用析构函数的时候报错
<< "person年龄:" << p1.m_Age << "身高:" << * p1.m_Height << endl;
}
} 结果如下:
六、初始化列表
1.作用
用于初始化属性
2.语法
namespace test_init
{
class Person
{
public :
//初始化列表
//Person() :m_A(10), m_B(20), m_C(30) { }
int a,int b,int c) : m_A(a), m_B(b), m_C(c) { }
~ Person() {}
int m_A;
int m_B;
int m_C;
};
void test () {
Person p(10 , 20 , 30 );
cout << "m_A:" << p.m_A << endl;
cout << "m_B:" << p.m_B << endl;
cout << "m_C:" << p.m_C << endl;
}
} 七、类对象作为类成员
1.类中的成员可以是另一个类的对象,我们称该成员为对象成员
2.类对象作为类成员时,其构造顺序和声明顺序一致,析构顺序和构造相反
八、静态成员
1.静态成员变量
所有对象共享同一份数据
在编译阶段分配内存(代码运行前分配内存,在全局区)
类内声明,类外初始化
2.静态成员函数
所有对象共享同一个函数
静态成员函数只能访问静态成员变量
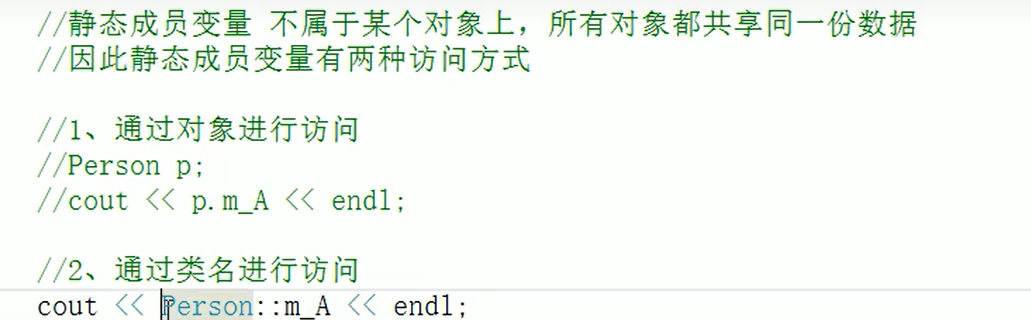
3.访问静态成员变量
4.静态成员变量也有访问权限
公有静态成员变量类外可以访问
私有静态成员变量类外不可以访问
namespace test_static
{
class Person
{
public :
static int m_A;
int m_B;
private :
static int m_C;
};
int Person:: m_A = 10 ;
void test01 () {
//1.通过对象访问
p.m_A = 100 ;
cout << "p.m_A = " << p.m_A << endl;
cout << "p.m_B = " << p.m_B << endl;
//2.通过类名访问
<< "Person::m_A = " << Person:: m_A << endl;
//cout << "Person::m_B = " << Person::m_B << endl;//报错,私有成员变量类外不可以访问
} 5.静态成员函数
所有对象共享一个函数
静态成员函数只能访问静态成员变量
namespace test_static_func
{
class Person
{
public :
static void func() {
m_A = 100 ;//静态成员函数可以访问静态成员变量
//m_B = 100;//静态成员函数不可以访问非静态成员变量
<< "static_func调用" << endl;
_}
static int m_A;
int m_B;
}
int Person:: m_A = 10 ;
void test01 () {
//1.通过对象访问
p.func();
//2.通过类名访问
:: func();
}
} 注意:静态成员函数也有访问权限
九、C++对象模型和this指针
1.成员变量和成员函数分开存储
在C++中,类内的成员变量和成员函数分开存储,只有非静态成员变量才属于类的对象上,静态成员函数不属于类的对象上。
namespace test_this{
class Person
{
};
class Person2
{
int m_A;
static m_B;//静态成员,不在类对象上
void func (){}//非静态成员函数,不在类对象上【原因需要看下一节】
static void func2 (){}//静态成员函数,不在类对象上
int Person:: m_B = 10 ;
void test01 () {
Person p;
//空对象占用内存为1
//原因:C++编译器给每个空对象也分配一个字节空间,是为了区分空对象占用的内存区域,否则,空对象和字符数组无法区分
<< sizeof (p) << endl;//1
void test02 () {
Preson2 p2;
cout << sizeof (p2)<< endl;
//空对象占用内存为4
//原因:此时不是5而是4,当不是空的时候,为int类型,占用4个字节
//同时也验证了静态成员变量不属于类的对象上。
} 2.this指针
this是指针,谁调用,this指针就指向谁,
用途:
通过this指针访问类的成员
this指针的本质是指针常量,即指针的值不能修改
在类的非静态成员函数中,this指针默认作为隐含参数存在,不需要定义
(1)名称冲突:
namespace test_this{
class Person
{
public :
Person(int age) {
age = age;
}
int age;
}
void test01 () {
Person p(19 );
cout<< "age:" << p.age<< endl;
}
} 此时,得到的数据不是18,原因在于“age = age;”与"int age;“名字相同但不是同一个东西,解决的办法有而,第一种是如之前一样定义一个"int m_Age;",然后在代码中使用"m_Age = age;"。
第二种就是使用this指针,代码如下:
namespace test_this{
class Person
{
public :
Person(int age) {
this -> age = age;
}
int age;
}
void test01 () {
Person p(19 );
cout<< "age:" << p.age<< endl;
}
} 这种办法也可以实现正常输出,这里就解释了this指针的用途。对象p调用Person(int age)函数,此时this指针指向p,this指针指向p,this->age就相当于p.age。
(2)以返回值方式返回对象本身
namespace test_this {
class Person {
public :
// 修改1:添加类定义结尾的分号
void addAge(int age) {
this -> m_Age += age;
}
int m_Age = 10 ;
}; // 修正:补充分号
void test01 () {
Person p;
p.addAge(10 );
// 修改2:void 返回值无法输出,需直接访问成员变量
<< "age:" << p.m_Age << endl; // 输出 20
} 此时得到的结果是20,如果想实现p.addAge(10).addAge(10).addAge(10)这样的操作,那么需要修改为如下代码:
namespace test_this {
class Person {
public :
// 返回引用以实现链式调用
& addAge(int age) {
this -> m_Age += age;
return * this ; // 返回对象本身的引用
int m_Age = 10 ;
};
// 修改3:重载 operator<< 以支持输出 Person 对象
& operator << (ostream& os, const Person& p) {
os << p.m_Age;
return os;
}
void test01 () {
Person p;
// 链式调用操作的是同一个对象(p)
10 ).addAge(10 ).addAge(10 );
cout << "p.m_Age: " << p.m_Age << endl; // 输出 40
} 这时候输出的结果就是40,实现了链式调用 ,类似与cout<<a<<b<<c<<endl;这样的操作。
当返回类型是 Person(而非引用)时,p.addAge(10) 会返回一个临时副本,后续的 .addAge(10) 操作修改的是临时副本的 m_Age,而非原始对象 p。
Person addAge (int age) { /* ... */ } // 返回副本
Person p;
p.addAge(10 ).addAge(10 ); // 第二个 addAge 操作的是临时副本
<< p.m_Age; // 输出 20(仅第一次修改生效)
十、空指针的访问函数
C++中空指针也是可以调用成员函数的,但是也要注意有没有访问成员变量。
namespace test_nullptr {
class Person {
public :
void showClassName() {
cout << "this is Person class" << endl;
}
void showPersonAge () {
//报错的原因是因为传入的指针是空指针,空指针访问成员变量会报错,解决办法如下:
// if(this == NULL){
// return;
// }
<< "age = " << m_Age << endl;//这条代码的本质:cout << "age = " << this->m_Age << endl;
int m_Age;
};
void test01 () {
Person * P = NULL;
p-> showClassName();//不报错
-> showPersonAge();//报错,空指针访问成员变量
} 十一、const修饰成员函数
1.常函数
成员函数后加const,称为常函数
常函数内不可以修改成员变量,除了 mutable修饰的成员变量
2.常对象
声明对象前加const,称为常对象
常对象只能调用常函数
namespace test_const{
//常函数
class Person {
public :
//this指针的本质是指针常量,指针指向的内容不可以修改
//Person * const this
//如果在成员函数后写了const,那么上面的语句就变成:
//const Person * const this
//在成员函数的后面加const,本质上是修饰了this指针,让this指针指向的值不可修改
void showPerson() const
{
//this->m_A = 100;//常函数不可以修改成员变量
= 100 ;//在变量前加mutable,让这个变量永远可变
void func (){
cout<< "func调用" << endl;
}
int m_A;
mutable int m_B;//在变量前加mutable,让这个变量永远可变
void test01 () {
Person p;
p.showPerson();
}
//常对象
void test02 () {
const Person p;
//p.m_A = 100;//常对象不可以修改成员变量
= 100 ;//可以调用
//可以调用
//可以调用
}
友元
友元关键字:friend
一、全局函数做友元
作用:全局函数做友元,全局函数就可以访问类中的私有内容
namespace test_friend{
class Building {
//告诉编译器GoodGay全局函数是Building类的好朋友,可以访问类中的私有内容
friend void GoodGay (Building & building);
public :
Building(){
this -> m_SittingRoom = "客厅" ;
this -> m_BedRoom = "卧室" ;
}
public :
string m_SittingRoom;
private :
string m_BedRoom;
};
void GoodGay (Building & buiding){
cout<< "好基友正在访问" << buiding.m_SittingRoom<< endl;
cout<< "好基友正在访问" << buiding.m_BedRoom<< endl;
}
void test01 (){
Building buiding;
GoodGay(buiding);
}
} 二、友元类
目的:让一个类可以访问另一个类的私有成员
友元类的所有成员函数都可以访问对方类的私有保护成员。
namespace test_friend{
class Building ;//先写出来防止报错
class GoodGay {
public :
GoodGay();
void visit ();//参观函数访问Building中的成员
* m_Building;//让该类有访问Building的权限
class Building {
friend class GoodGay ;//告诉编译器GoodGay类是Building的好朋友,可以访问Building的私有内容
public :
Building();//构造函数
public :
string m_SittingRoom;
private :
string m_BedRoom;
};
GoodGay:: GoodGay(){
this -> m_Building = new Building();//在对象被初始化时,就创建一个Building对象,方便后续访问Building中的成员
Building:: Building(){//当building对象被创建的时候,给变量初始化
this -> m_SittingRoom = "客厅" ;
this -> m_BedRoom = "卧室" ;
}
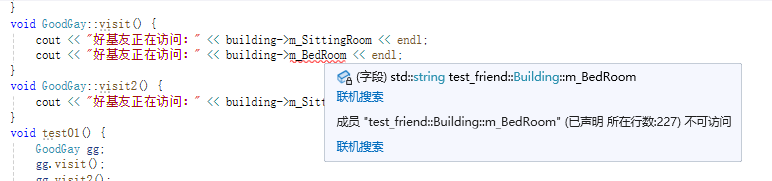
void GoodGay:: visit(){
cout<< "好基友正在访问:" << this -> m_Building.m_SittingRoom<< endl;
cout<< "好基友正在访问:" << this -> m_Building.m_BedRoom<< endl;//在没有声明GoodGay为Building的友元类时,这句代码不通过。
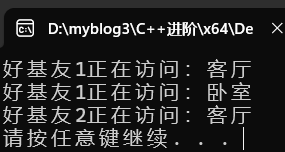
void test01 (){
GoodGay gg;
gg.visit();
}
}
三、成员函数做友元
作用:
``` cpp
namespace test_friend{
class Building ;
class GoodGay {
public :
GoodGay();
void visit ();//参观函数访问Building中的成员
void visit2 ();//让参观函数不可以访问访问Building中的成员
* building;//让该类有访问Building的权限
class Building {
//告诉编译器GoodGay类中的visit成员函数是Building好朋友,可以访问Building的私有内容
friend void GoodGay:: visit();
public :
Building();//构造函数
public :
string m_SittingRoom;
private :
string m_BedRoom;
};
Building:: Building(){
m_SittingRoom = "客厅" ;
m_BedRoom = "卧室" ;
}
GoodGay:: GoodGay(){
building = new Building();//在对象被初始化时,就创建一个Building对象
void GoodGay:: visit(){
cout<< "好基友正在访问:" << building-> m_SittingRoom<< endl;
cout<< "好基友正在访问:" << building-> m_BedRoom<< endl;
}
void GoodGay:: visit2(){
cout<< "好基友正在访问:" << building-> m_SittingRoom<< endl;
}
void test01 (){
GoodGay gg;
gg.visit();
gg.visit2();
}
} 未加入关键字friend时:
加入后:
结果:
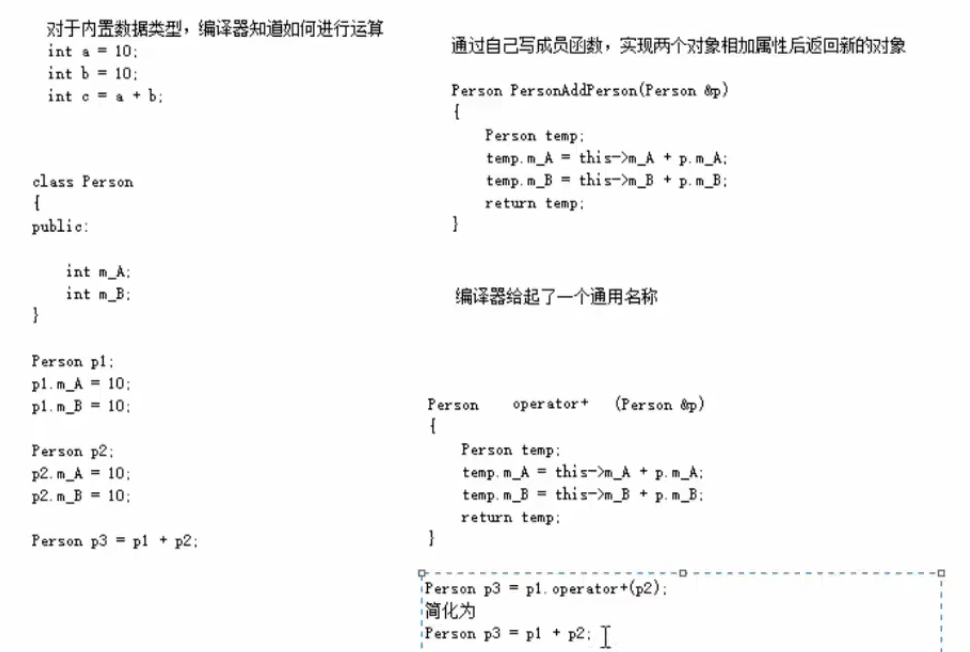
运算符重载
作用:让自定义的类,对象,也能够进行加减乘除等操作。
加号运算符重载
实现两个自定义数据结构的相加
需求:
namespace test_add
{
class Person
{
public :
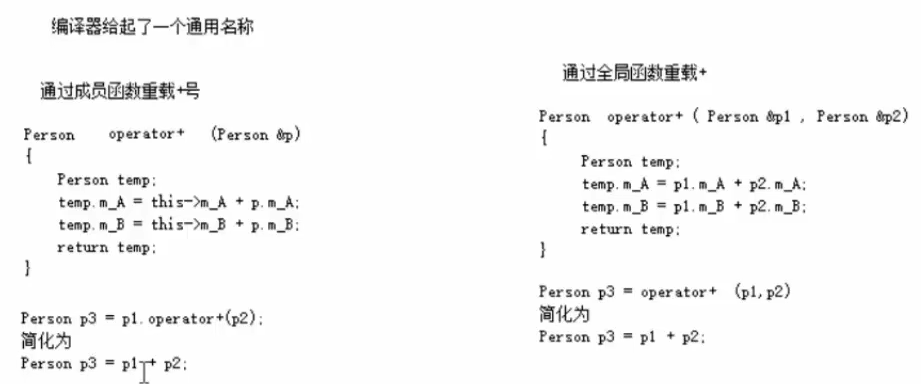
//1、成员函数重载
/*Person operator+ (Person &p)
{
Person temp;
temp.m_A = this->m_A + p.m_A;
temp.m_B = this->m_B + p.m_B;
return temp;
}*/
int m_A;
int m_B;
};
Person operator + (Person& p1, Person& p2)
{
Person temp;
temp.m_A = p1.m_A + p2.m_A;
temp.m_B = p1.m_B + p2.m_B;
return temp;
}
void test () {
Person p1;
p1.m_A = 20 ;
p1.m_B = 10 ;
Person p2;
p2.m_A = 20 ;
p2.m_B = 10 ;
//本质:Person ret = p2.operator+(p1)或者Person ret = operator+(p2,p1);简化为如下写法:
= p1 + p2;
cout << "结果:" << p3.m_A << endl;
cout << "结果:" << p3.m_B << endl;
}
} 除了以上的写法我们还可以使用函数重载的知识,将operator+重载实现Person p4 = p1+10;
左移运算符重载
作用:可以输出自定义数据类型
通过上面的学习我们可以使用两种办法实现输出自定义数据类型,但是此处如果使用成员函数重载,那么会出现对象在左侧,而cout在右侧的情况,详细如下图解释:
所以一般的作揖运算符重载使用全局函数重载,代码如下:
namespace test_LeftMove
{
class Person
{
//使用友元思想实现类外函数访问类内私有成员
friend ostream& operator << (ostream& cout, Person& p);
public :
Person(int a,int b): m_A(a),m_B(b){}
private : //数据一般为私有
int m_A;
int m_B;
};
//此处传入的值与返回的值都是用引用,对于ostream& cout是唯一的,
// 所以使用引用,ostream&作为返回值类型是为了实现链式输出
//即:cout << p << endl;
& operator << (ostream& cout, Person & p)
{
cout << "m_A = " << p.m_A << " m_B = " << p.m_B;
return cout;
}
void test () {
Person p(10 ,20 );
cout << p << endl;
}
} 递增运算符重载
作用:实现对自定义数据类型的递增
namespace test_MyInteger {
class MyInteger
{
friend ostream& operator << (ostream& cout, const MyInteger& myint);
public :
MyInteger(){
Integer = 0 ;
}
//前置运算符
& operator ++ () {
Integer++ ;
return * this ;
}
//后置运算符
operator ++ (int )//int是占位符,用于区分是前置还是后置运算符
MyInteger myint = * this ;//记录当前值
++ ;//对象属性自增
return myint;//返回记录值而不是自增后的值
private :
int Integer;
};
ostream& operator << (ostream& cout, const MyInteger& myint)
{
cout << myint.Integer;
return cout;
}
void test1 () {
MyInteger myint;
cout << ++ (++ myint) << endl;//如果返回的不是引用,那么这里的++(++myint)也能通过,但是并不是在原来的对象上进行操作,而是一个新的对象上操作。
<< myint << endl;
}
void test2 () {
MyInteger myint;
cout << (myint++ )++ << endl;//这样的操作精良避免发生,这不符合C++语法,因为第二次自增是在临时对象上自增而不是原始对象。
<< myint << endl;
}
} 关键点总结
右值与左值引用:非 const 左值引用 (MyInteger&) 无法绑定到右值(如 myint++ 返回的临时对象)。
const 引用的灵活性:const 左值引用 (const MyInteger&) 可以绑定到右值和左值,解决了参数匹配问题。
所以上面的代码中,«的重载第二个参数是const的引用类型,如果是非const的引用类型,那么在test2()函数中,cout << myint++<<endl;就会报错,因为 myint++的返回值是右值引用。
赋值运算符重载
C++编译器至少给一个类添加4个函数
默认构造函数(无参,函数体为空)
默认析构函数(无参,函数体为空)
默认拷贝构造函数,对属性值进行拷贝
赋值运算符重载函数operator=(对属性值进行拷贝)
解决办法:
namespace test_assig
{
class Person
{
public :
Person(int age) {
m_Age = new int (age);
}
~ Person() {
if (m_Age != NULL)
{
delete m_Age;
m_Age = NULL;
}
}
Person& operator = (Person & p) {
//默认赋值语句
//m_Age= p.age;
//先判断是否有属性在堆区,如果有先删除干净,再深拷贝
if (m_Age != NULL)
{
delete m_Age;
m_Age = NULL;
}
//深拷贝
= new int (* p.m_Age);
return * this ;
}
int * m_Age;
};
void test () {
Person p1(18 );
Person p2(20 );
Person p3(90 );
p3= p1 = p2;
cout << * p1.m_Age << endl;
cout << * p2.m_Age << endl;
cout << * p3.m_Age << endl;
}
} 关系运算符重载
作用:重载关系运算符。可以让两个自定义类型对象进行对比操作。
namespace test_relation
{
class Person
{
public :
Person(string name, int age)
{
m_Name = name;
m_Age = age;
}
bool operator == (Person& p)
{
if (m_Age == p.m_Age && m_Name == p.m_Name)
{
return true;
}
else {
return false;
}
}
int m_Age;
string m_Name;
};
void test ()
{
Person p1("JUN" , 18 );
Person p2("JUN" , 18 );
if (p1 == p2)
{
cout << "p1与p2相等" << endl;
}
else
{
cout << "p1与p2不相等" << endl;
}
}
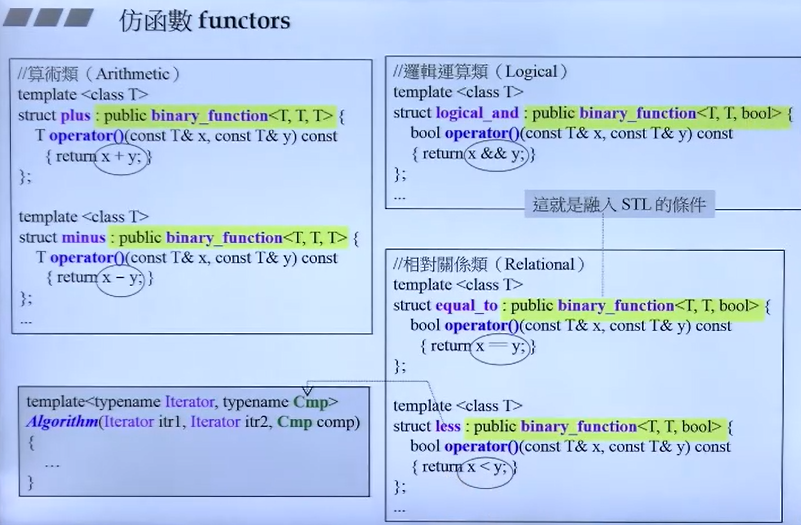
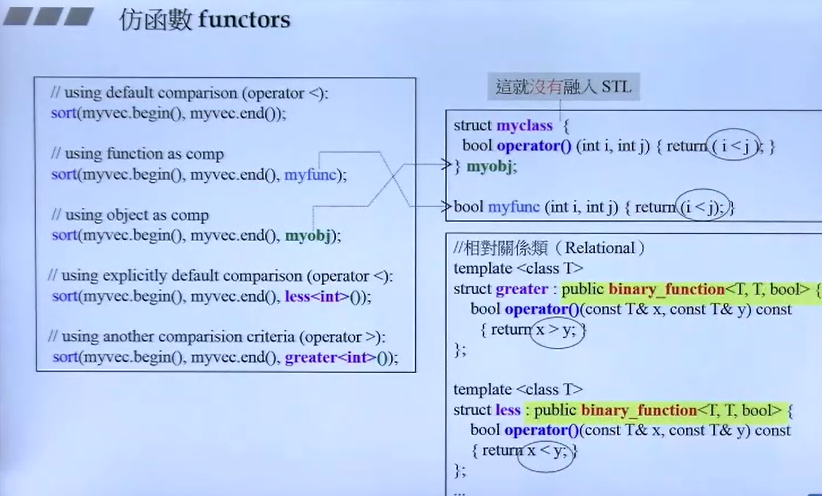
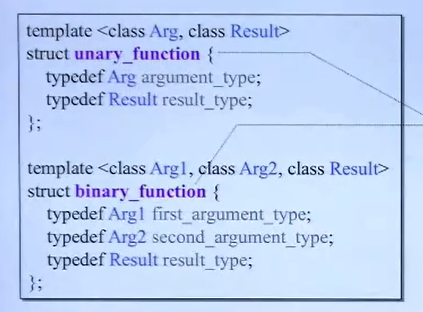
} 函数调用运算符重载
函数调用运算符()也可以重载
由于重载后使用的方式非常像函数的调用,因此称之为仿函数
仿函数没有固定写法,非常灵活
namespace test_call
{
class MyPrint
{
public :
void operator ()(string text)
{
cout << text << endl;
}
void operator ()(int a, int b)
{
cout << a + b << endl;
}
};
void test ()
{
MyPrint myprint;
myprint("hello world" );
myprint(1 , 2 );
cout<< MyPritn()("hello world" )<< endl;//MyPritn()是匿名对象,作用域在当前行,所以输出后立即销毁
} 继承
继承的基本语法
class 子类 : 继承方式 父类
{
//类体
继承方式一共有三种:public、protected、private
以下是 public、protected 和 private 访问权限的总结对比表(Markdown 格式):
访问权限对比表
场景
publicprotectedprivate
类内部访问
✅ 直接访问
✅ 直接访问
✅ 直接访问
派生类内部访问
✅ 直接访问
✅ 直接访问
❌ 不可直接访问
外部代码访问
✅ 直接访问
❌ 不可直接访问
❌ 不可直接访问
默认继承方式
类默认 private 继承
结构体默认 public 继承
-
继承方式对基类成员权限的影响
基类成员权限
public 继承后protected 继承后private 继承后
public 成员public(保留)protected(降级)private(降级)
protected 成员protected(保留)protected(保留)private(降级)
private 成员❌ 不可见
❌ 不可见
❌ 不可见
继承后的访问权限:
父类的私有成员,哪种方式继承都无法访问;
public继承,原来是什么还是什么:public–>public,protected–>protected;
protected继承,都变保护:public–>protected,protected–>protected;
private继承,都变私有:public–>private,protected–>private;
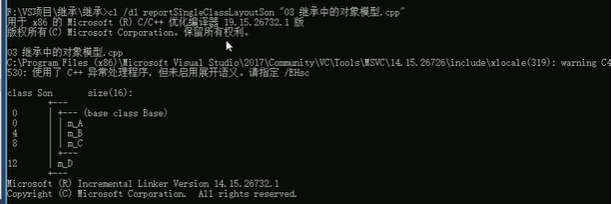
继承中的对象模型
namespace test_model
{
class Base {
public :
int m_A;
protected :
int m_B;
private :
int m_C;
};
class Son : public Base {
public :
int m_D;
};
void test (){
cout<< "sizeof(Base) = " << sizeof (Base)<< endl;
}
} 结果为16,因此可知父类中的所有非静态成员属性都被子类继承了,并且子类对象中包含了父类对象,父类对象在子类对象中是隐藏的。
另一种方式查看类的大小:
继承构造和析构函数
问题:父类和子类的构造和析构函数的调用顺序是什么?
namespace test_construct_destruct{
class Base {
public :
Base(){
cout<< "Base构造函数" << endl;
}
~ Base(){
cout<< "Base析构函数" << endl;
}
};
class Son : public Base{
public :
Son(){
cout<< "Son构造函数" << endl;
}
~ Son(){
cout<< "Son析构函数" << endl;
}
}
} 结果为:
Base构造函数
Son构造函数
Son析构函数
Base析构函数
继承同名成员处理方式
问题:当子类和父类出现同名的成员,如何通过子类对象,访问到父类和子类的同名成员?
访问子类同名成员直接访问即可;
访问父类同名成员需要加作用域;
namespace test_same_name{
class Base {
public :
Base()
{
m_A = 100 ;
}
void func (){
cout<< "Base func()" << endl;
}
void func (int a){
cout<< "Base func(int a)" << endl;
}
int m_A;
};
class Son : public Base{
public :
Son()
{
m_A = 200 ;
}
void func (){
cout<< "Son func()" << endl;
}
int m_A;
};
//同名的成员属性
void test01 (){
Son s;
cout<< s.m_A<< endl;
cout<< s.Base:: m_A<< endl;
}
//同名的函数
void test02 (){
Son s;
s.func():
s.Base:: func();//通过作用域解决
//下面的代码不通过,因为当子类和父类存在相同函数名时,子类的同名函数会屏蔽父类的同名函数,要想访问父类的同名函数,需要加作用域
//s.func(10);
} 继承同名静态成员处理方式
问题:继承中同名的静态成员在子类对象上如何进行访问?
访问子类同名静态成员,直接通过子类对象访问即可;
访问父类同名静态成员,需要加作用域;
namespace test_same_static{
class Base {
public :
static int m_A;
static void func (){
cout<< "Base func()" << endl;
}
};
class Son : public Base{
public :
static int m_A;
static void func (){
cout<< "Son func()" << endl;
}
};
int Base:: m_A = 100 ;
int Son:: m_A = 200 ;
//同名的静态成员属性
void test01 (){
Son s;
//通过对象访问
<< s.m_A<< endl;
cout<< s.Base:: m_A<< endl;
//通过类名访问
<< Son:: m_A<< endl;
cout<< Son:: Base:: m_A<< endl;
}
//同名的静态成员函数
void test02 (){
Son s;
s.func();
s.Base:: func();
//通过对象访问
:: func();
Son:: Base:: func();
}
} 多继承
C++允许一个类继承多个类:
语法:class 子类:继承方式 父类1, 继承方式 父类2...
多继承可能会引发父类中有同名成员出现的情况,需要加作用域区分。
C++实际开发中不建议使用多继承,因为会引发很多二义性问题。
namespace test_multi_inherit{
class Base1 {
public :
Base1(){
m_A = 100 ;
cout<< "Base1构造函数" << endl;
}
int m_A;
};
class Base2 {
public :
Base2(){
m_A = 200 ;
cout<< "Base2构造函数" << endl;
}
int m_A;
};
class Son : public Base1,public Base2{
public :
Son(){
m_A = 300 ;
m_B = 400 ;
cout<< "Son构造函数" << endl;
}
int m_A;
int m_B;
};
void test (){
Son s;//调用Base1构造函数,再调用Base2构造函数,最后调用Son构造函数
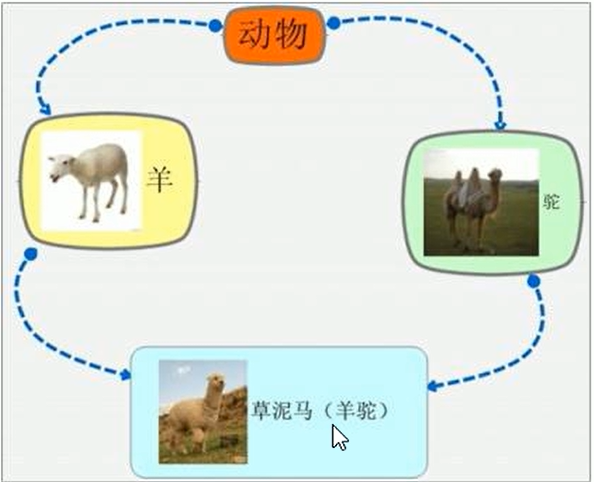
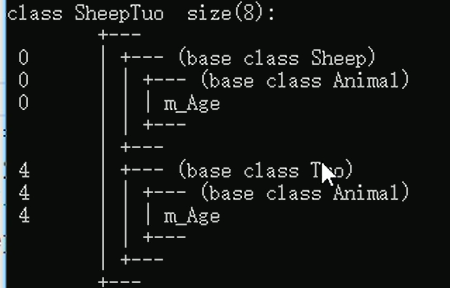
} 菱形继承
菱形继承的概念:
两个派生类继承同一个基类;
又有一个类同时继承这两个派生类;
这个类就叫做菱形继承;
菱形继承会导致二义性问题 ;
经典菱形继承案例:
出现的问题:
如何解决:
namespace test_diamond_inherit {
//动物类
class Animal {
public :
int m_Age;
};
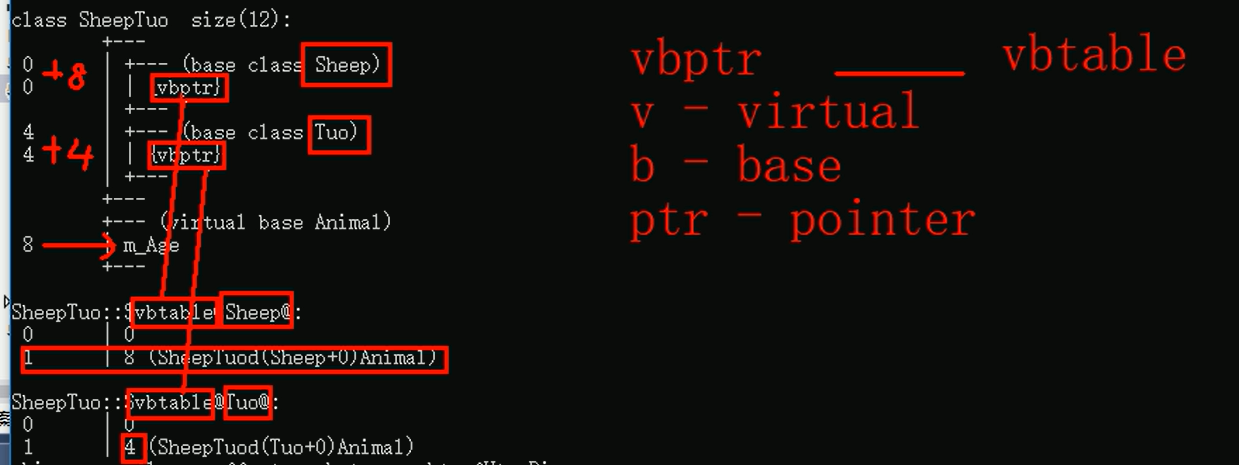
//利用虚继承可以解决菱形继承的问题
//在继承之前加virtual
//羊类
class Sheep : virtual public Animal {
};
//驼类
class Tuo : virtual public Animal {
};
//羊驼类
class SheepTuo : public Sheep, public Tuo {
};
void test () {
SheepTuo st;
//当菱形继承,连个父类拥有相同的数据时,需要加作用域加以区分
:: m_Age = 10 ;
st.Tuo:: m_Age = 20 ;
cout << "st.Sheep::m_Age = " << st.Sheep:: m_Age << endl;
cout << "st.Tuo::m_Age = " << st.Tuo:: m_Age << endl;
//当添加virtual关键字后,就可以使用下面的语句,而且不会出现二义性
<< "st.m_Age = " << st.m_Age << endl;
}
} 在没有使用virtual前,输入cl /d1 repoterSingleClassLayoutSheepTuo 类与对象.cpp后的结果如下图
加入virtual后,输入cl /d1 repoterSingleClassLayoutSheepTuo 类与对象.cpp后的结果如下图,下图就解释了为什么使用virtual能解决菱形继承问题。
多态
多态的基本概念
多态的含义:
**多态是允许不同对象通过统一的接口执行特定行为的能力,其意义在于提升代码的灵活性和可维护性,实现“接口复用,逻辑分离”。**(示例:基类Animal定义虚函数speak(),子类Dog和Cat分别实现自己的speak(),通过基类指针调用时自动执行对应子类逻辑。)
多态时C++三大特性之一,它分为编译时多态和运行时多态。
编译时多态:函数重载与运算符重载属于静态多态,复用函数名
运行时多态:派生类与虚函数实现运行时多态
二者的区别
静态多态函数的地址早绑定,在编译阶段确定函数地址;
动态多态函数的地址晚绑定,在运行阶段确定函数地址;
动态多态的满足条件:
1.有继承关系;
2.子类要重写父类的虚函数;(注意不是重载,是重写,父类中的函数要加virtual,至于子类可写可不写 )
动态多态的使用方式:
namespace test_polymorphism
{
class Animal
{
public :
virtual void speak()
{
cout << "动物在说话" << endl;
}
};
class Cat : public Animal
{
public :
void speak()
{
cou<< "喵喵喵" << endl;
}
};
void doSpeak (Animal & animal)//父类的指针可以指向子类的对象
animal.speak();
}
void test (){
Cat cat;
doSpeak(cat);//在未添加virtual关键字时,输出的是:动物在说话,添加后输出的是:喵喵喵,原因是未添加前,在编译阶段确定了speak()函数地址,而添加后,程序运行阶段才确定speak()函数地址
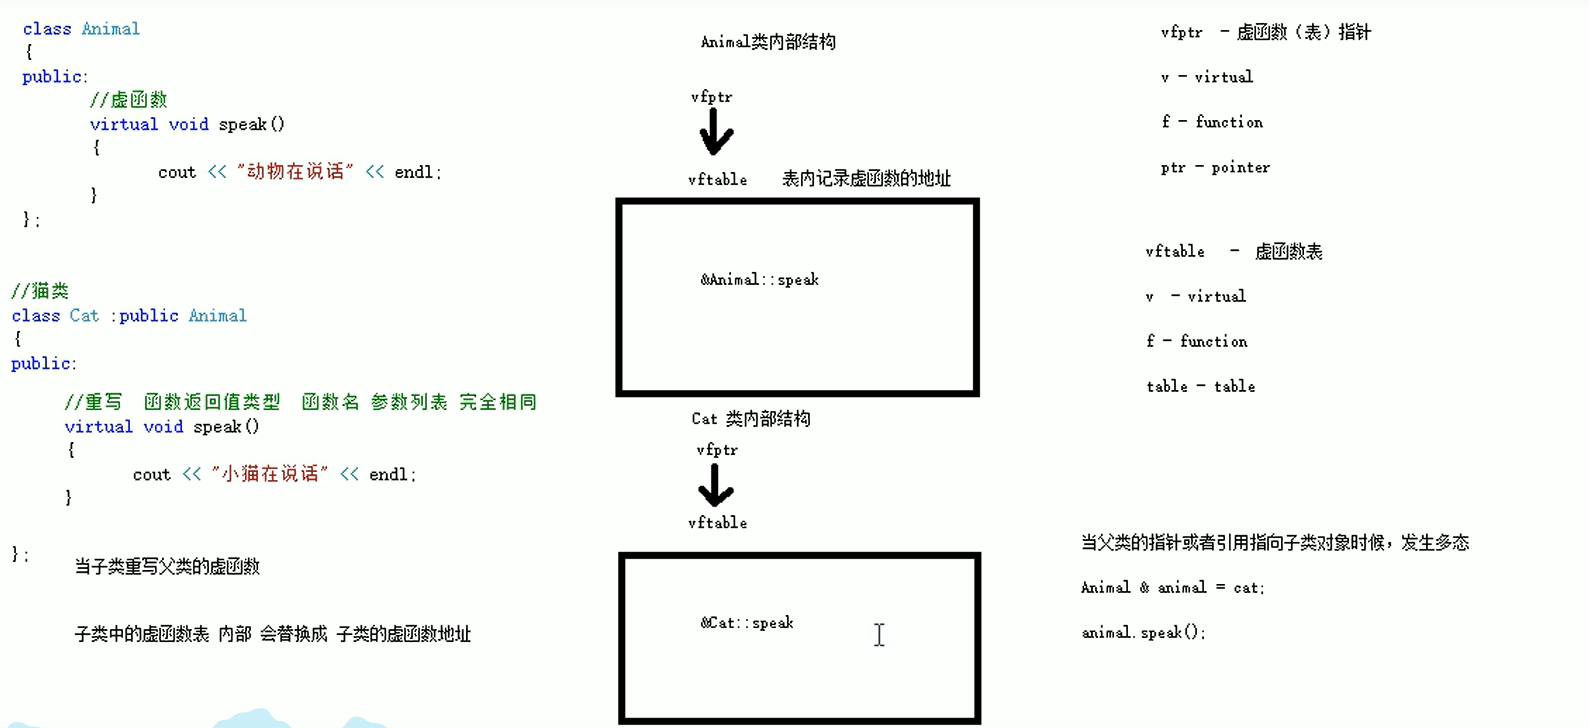
} 动态的底层原理
namespace test_polymorphism
{
class Animal
{
public :
virtual void speak()
{
cout << "动物在说话" << endl;
}
};
class Cat : public Animal
{
public :
void speak()
{
cou<< "喵喵喵" << endl;
}
};
void doSpeak (Animal & animal)//父类的指针可以指向子类的对象
animal.speak();
}
void test01 (){
Cat cat;
doSpeak(cat);
}
void test02 (){
cout<< sizeof (Animal)<< endl;
}
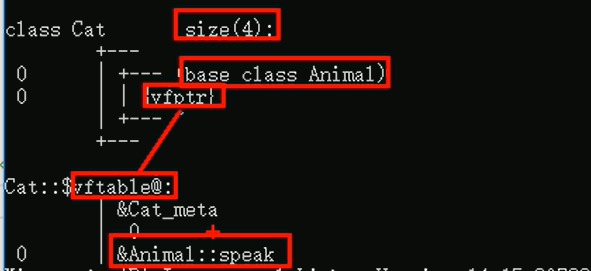
} 如果未添加virtual关键字,那么输出的size大小是1,也就是空类,但是加了virtual后,输出的结果是4,也就是指针。
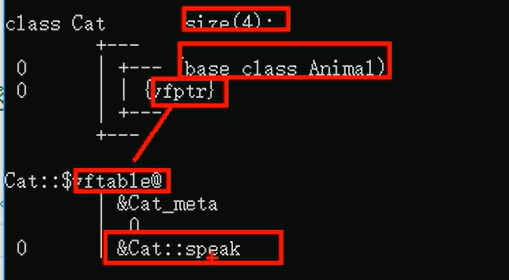
1.解释方式1
在上图中,当在子类重写父类方法后,子类的重写的方法会在虚函数表中覆盖从父类继承的方法。当用父类指针(或者引用)指向子类,代码运行时程序就会通过虚函数表找到子类重写的方法,从而实现多态。
2.解释方法2
子类没有重写前,子类的结构:
子类重写后,子类的结构:
经典案例-计算器类
//计算器抽象类
class AbstractCalculator
{
public :
virtual int getResult()
{
return 0 ;
}
virtual string reOperator ()
{
return " " ;
}
int m_Num1;
int m_Num2;
};
ostream& operator << (ostream & cout, AbstractCalculator & abc)
{
cout << abc.m_Num1 << abc.reOperator() << abc.m_Num2 << "=" << abc.getResult();
return cout;
}
//加法类
class AddCalculator : public AbstractCalculator
{
public :
AddCalculator(int a,int b){
m_Num1 = a;
m_Num2 = b;
}
int getResult ()
{
return m_Num1 + m_Num2;
}
string reOperator ()
{
return "+" ;
}
};
void test01 ()
{
AbstractCalculator * abc = new AddCalculator(1 ,2 );
cout << * abc << endl;
delete abc;
} 纯虚函数和抽象类
在多态中,通常父类中虚函数的实现是毫无意义的,主要都是调用子类重写的内容。因此可以将虚函数改为纯虚函数 。
纯虚函数语法:virtual 返回值类型 函数名(参数列表) = 0;
当类中有了纯虚函数,这个类就变成了抽象类 。
抽象类特点:
1.无法实例化对象;
2.子类必须重写抽象类中的纯虚函数,否则也变成抽象类;
//多态-纯虚函数和抽象类
namespace test_pvfAndAbc
{
class Base
{
//纯虚函数,该类为抽象类
//1.无法实例化对象
//2.子类必须重写父类的纯虚函数
public :
virtual void func() = 0 ;
};
class Son : public Base
{
public :
void func()
{
cout << "func()" << endl;
}
};
void test01 () {
//Base b;抽象类无法实例化对象
//new Base; 抽象类无法实例化对象
//Son s;在没有重写抽象类时,无法实例化对象
* base = new Son;
base-> func();
}
} 纯虚函数案例
//纯虚函数案例
class AbstractDrinking
{
public :
//煮水
virtual void Boil() = 0 ;
//冲泡
virtual void Brew () = 0 ;
//倒入
virtual void PourInCup () = 0 ;
//加入辅料
virtual void PutSomething () = 0 ;
//制作饮品
void makeDrink ()
{
Boil();
Brew();
PourInCup();
PutSomething();
}
};
class Coffer : public AbstractDrinking
{
public :
//煮水
virtual void Boil()
{
cout << "煮矿泉水" << endl;
}
//冲泡
virtual void Brew ()
{
cout << "热水冲泡咖啡" << endl;
}
//倒入
virtual void PourInCup ()
{
cout << "倒入杯子" << endl;
}
//加入辅料
virtual void PutSomething ()
{
cout << "加入冰块与牛奶" << endl;
}
};
class Tea : public AbstractDrinking
{
public :
//煮水
virtual void Boil()
{
cout << "煮泉水" << endl;
}
//冲泡
virtual void Brew ()
{
cout << "冲泡茶叶" << endl;
}
//倒入
virtual void PourInCup ()
{
cout << "倒入杯子" << endl;
}
//加入辅料
virtual void PutSomething ()
{
cout << "加入红枣" << endl;
}
};
void doWork (AbstractDrinking* abd)
{
abd-> makeDrink();
delete abd;
}
void test01 () {
//制作咖啡
new Coffer);
cout << "---------------" << endl;
//制作茶
new Tea);
} 虚析构和纯虚析构
多态使用时,如果子类有属性开辟到堆区,则父类指针在释放时无法调用子类的析构函数,从而造成内存泄漏。
解决方式:将父类中的析构函数改为虚析构 或者纯虚析构 。
虚析构和纯虚析构共性:
1.可以解决父类指针释放子类对象;
2.都需要有具体的函数实现;
虚析构和纯虚析构区别:
1.如果是纯虚析构,该类属于抽象类,无法实例化对象;
语法:
1.虚析构:virtual ~类名(){}
2.纯虚析构:virtual ~类名() = 0;
namespace test_pureVirtualDestructor
{
class Animal
{
public :
Animal()
{
cout << "Animal构造函数调用" << endl;
}
virtual void speak () = 0 ;
//下面的写法是虚析构函数
/*~Animal()
{
cout << "Animal析构函数调用" << endl;
}*/
//下面的写法是纯虚析构函数
//这种写法需要类内声明类外实现
virtual ~ Animal() = 0 ;
};
Animal::~ Animal()
{
cout << "Animal析构函数调用" << endl;
}
class Cat : public Animal
{
public :
Cat(string name)
{
cout << "Cat构造函数调用" << endl;
m_Name = new string(name);
}
void speak () {
cout <<* m_Name<< "在喵喵喵" << endl;
}
~ Cat()
{
cout << "Cat析构函数调用" << endl;
if (m_Name != NULL)
{
delete m_Name;
m_Name = NULL;
}
}
//假设现在使用一个指针来管理猫的名字
* m_Name;
};
void test01 () {
//父类执政在析构时候不会调用子类中的析构函数,
// 导致子类如果子类有堆区的数据,将无法释放。
* anm = new Cat("Tom" );
anm-> speak();
delete anm;
}
} 上面的代码如果父类的析构函数不加virtual,那么结果如下:
Animal构造函数调用
Cat构造函数调用
Tom在喵喵喵
Animal析构函数调用 子类对象没有被释放掉,是因为父类执政在析构时候不会调用子类中的析构函数,导致子类如果子类有堆区的数据,将无法释放。
利用虚析构函数(或者纯虚析构函数)解决父类指针释放子类对象,如果父类的析构函数加了virtual,那么结果如下:
Animal构造函数调用
Cat构造函数调用
Tom在喵喵喵
Cat析构函数调用
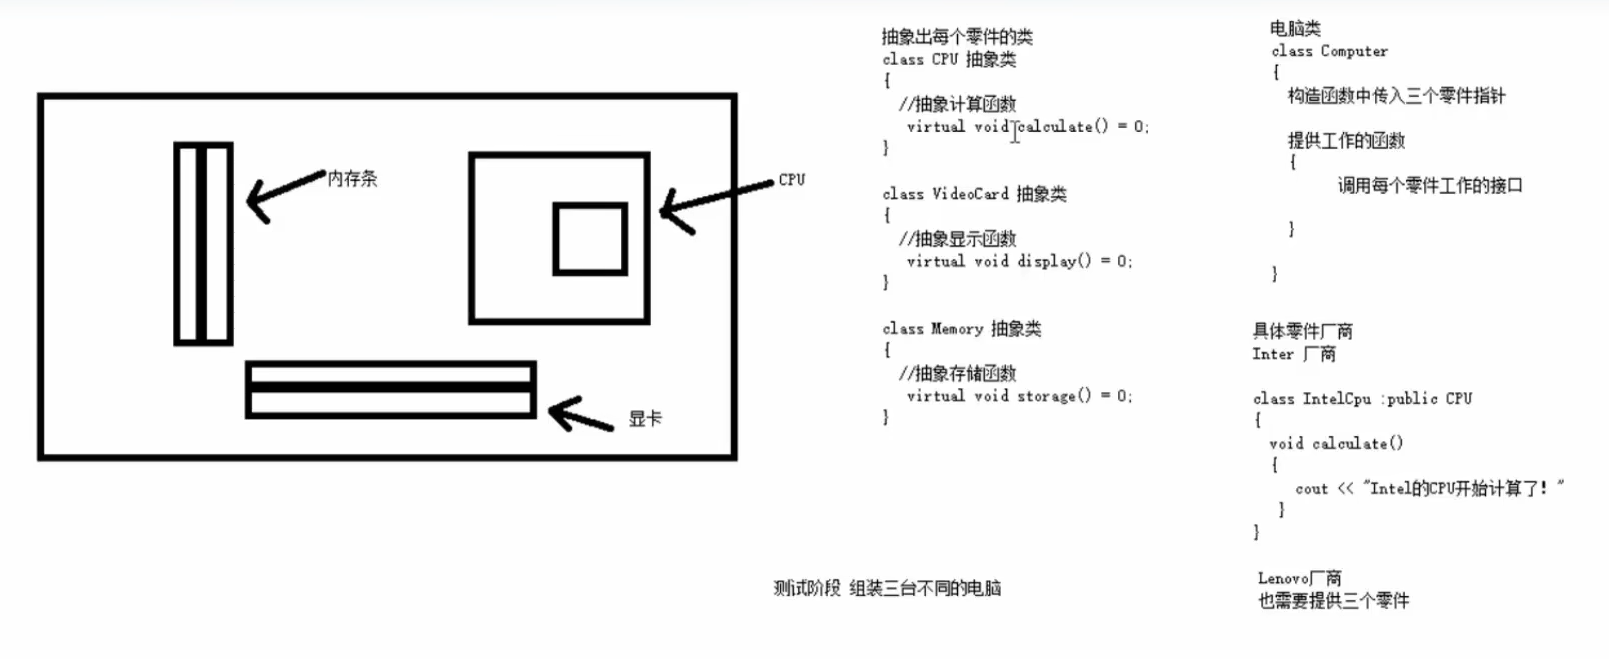
Animal析构函数调用 多态案例-电脑组装
需求:
namespace test_computer
{
//抽象不同零件类
class CPU
{
public :
virtual void calculate() = 0 ;
};
class VideoCard
{
public :
virtual void display() = 0 ;
};
class Memory
{
public :
virtual void storage() = 0 ;
};
//组装电脑的类
class Computer
{
public :
Computer(CPU* cpu, VideoCard* vc, Memory* mem)//父类的指针,在此处已经涉及多态了
m_cpu = cpu;
m_vc = vc;
m_mem = mem;
}
//工作的函数
//调用接口
void work ()
{
m_cpu-> calculate();
m_vc-> display();
m_mem-> storage();
}
~ Computer()
{
if (m_cpu != NULL)
{
delete m_cpu;
m_cpu = NULL;
}
if (m_vc != NULL)
{
delete m_vc;
m_vc = NULL;
}
if (m_mem != NULL)
{
delete m_mem;
m_mem = NULL;
}
}
private :
CPU* m_cpu;
VideoCard* m_vc;
Memory* m_mem;
};
class IntelCPU : public CPU
{
public :
void calculate()
{
cout << "IntelCPU开始计算" << endl;
}
};
class IntelVideoCard : public VideoCard
{
public :
void display()
{
cout << "IntelVideoCard开始显示" << endl;
}
};
class LenoMemory : public Memory
{
public :
void storage()
{
cout << "LenoMemory开始存储" << endl;
}
};
void test01 () {
//创建具体品牌的对象
* intelCpu = new IntelCPU;
VideoCard* intelVc = new IntelVideoCard;
Memory* lenoMem = new LenoMemory;
//创建电脑对象
* computer = new Computer(intelCpu, intelVc, lenoMem);
//电脑开始工作
-> work();
//释放资源
delete computer;
}
} 文件操作
程序运行时产生的数据都属于临时数据,程序一旦结束都会被释放。
通过文件可以将数据持久化。
文件类型:
文本文件:文件以文本的ASCLL码形式存储在计算机中。
二进制文件: 文本以文本的二进制形式存储在计算机中 。
操作文件的三大类:
ofstream:写操作
ifstream:读操作
fstream:读写操作
文本文件
写文件步骤:
包含头文件:#include
创建流对象:ofstream ofs;
打开文件:ofs.open(“文件路径”,打开方式);
写数据:ofs « “写入的数据”;
关闭文件:ofs.close();
文件打开方式:
ios::in 读
ios::out 写
ios::ate 从文件末尾开始写数据
ios::app 追加方式写文件
ios::trunc 如果文件存在先删除,再创建
ios::binary 二进制方式
示例代码:
//写文件
namespace test_write
{
//写文本
void test01 ()
{
//1.包含头文件
//2.创建流对象
//3.制定一个打开的方式
"text.txt" , ios:: out);
//4.写内容
<< "姓名:张三" << endl;
ofs << "性别:男" << endl;
ofs << "年龄:18" << endl;
//5.关闭文件
}
//写二进制文件
class Person
{
public :
char m_Name[64 ];
int m_Age;
};
void test02 () {
//1.包含头文件
//2.创建流对象
"person.txt" , ios:: out | ios:: binary);
//3.打开文件
//ofs.open("person.txt", ios::out | ios::binary);
//4.写文件
= { "zhangsan" ,18 };
ofs.write((const char * )& p, sizeof (Person));
//5.关闭文件
}
}
//读文件
namespace test_read
{
//读文本
void test01 ()
{
//1.包含头文件
//2.创建流对象
//3.制定一个打开的方式,判断打开是否成功
"text.txt" , ios:: in);
if ( ! ifs.is_open() )
{
cout << "文件打开失败" << endl;
return ;
}
//4.读内容
//(1)
/*char buf[1024] = { 0 };
while (ifs >> buf)
{
cout << buf << endl;
}*/
//(2)
/*char buf[1024] = { 0 };
while (ifs.getline(buf, 1024))
{
cout << buf << endl;
}*/
//(3)
while (getline(ifs, buf)) {
cout << buf << endl;
}
//(4)不推荐这种方法
/*char c;
while ((c = ifs.get()) != EOF)
{
cout << c ;
}*/
//5.关闭文件
}
//读二进制文件
class Person
{
public :
char m_Name[64 ];
int m_Age;
};
void test02 () {
//1.包含头文件
//2.创建流对象
//3.制定一个打开的方式,判断打开是否成功
"person.txt" , ios:: in| ios:: binary);
if (! ifs.is_open())
{
cout << "文件打开失败" << endl;
return ;
}
//4.读内容
ifs.read((char * )& p, sizeof (Person));
cout << "姓名:" << p.m_Name << " 年龄:" << p.m_Age << endl;
//5.关闭文件
}
} ————–C++的内容就先告一段落,对于以上只是将用一个项目总结前面学过的知识——
模板(泛型编程)
模板概念
模板就是将类型参数化,将类型参数化后,可以创建出针对不同类型的函数或类。
特点:
函数模板
作用
建立一个通用的函数,其他函数返回值类型和形参类型可以不一样,但是逻辑是一样的。
函数模板语法:
template < typename T>
函数声明或定义 示例代码:
namespace test01
{
template < typename T>
void swap(T& a, T& b)
{
T temp = a;
a = b;
b = temp;
}
} 函数注意事项
自动类型推导,必须推导出一致的类型T,才可以使用
模板需要确定出T的类型才可以使用
代码说明:
namespace test_ClassTemplate
{
template < typename T>
void mySwap(T & a, T & b)
{
T temp = a;
a = b;
b = temp;
}
//1.自动类型推到,需要自动推到出一致数据类型T才可以使用
void test01 ()
{
int a = 10 ;
int b = 20 ;
//char c = 'c';
//mySwap(a, c);//此处会报错,原因就是类型不一致
}
//2.模板必须确定出T的数据类型,才可以使用
template < typename T>
void fun()
{
cout << "你好!" << endl;
}
void test02 ()
{
//fun();//T类型没有被确定,报错;想直接使用也可以
< int > ();//这样可以使用,但这样就没必要写函数模板了
} 函数模板案例
普通函数与函数模板的区别
普通函数调用可以发生隐式转换
函数模板自动类型推导,不可以发生隐式转换;
函数模板 显示指定类型,可以发生隐式转换。
示例代码:
namespace test03
{
int myPrint1 (int a, int b)
{
return a+ b;
}
template < typename T>
T myPrint2(T a, T b)
{
return a + b;
}
void test01 ()
{
int a = 10 ;
int b = 20 ;
char c = 'c' ;
//1.普通函数可以发生隐式类型转换
//2.函数模板如果发生隐式类型转换,编译器会报错
//3.函数模板如果是显示指定类型,则可以发生隐式转换
< int > (a, c);
}
} 建议:建议使用显示指定类型的方式,因为可以避免隐式转换可能带来的问题。
普通函数与函数模板的调用规则
如果函数模板和普通函数都可以实现,优先调用普通函数;
可以通过空模板参数列表 来强制调用函数模板;
函数模板也可以发生函数重载;
如果函数模板可以产生更好的匹配,优先调用函数模板。
示例代码:
namespace test_usingFun
{
void myPrint (int a, int b)
{
cout << "调用的普通函数" << endl;
}
template < typename T>
void myPrint(T a, T b)
{
cout << "调用的函数模板" << endl;
}
template < typename T>
void myPrint(T a, T b, T c)
{
cout << "调用的函数模板2" << endl;
}
void test01 ()
{
int a = 10 ;
int b = 20 ;
int d = 30 ;
char c = 'c' ;
myPrint(a, b);//调用的普通函数
<> (a, b);//强制调用函数模板
myPrint(a, b, d);//函数重载
char c1 = 'c' ;
char c2 = 'b' ;
//理论上,myPrint(int a, int b)(隐式转换)和myPrint(T a, T b)都可以调用
//但实际上是调用myPrint(T a, T b),这就是"更好的匹配机制,优先调用"
}
} 建议: 实际开发中不建议使用这种方式写,因为这样容易让代码阅读者产生困扰。
模板的局限性
template < typename T>
T add(T a, T b)
{
return a + b;
} 如上代码,若传入数组,无法实现想要的效果。为了解决类似的问题,提供了模板重载,可以为这些特定类型提供具体化模板。
class Person {
public :
int a;
int b;
}
template < typename T>
T add(T a, T b)
{
return a + b;
}
template <> Person add(Person a,Person b){
Person c;
c.a = a.a + b.a;
c.b = a.b + b.b;
return c;
}
void test01 (){
Person p1,p2;
p1.a = 10 ;
p1.b = 20 ;
p2.a = 10 ;
p2.b = 20 ;
Person p3 = add(p1,p2);
cout << p3.a << " " << p3.b << endl;
} 类模板
类模板定义格式:
示例代码:
namespace test02
—————————————————————————————————————————————————————————————————————————————————————————————— -
### 类
将数据结构和操作该数据结构的函数捆绑在一起形成一个类。
### 在类中使用缺省函数
需要注意避免二义性:
! [alt text](image- 5. png)
## 构造函数
### 类中为什么需要构造函数
! [alt text](image- 6. png)
### 构造函数在数组中的使用
``` cpp
class A {
int a;
public :
A(){std:: cout<< "hello \n " ;}//1
int b){std:: cout<< "value: " << b<< std:: endl;}//2
int main (){
A arr[2 ] = {1 };
} 上面的语句就调用了第1,2个构造函数,首先数据里的1会调用2,而数组的第二个是空值那么就会调用第1个。
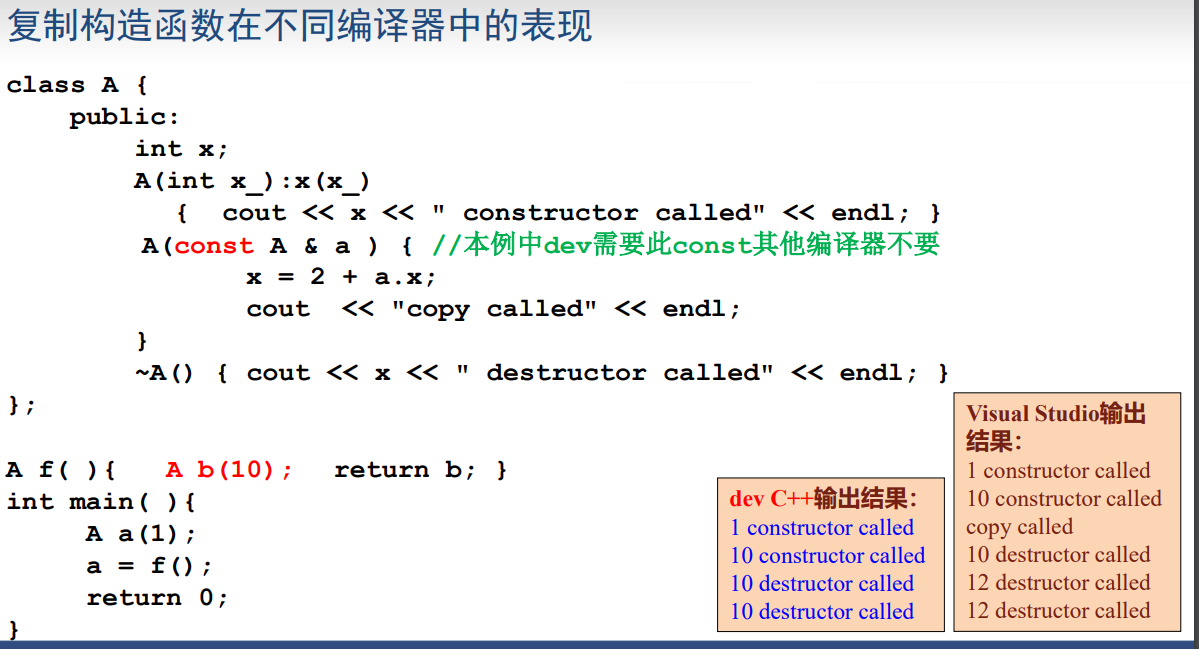
复制构造函数-copy constructor
函数名与类名相同,参数为A(A& a)或A(const A& a)(二选一)。
三种情况下复制构造函数起作用
同类对象a,b,将a的值初始化b;
将类当作参数传入函数;
将类作为返回值;
注意:对象之间的复制是不会导致复制构造函数的
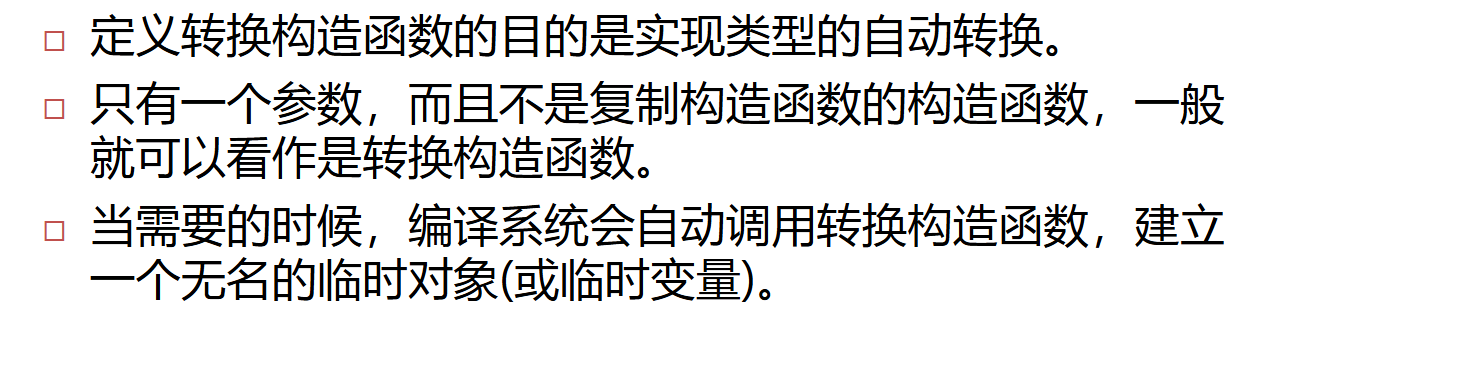
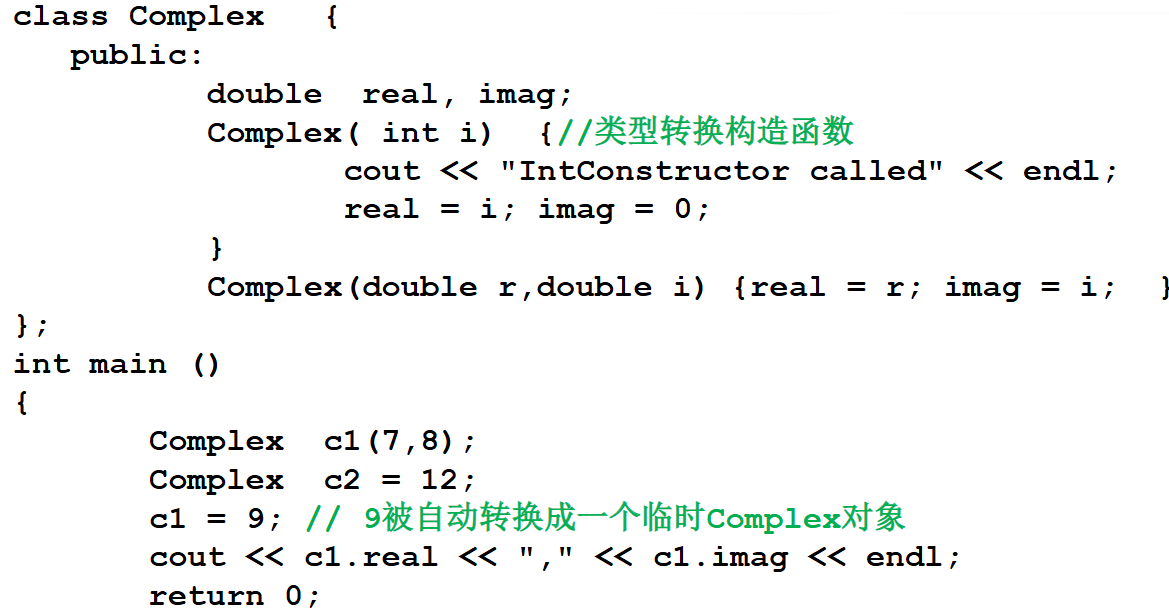
转换构造函数
什么是转换构造函数
示例代码:
c1 = 9;会被自动转换为调用转换构造函数,如果不想让这样的事情发生,可以在转换构造函数前面加上修饰字段 explicit,这样再次使用c1 = 9;时程序会报错。
析构函数-destructors
这里补充几点,一个类只能有一个析构函数;
析构函数与数组:
数组成员的每一次结束时都会调用析构函数,假设类A数组array[2],则生命周期结束时会调用两次析构函数。
析构函数什么时候被调用呢?
class CMyclass {
public :
~ CMyclass() { cout << "destructor" << endl; }
};
CMyclass obj;
CMyclass fun (CMyclass sobj ) { //参数对象消亡也会导致析
//构函数被调用
return sobj; //函数调用返回时生成临时对象返回
int main (){
obj = fun(obj); //函数调用的返回值(临时对象)被
return 0 ; //用过后,该临时对象析构函数被调用
上面结果输出三个destructor,在fun(CMyclass sobj)参数对象消亡调用析构函数(具体可以联想复制构造函数),会调用一次析构函数;当函数返回赋值给obj后,再次调用析构函数;整个程序结束再次调用析构函数。
this指针
静态成员函数中可以直接使用this指针来代表指向该函数作用的对象的指针
示例1:
class Complex {
public :
double real, imag;
void Print () { cout << real << "," << imag ; }
Complex(double r,double i): real(r),imag(i)
{ }
Complex AddOne () {
this -> real ++ ; //等价于 real ++;
this -> Print(); //等价于 Print
return * this ;
}
};
int main () {
Complex c1(1 ,1 ),c2(0 ,0 );
c2 = c1.AddOne();//调用AddOne函数后内部this指针变为c1,所以是c1中的read++
return 0 ;
} //输出 2,1
示例2:
class A
{
int i;
public :
void Hello() { cout << i << "hello" << endl; }
}; // 翻译为void Hello(A * this ) { cout << this->i << "hello"<< endl; }
int main ()
{
A * p = NULL;
p-> Hello(); //翻译为Hello(p);
//编译报错
报错的原因是p指针式一个空指针,它并不指向任何A的对象,所以编译到 this->i 会报错。
静态成员变量和函数
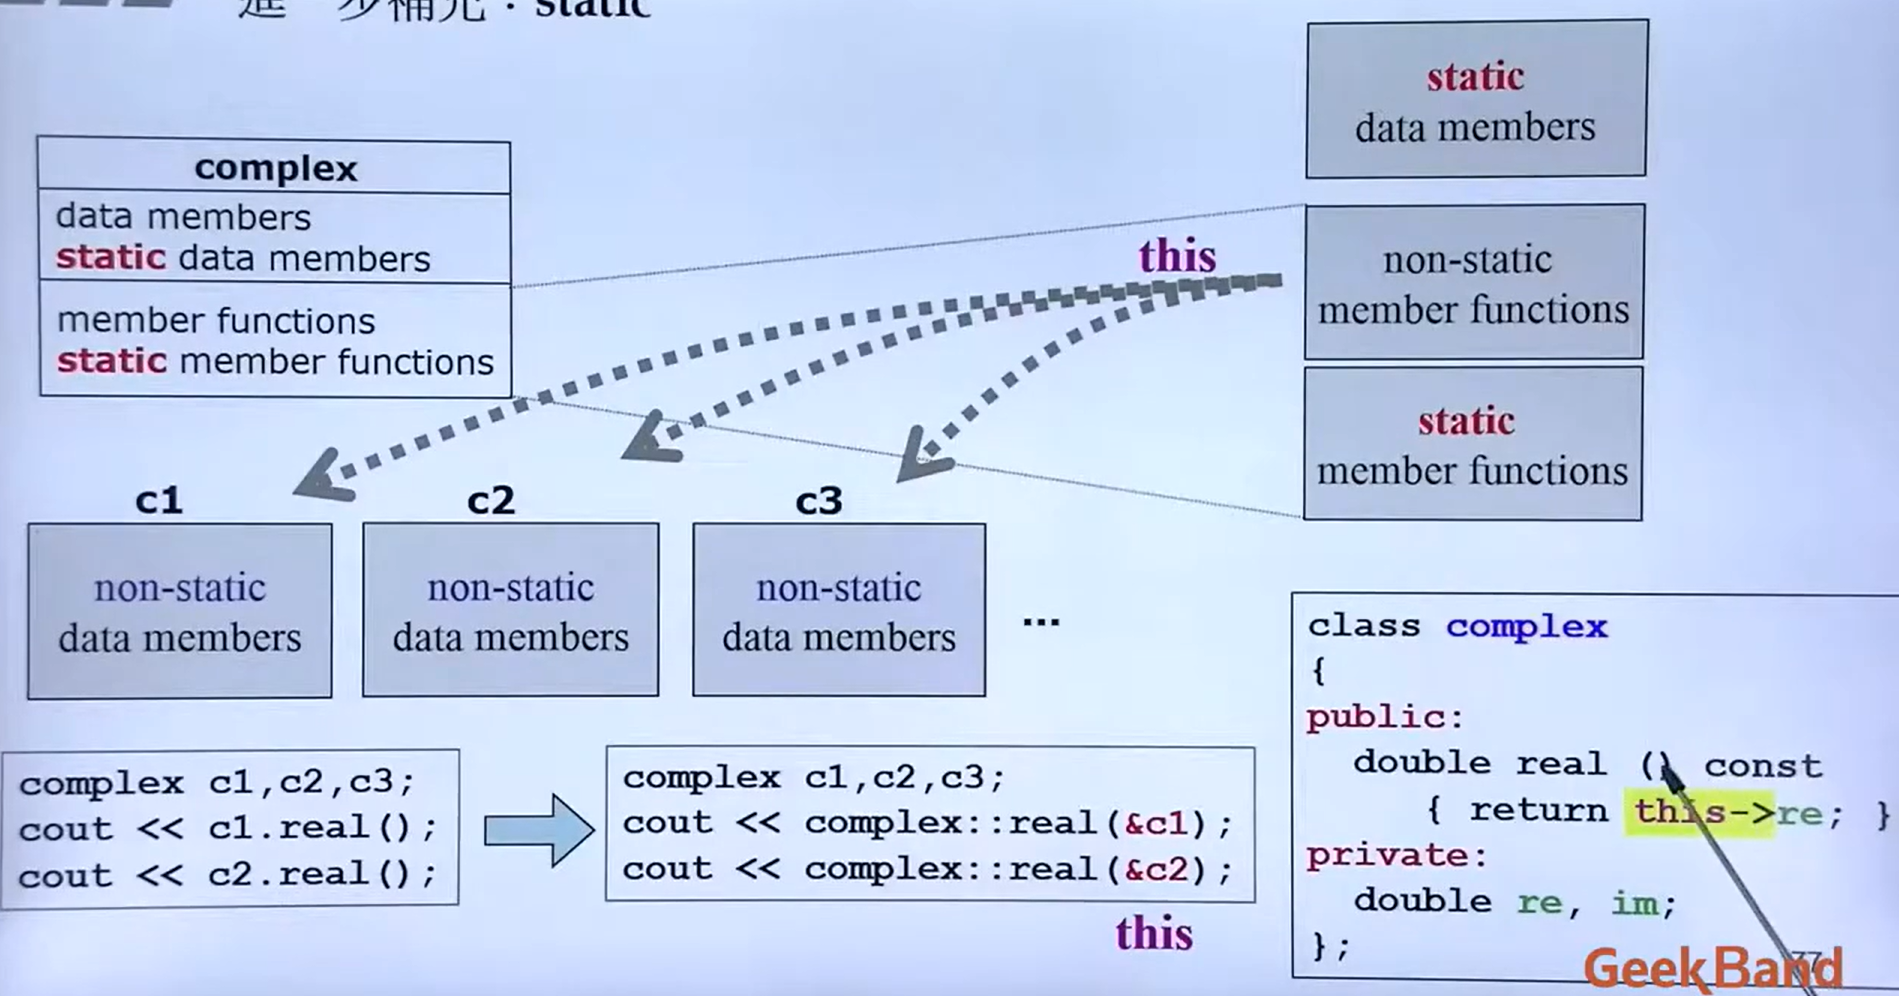
基本特点:
普通成员变量每个对象有各自的一份,而静态成员变量一共就一份,为所有对象共享。
普通成员函数必须具体作用于某个对象,而静态成员函数并不具体作用于某个对象。因此静态成员不需要通过对象就能访问。
对第二句话的理解,如下代码示例:
class Dog {
public :
// 普通成员函数
void bark() {
std:: cout << "Woof!" << std:: endl;
}
// 静态成员函数
static std:: string getSpecies() {
return "Canine" ;
}
}; 要调用bark我们需要先创建一个Dog的类对象,然后通过 . 调用,也就是非静态成员作用于对象的意思,但是对于 getSpecies 就不需要,可以直接 Dog::getSpecies调用。
如何访问静态成员?
类名::成员名
CRectangle::PrintTotal();
对象名.成员名
CRectangle r; r.PrintTotal();
指针->成员名
CRectangle * p = &r; p->PrintTotal();
引用.成员名
CRectangle & ref = r; int n = ref.nTotalNumber;
设置静态成员变量的目的是什么?
设置静态成员这种机制的目的是将和某些类紧密相关的全局变量和函数写到类里面,看上去像一个整体,易于维护和理解。比如,考虑一个需要随时知道矩形总数和总面积的图形处理程序,可以用全局变量来记录总数和总面积,用静态成员将这两个变量封装进类中,就更容易理解和维护。
注意事项:
必须在定义类的文件中对静态成员变量进行一次说明或初始化。否则编译能通过,链接不能通过。
在静态成员函数中,不能访问非静态成员变量,也不能调用非静态成员函数。
成员对象和封闭类
有成员对象的类叫 封闭(enclosing)类。
任何生成封闭类对象的语句,都要让编译器明白,对象中的成员对象,是如何初始化的。具体的做法就是:通过封闭类的构造函数的初始化列表。
封闭类的复制构造函数:
class A
{
public :
A() { cout << "default" << endl; }
A(A & a) { cout << "copy" << endl;}
};
class B { A a; };
int main ()
{
B b1,b2(b1);//b2调用自生默认复制构造函数,而内部的A a也会调用默认的复制构造函数
return 0 ;
} 友元
友元函数: 一个类的友元函数可以访问该类的私有成员。
可以将一个类的成员函数(包括构造、析构函数)说明为另一个类的友元。
友元类: 如果A是B的友元类,那么A的成员函数可以访问B的私有成员。
友元类之间的关系不能传递,不能继承。
常量成员
常量成员函数:内部不能改变属性的值,也不能调用非常量成员函数。
**注意:**如果一个成员函数中没有调用非常量成员函数,也没有修改成员变量的值,那么,最好将其写成常量成员函数。
mutable成员变量
可以在const成员函数中修改的成员变量
class CTest
{
public :
bool GetData() const
{
m_n1++ ;//这个值更可以更改
return m_b2;
}
private :
mutable int m_n1;
bool m_b2;
}; 运算符重载函数
浅拷贝与深拷贝:
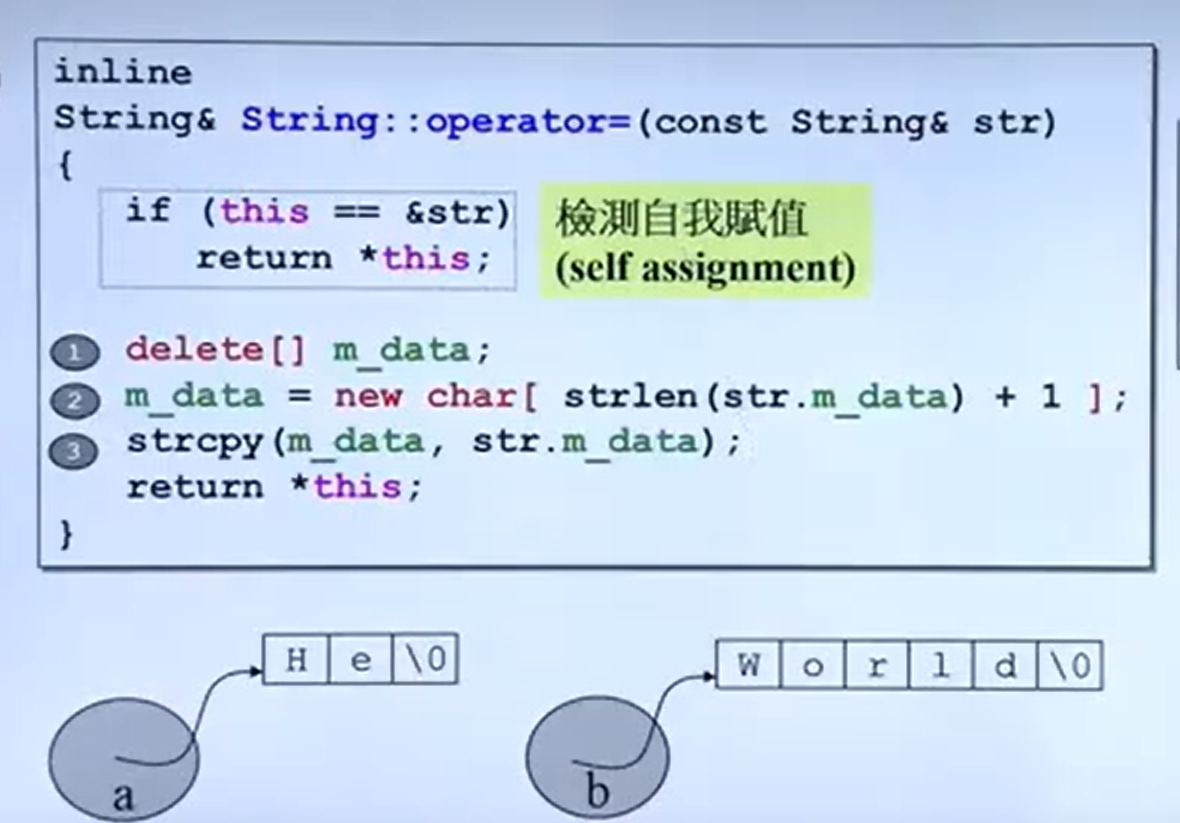
为解决这个问题,我们需要修改赋值运算符重载:
String & operator = (const String & s){
if ( this == & s)
return * this ;
delete [] str;
str = new char [strlen(s.str)+ 1 ];
strcpy( str,s.str);
return * this ;
} 自增自减运算法重载
class CDemo {
private :
int n;
public :
CDemo(int i= 0 ): n(i) { }
CDemo & operator ++ (); //用于前置形式
operator ++ ( int ); //用于后置形式
operator int ( ) { return n; }
friend CDemo & operator -- (CDemo & );
friend CDemo operator -- (CDemo & ,int );
} operator int ( ) {return n;}
这里,int 作为一个类型强制转换运算符被重载, 此后
Demo s;
(int ) s ; //等效于 s.int();
类型强制转换运算符被重载时不能写返回值类型,实际上其返回值类型就是该类型强制转换运算符代表的类型。
继承和派生
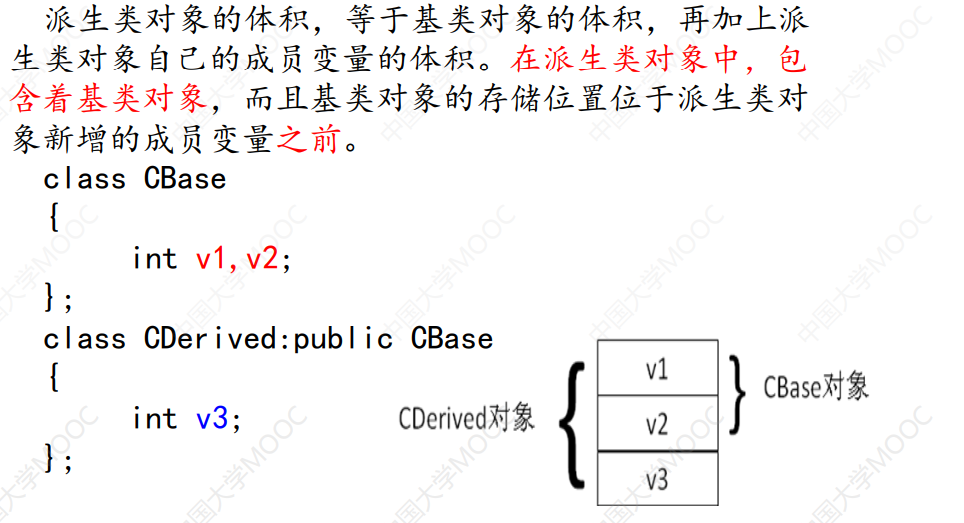
**注意:**在派生类的各个成员函数中,不能访问基类中的private成员。
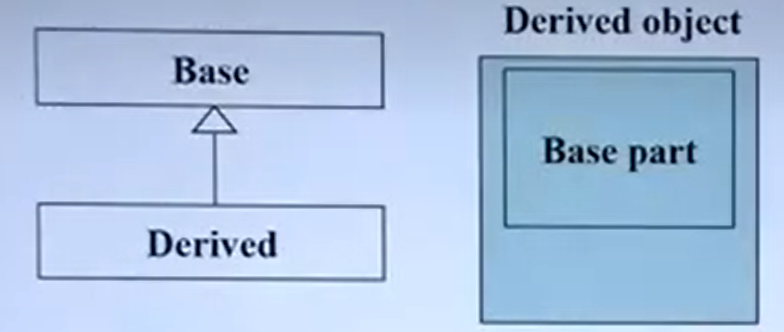
派生类的内存空间
类之间的关系
继承:“是”关系。
基类 A,B是基类A的派生类。
逻辑上要求:“一个B对象也是一个A对象”。
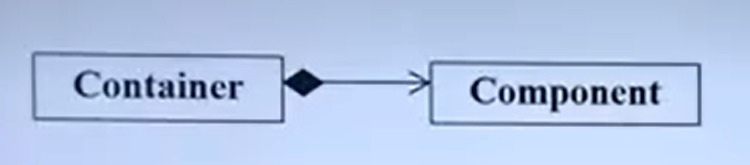
复合:“有”关系。
类C中“有”成员变量k,k是类D的对象,则C和D是复合
关系
一般逻辑上要求:“D对象是C对象的固有属性或组成部
分”
复合关系的示例:
基类与派生类名字重名的情况
一般来说,基类和派生类不定义同名成员变量。但如果要方位可以使用基类::基类成员来访问。
访问权限
• 基类的private成员:可以被下列函数访问
• 基类的public成员:可以被下列函数访问
基类的成员函数
基类的友元函数
派生类的成员函数
派生类的友元函数
其他的函数
• 基类的protected成员:可以被下列函数访问
基类的成员函数
基类的友元函数
派生类的成员函数可以访问当前对象和其它对象的基类的保护成
举一个例子:
class Father {
private : int nPrivate; //私有成员
public : int nPublic; //公有成员
protected : int nProtected; // 保护成员
class Son : public Father{
void AccessFather () {
nPublic = 1 ; // ok;
= 1 ; // wrong
= 1 ; // OK,访问从基类继承的protected成员
f.nProtected = 1 ; //ok,派生类的成员函数可以访问当前对象和其它对象的基类的保护成
};
int main (){
Father f;
Son s;
f.nPublic = 1 ; // Ok
= 1 ; // Ok
= 1 ; // error,因为只能在派生类(或友元类)中访问
= 1 ; // error
= 1 ; //error
= 1 ; // error
return 0 ;
} 派生类构造函数中包含成员变量时该如何写?
class Bug {
private :
int nLegs; int nColor;
public :
int nType;
Bug ( int legs, int color);
void PrintBug (){ };
};
class Skill {
public :
Skill(int n) { }
};
class FlyBug : public Bug {
int nWings;
Skill sk1, sk2;
public :
FlyBug( int legs, int color, int wings);
};
FlyBug:: FlyBug( int legs, int color, int wings):
Bug(legs,color),sk1(5 ),sk2(color) ,nWings(wings) { }//注意这种写法。
private 和 protected的继承
• protected继承时,基类的public成员和protected成员成为派生类的protected成员。
• private继承时,基类的public成员成为派生类的private成员,基类的protected成员成
为派生类的不可访问成员。
• protected和private继承不是“是”的关系。
问题:
即便基类指针指向的是一个派生类的对象,也不能通过基类指针访问基类没有,而派生类中有的成员。
解决办法:
通过强制指针类型转换,可以把ptrBase转换成Derived类的指针
Base * ptrBase = & objDerived;
Derived * ptrDerived = (Derived * ) ptrBase; 程序员要保证ptrBase指向的是一个Derived类的对象,否则很容易会出错。
虚函数和多态
多态的表现形式
派生类的指针(或引用)可以给基类赋值。
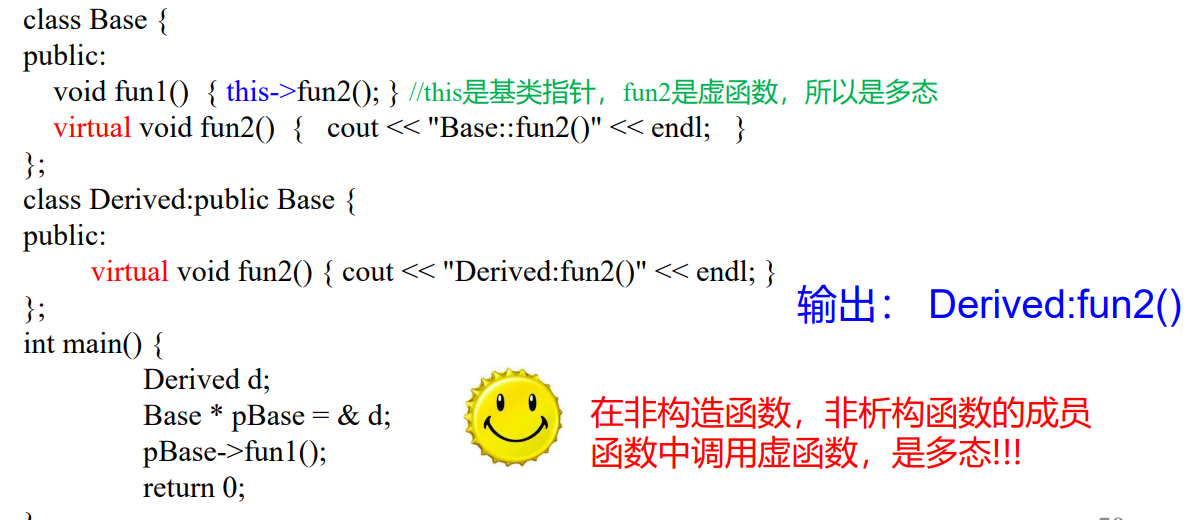
当指针指向基类时调用,基类的函数,当指针指向派生类时,调用调用派生类的函数,这叫做多态。
另外,在非虚函数和非构造、析构函数中调用虚函数,也叫做多态。
例子:
如果在构造、析构函数中调用虚函数,那么会怎么样呢?
如果这么做,那么编译器只会调用当前的虚函数,如果当前没有重写虚函数,则会从基类中找进行调用,为什么要这么做呢?其实这是为了防止未初始化就调用派生类的虚函数的情况。
你想想啊,一类的初始化先从基类的构造函数开始,如果这个时候构造函数具有多态性,那么此时将调用派生类的对应虚函数,但是派生类这个时候都还没有初始化。
例子:
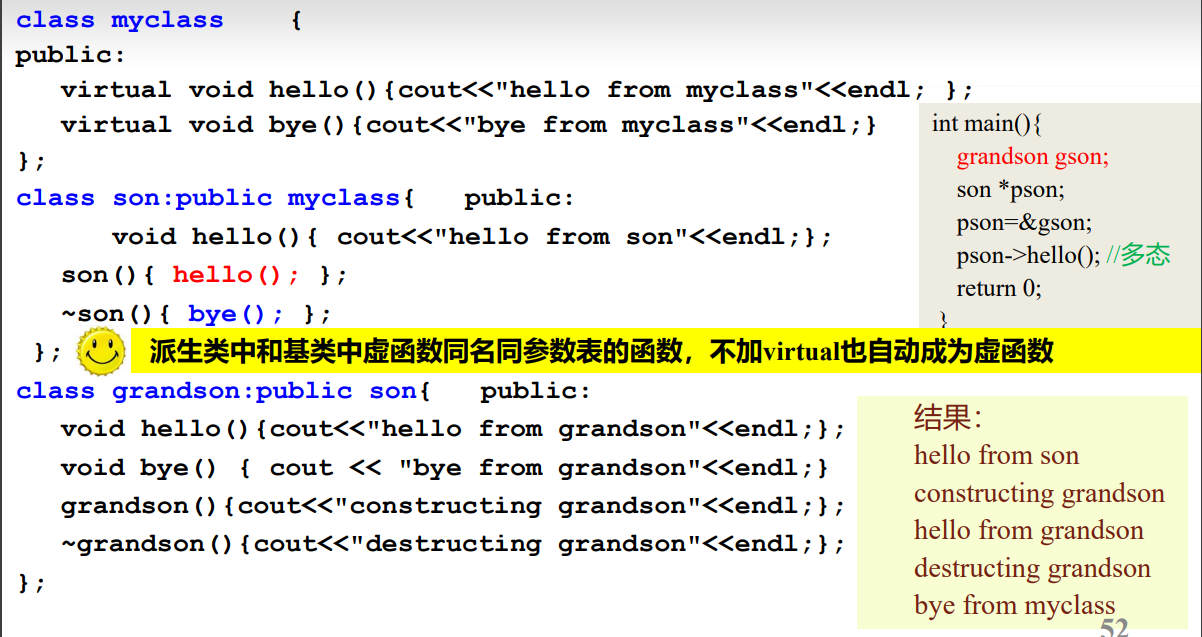
补充:在上面的图例子中,派生类写了与基类虚函数相同的名字,但是没有在前面加修饰符virtual,这种情况编译器认为是虚函数。
多态的作用
在面向对象的程序设计中使用多态,能够增强程序的可扩充性,即程序需要修改或增加功能的时候,需要改动和增加的代码较少。
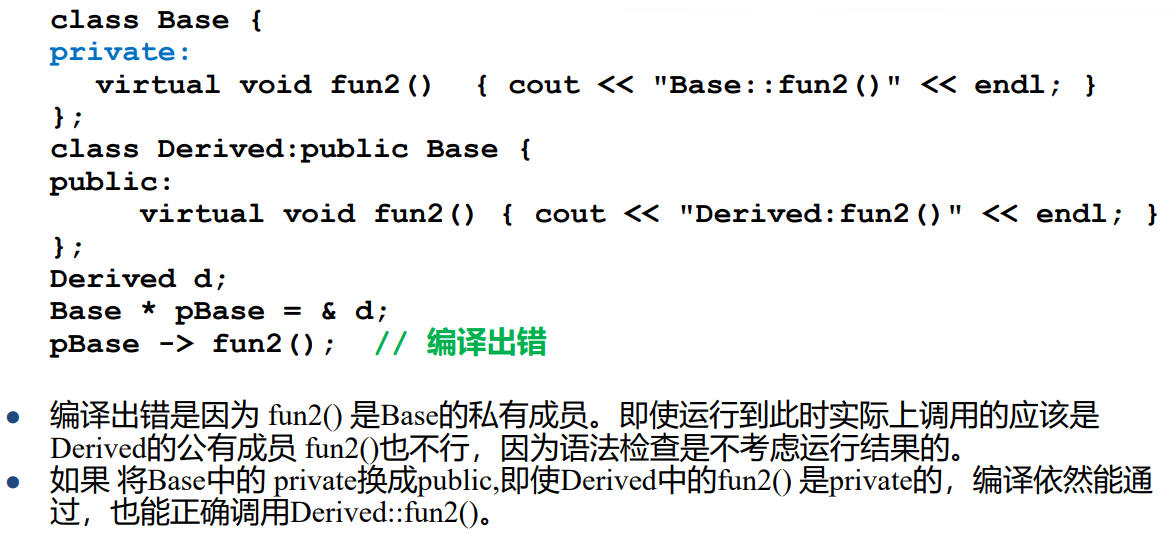
虚函数的访问权限
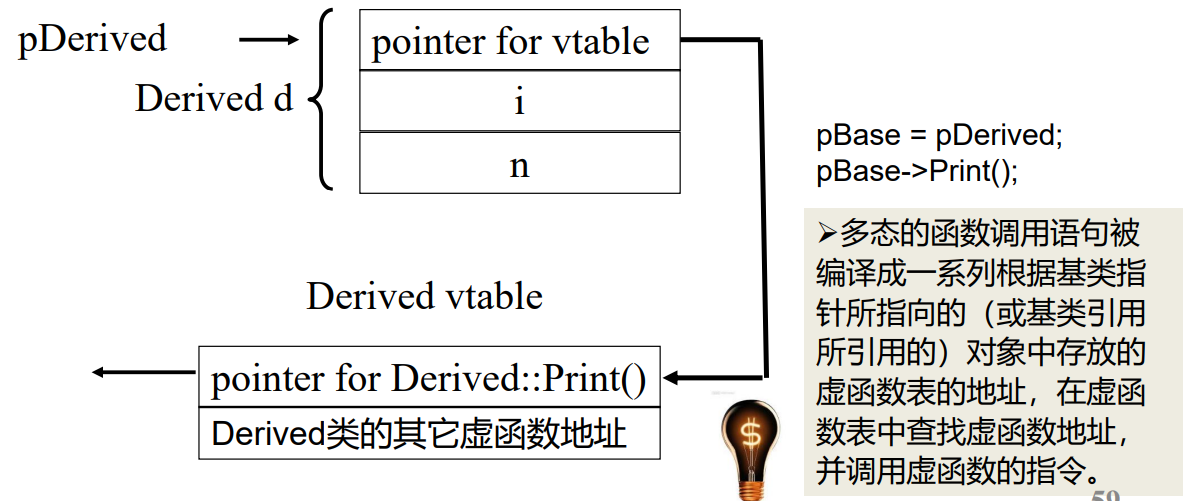
动态联编的实现机制
“多态”的关键在于通过基类指针或引用调用一个虚函数时,编译时不确定到底调用的是基类还是派生类的函数,运行时才确定 —- 这叫“动态联编”。
每一个有虚函数的类(或有虚函数的类的派生类)都有一个虚函数表,该类的任何对象中都放着虚函数表的指针。虚函数表中列出了该类的虚函数地址。多出来的4个字节就是用来放虚函数表的地址的。
下面一段代码将验证,对象的首地址是存了虚函数表的地址的:
#include <iostream>
using namespace std;
class A {
public : virtual void Func() { cout << "A::Func" << endl; }
};
class B : public A {
public : virtual void Func() { cout << "B::Func" << endl; }
};
int main () {
A a;
A * pa = new B();
pa-> Func();
//64位程序指针为8字节
long long * p1 = (long long * ) & a;
long long * p2 = (long long * ) pa;
* p2 = * p1;
pa-> Func();
return 0 ;
} 纯虚函数和抽象类
纯虚函数:没有函数体的虚函数
抽象类:有纯虚函数的类
注意:
包含纯虚函数的类叫抽象类
抽象类只能作为基类来派生新类使用,不能创建独立的抽象类的对象
抽象类的指针和引用可以指向由抽象类派生出来的类的对象
A a ; // 错,A 是抽象类,不能创建对象
* pa ; // ok,可以定义抽象类的指针和引用
= new A ; //错误, A 是抽象类,不能创建对象
在抽象类的成员函数内可以调用纯虚函数,但是在构造函数或析构函数内部不能调用纯虚函数。 如果一个类从抽象类派生而来,那么当且仅当它实现了基类中的所有纯虚函数,它才能成为非抽象类。
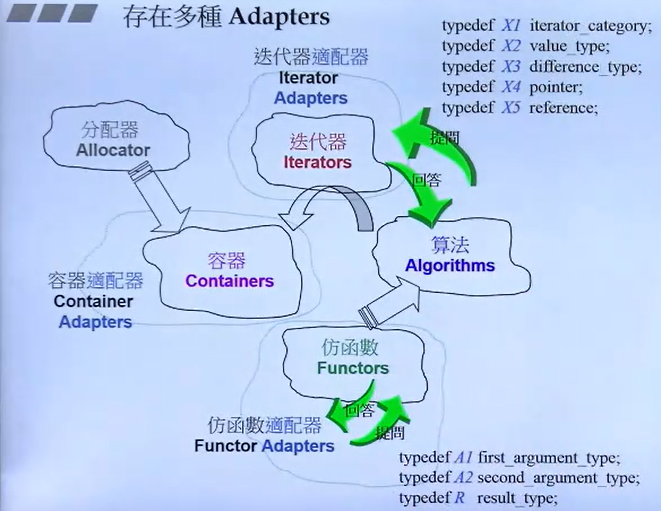
9.STL库学习之迭代器与算法
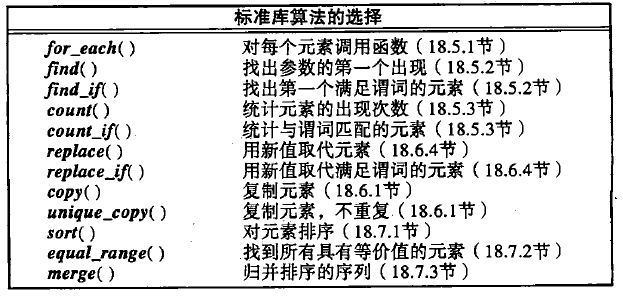
标准库常用算法
迭代器
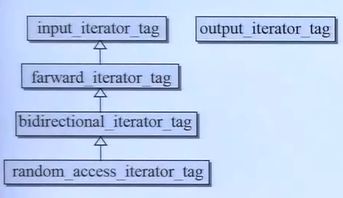
迭代器-的分类
struct input_iterator_tag {};
struct output_iterator_tag {};
struct forward_iterator_tag : public input_iterator_tag{};
struct bidirectional_iterator_tag : public forward_iterator_tag{};
struct random_access_tag : public bidirectional_iterator_tag {};以上5中迭代器的继承关系,如下图所示。
1.Input Iterator(输入迭代器):
输入迭代器是最基本的迭代器类型,支持单向遍历,只能向前移动。
用法示例:
std:: vector< int > vec = {1 , 2 , 3 , 4 , 5 };
std:: input_iterator< int > it = vec.begin();
while (it != vec.end()) {
std:: cout << * it << " " ;
++ it;
} 2.Forward Iterator(前向迭代器):
前向迭代器支持双向遍历,可以向前和向后移动。
用法示例:
std:: list< int > lst = {1 , 2 , 3 , 4 , 5 };
std:: forward_iterator< int > it = lst.begin();
while (it != lst.end()) {
std:: cout << * it << " " ;
++ it;
} 3.Output Iterator(输出迭代器):
输出迭代器允许对容器中的元素进行写操作,但不支持读操作。
用法示例:
std:: vector< int > vec;
std:: back_insert_iterator< std:: vector< int >> it(vec);
* it = 1 ; // 写操作
++ it;
* it = 2 ; // 写操作
4.Bidirectional Iterator(双向迭代器):
双向迭代器支持双向遍历,可以向前和向后移动。
用法示例:
std:: list< int > lst = {1 , 2 , 3 , 4 , 5 };
std:: bidirectional_iterator< int > it = lst.end();
while (it != lst.begin()) {
-- it;
std:: cout << * it << " " ;
} 5.Random Access Iterator(随机访问迭代器):
随机访问迭代器支持任意位置的快速访问,类似于指针操作。
用法示例:
std:: vector< int > vec = {1 , 2 , 3 , 4 , 5 };
std:: random_access_iterator< int > it = vec.begin();
it += 2 ; // 随机访问
:: cout << * it << " " ;各种容器的迭代器类型
测试代码:
#include <iterator>
namespace test_iterator_category
{
template < typename T>
void display_category(T itr) {
typename iterator_traits< T>:: iterator_category cagy; // 使用 std::iterator_traits 获取迭代器类别
// 这里不需要递归调用 display_iterator 函数
<< typeid (cagy).name() << endl;
}
void test () {
cout << " \n test_iterator_category.................... \n " ;
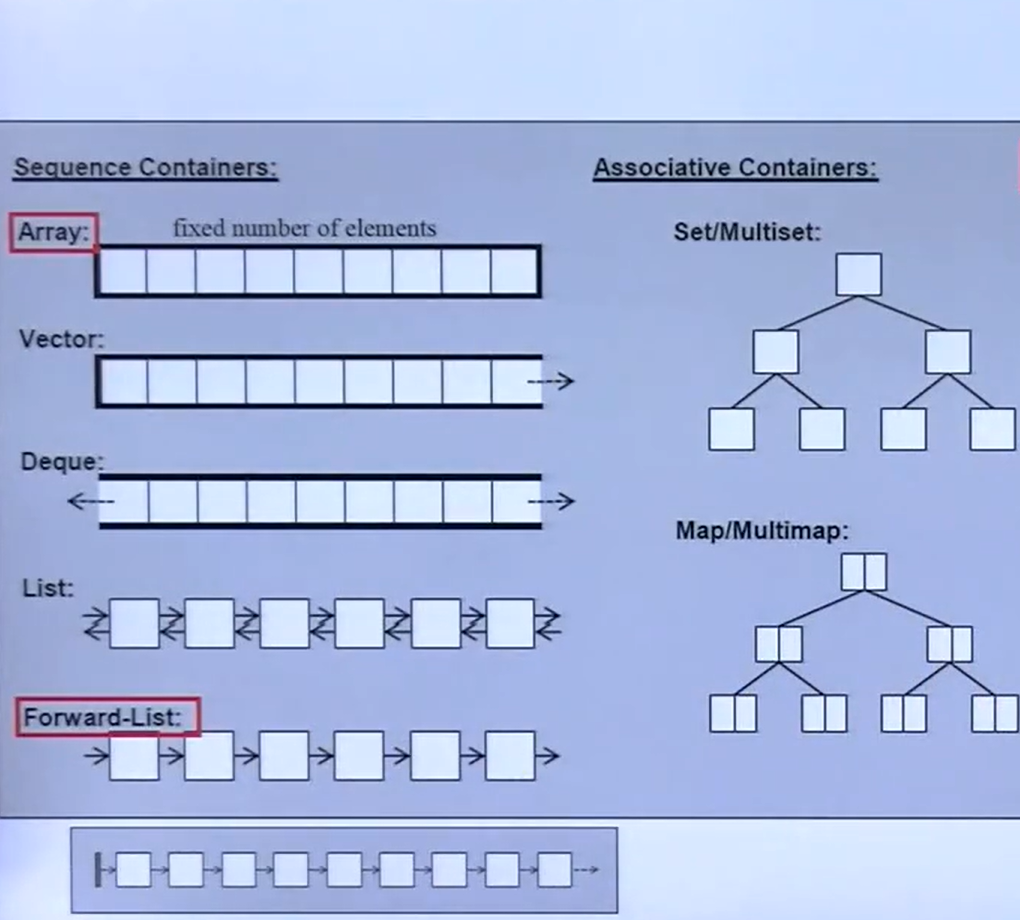
display_category(array< int , 10 >:: iterator());
display_category(vector< int >:: iterator());
display_category(list< int >:: iterator());
display_category(forward_list< int >:: iterator());
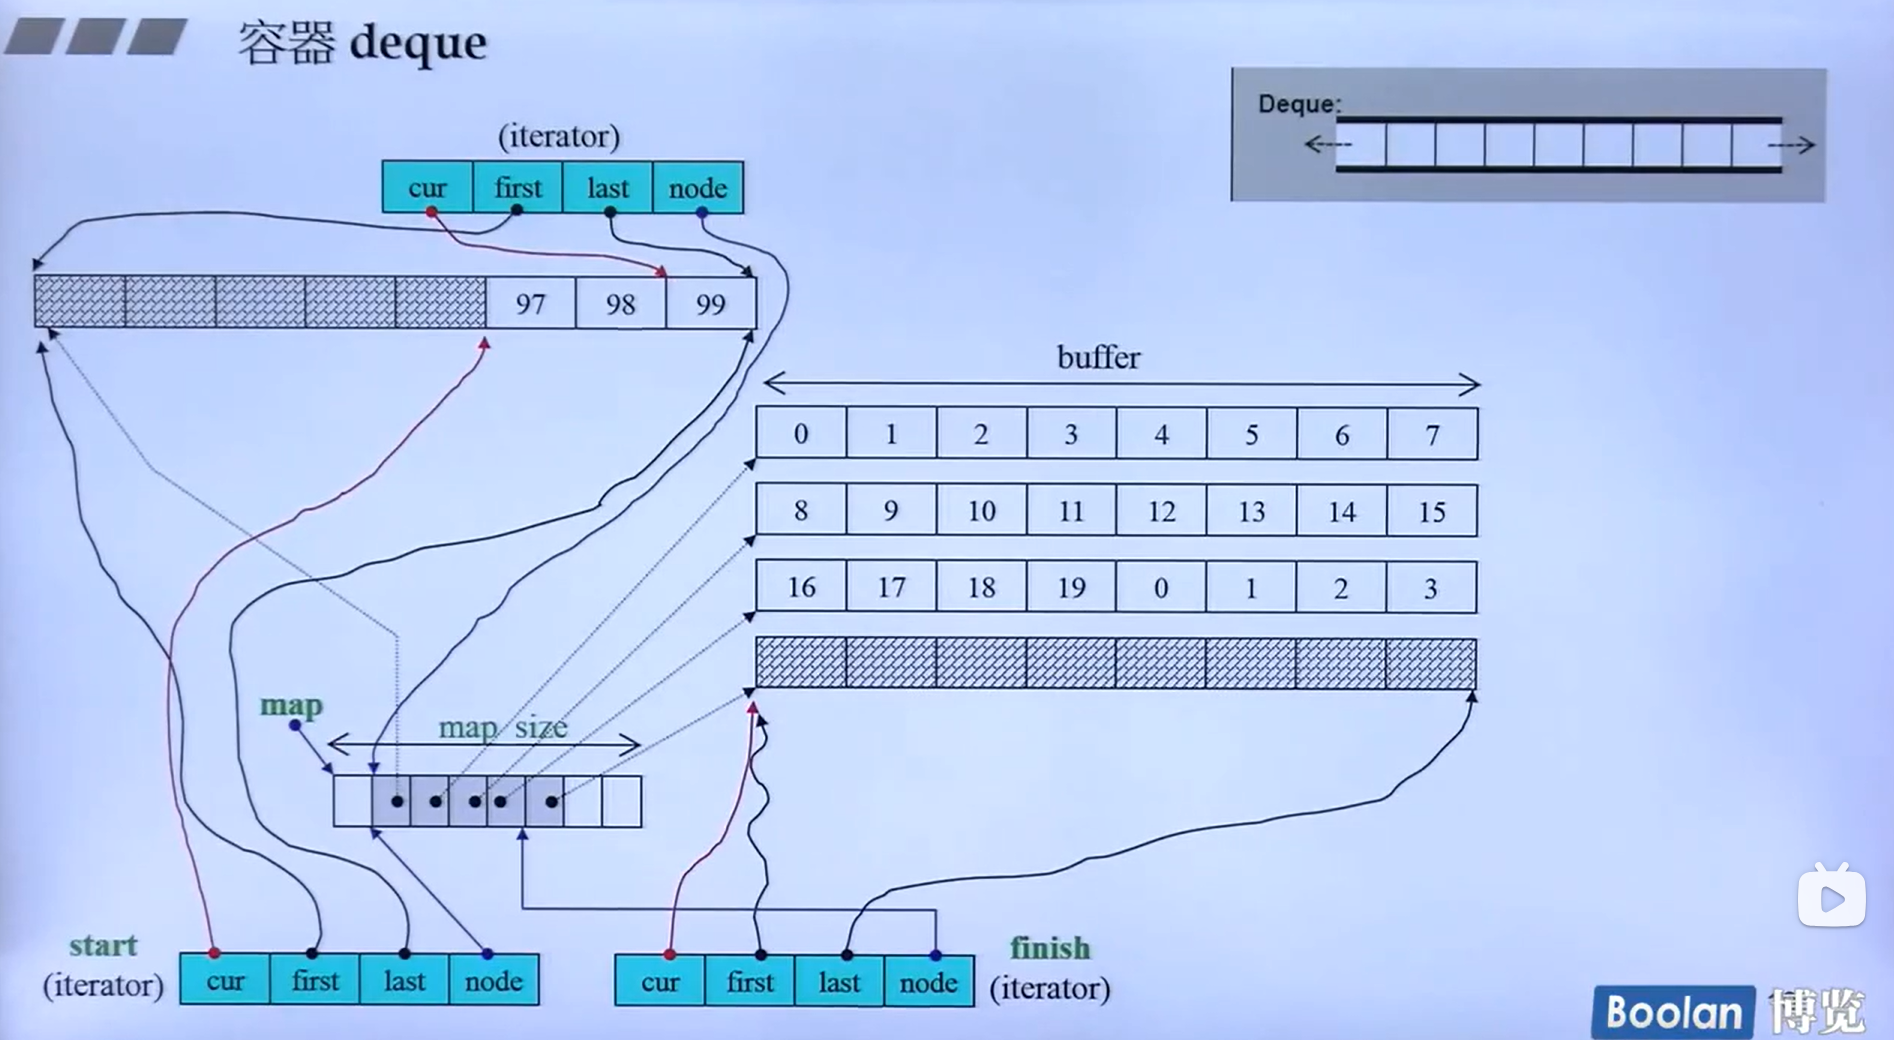
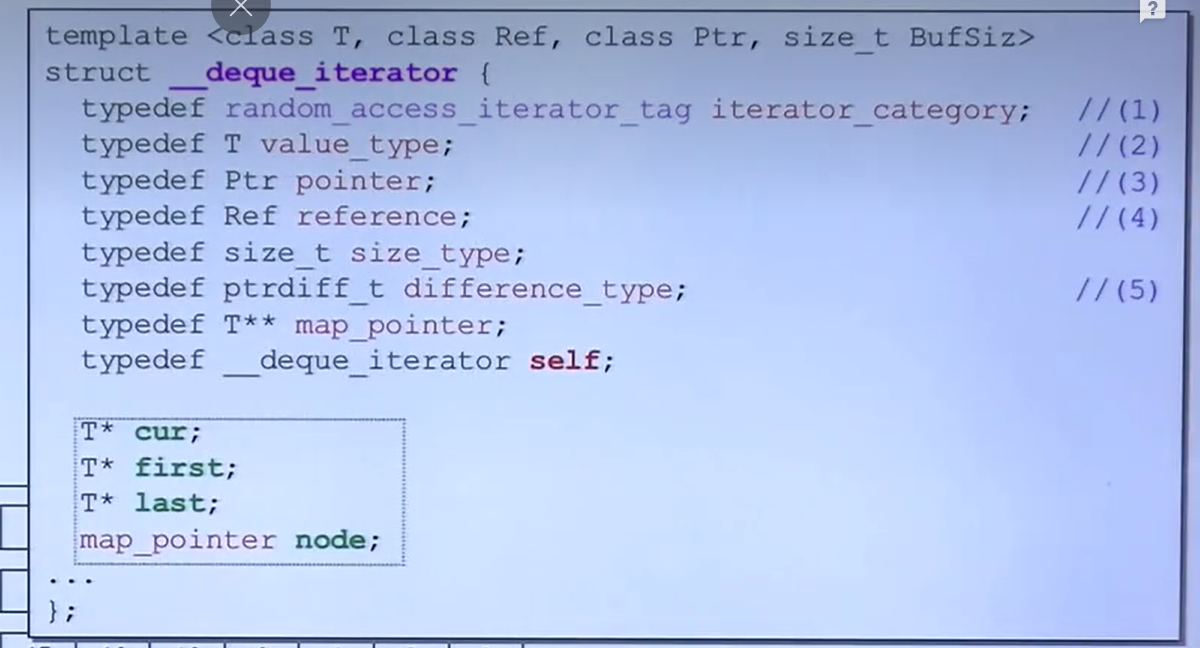
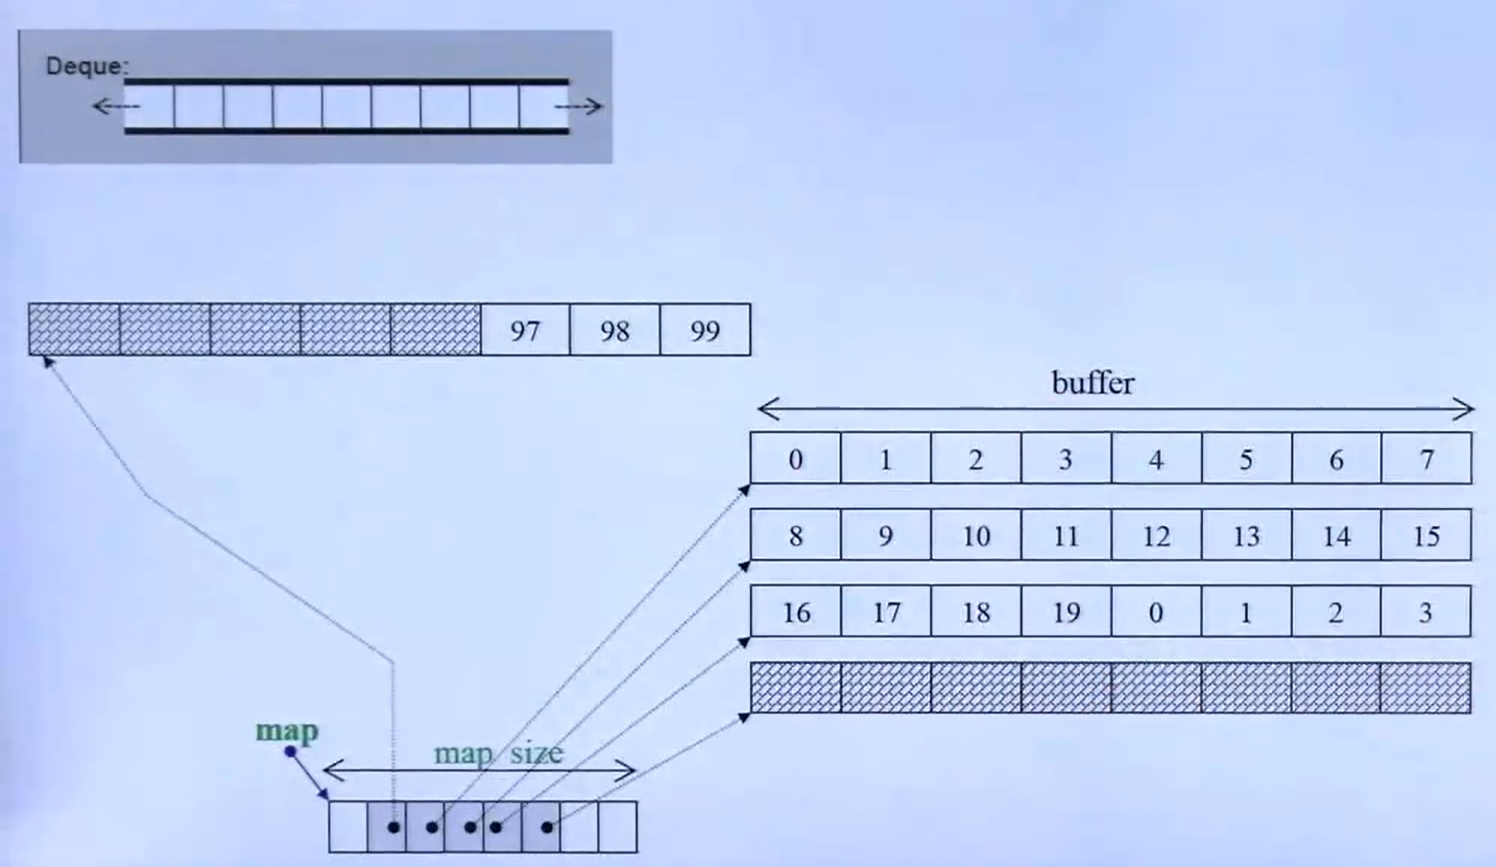
display_category(deque< int >:: iterator());
display_category(set< int >:: iterator());
display_category(map< int , int >:: iterator());
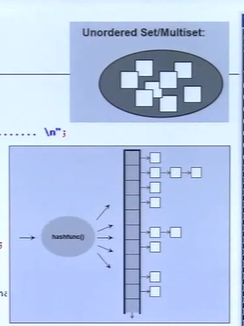
display_category(multiset< int >:: iterator());
display_category(multiset< int , int >:: iterator());
display_category(istream_iterator< int > ());
display_category(ostream_iterator< int > (cout,"" ));
}
} 此处可以参考一下display_category(array<int, 10>::iterator());中传递array<int, 10>::iterator()的方法。
测试结果:
test_iterator_category....................
struct std :: random_access_iterator_tag
struct std :: random_access_iterator_tag
struct std :: bidirectional_iterator_tag
struct std :: forward_iterator_tag
struct std :: random_access_iterator_tag
struct std :: bidirectional_iterator_tag
struct std :: bidirectional_iterator_tag
struct std :: bidirectional_iterator_tag
struct std :: bidirectional_iterator_tag
struct std :: input_iterator_tag
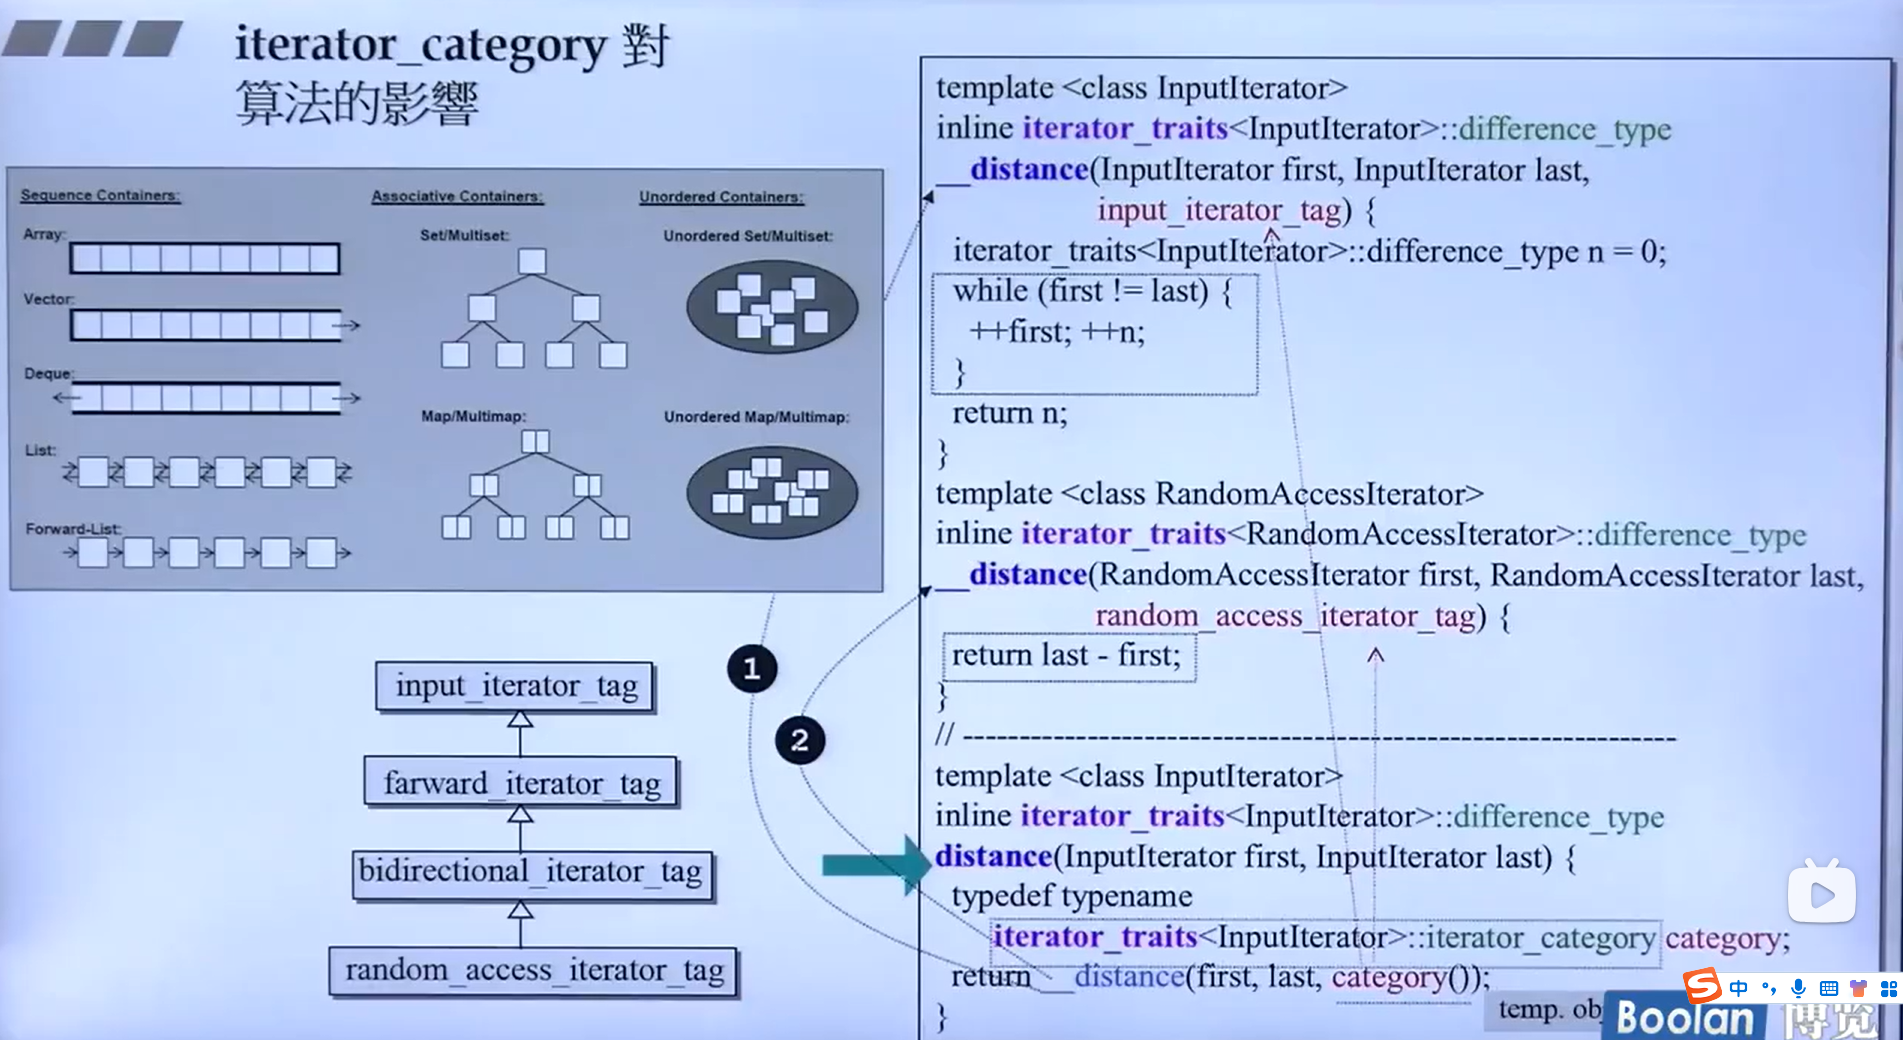
struct std :: output_iterator_tag迭代器对算法的影响
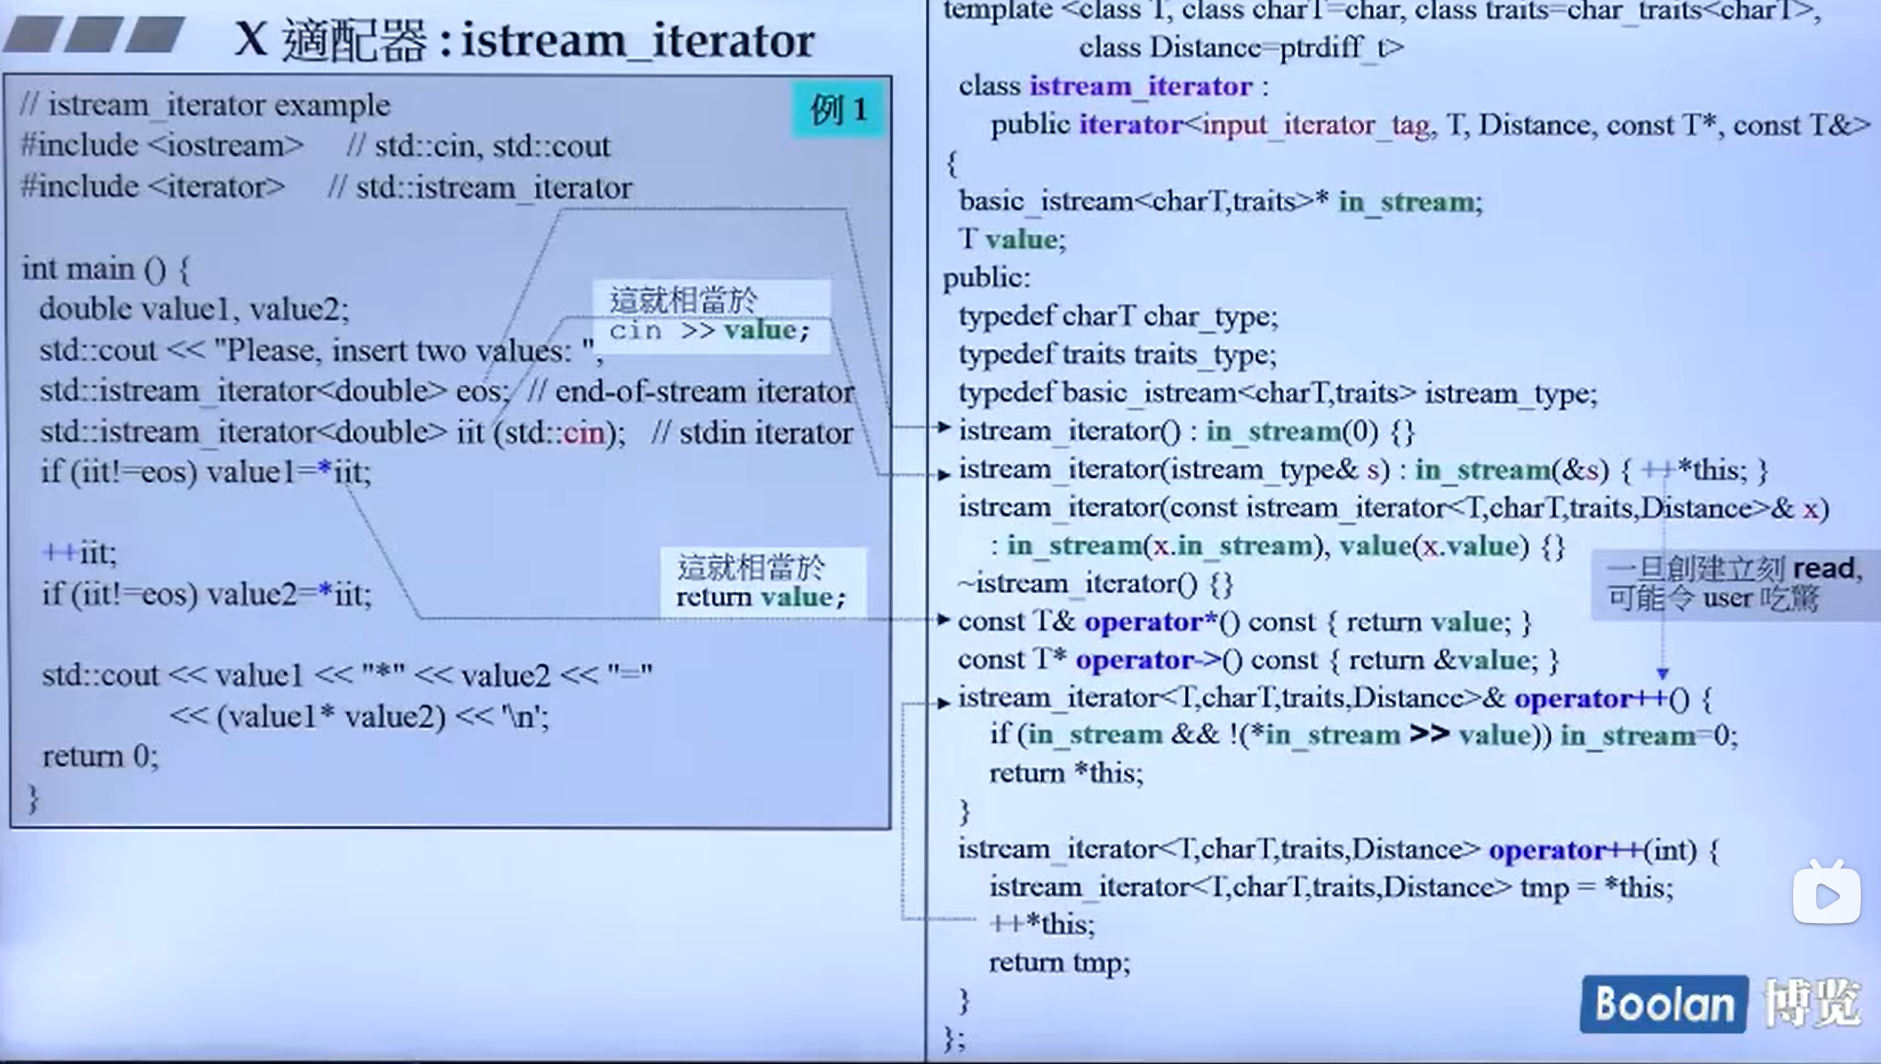
例子1-distance
迭代器如何计算容器元素之间的距离呢?当调用迭代器时,迭代器是如何操作以协助算法完成后续的增删改查的?
在计算距离方面,我们可以看到调用接口需要传入容器的头,以及容器尾部,接着使用:
...
typedef typename iterator_traits< InputIterator>:: itrerator_category category;
return __distance (first,last, category); typedef typename iterator_traits<InputIterator>::itrerator_category category;这一句会判断迭代器的类型,进而执行加操作或一步一步加操作。详细如下图所示。
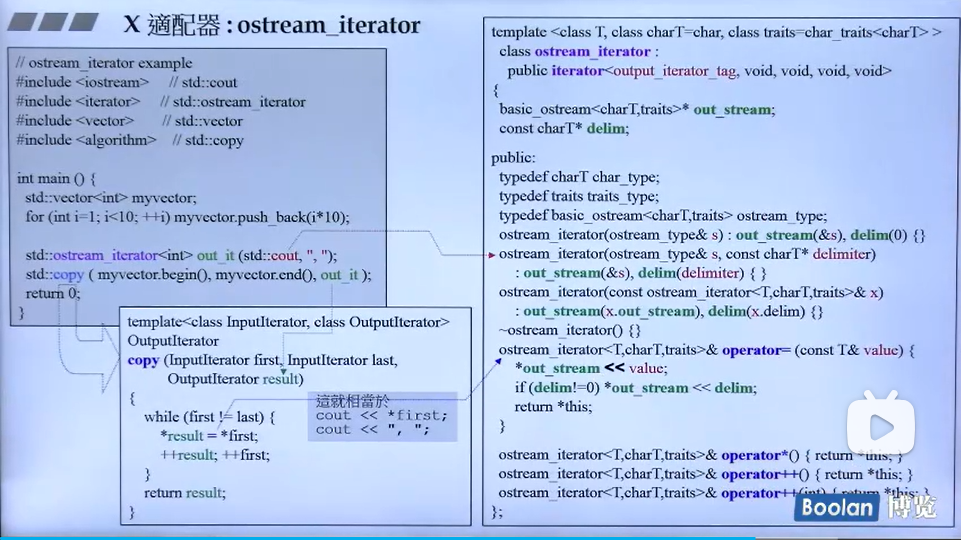
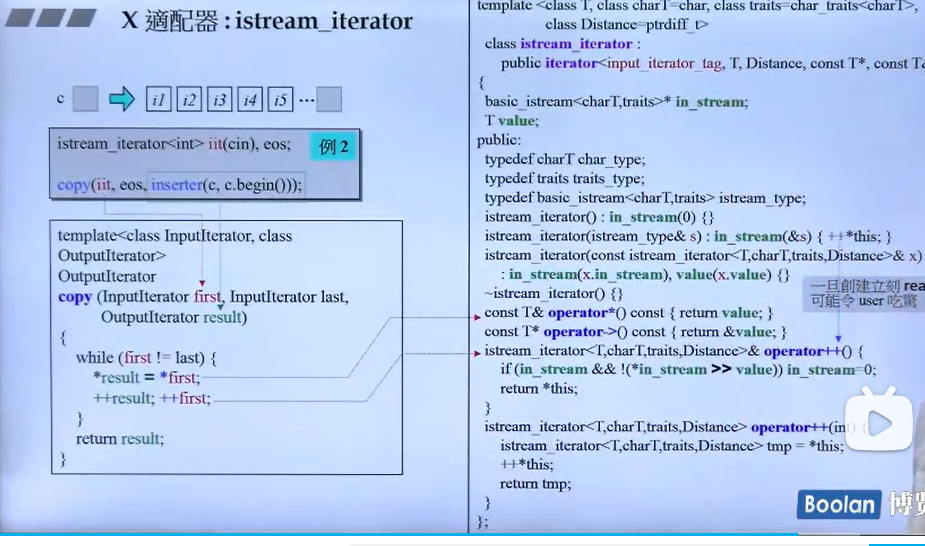
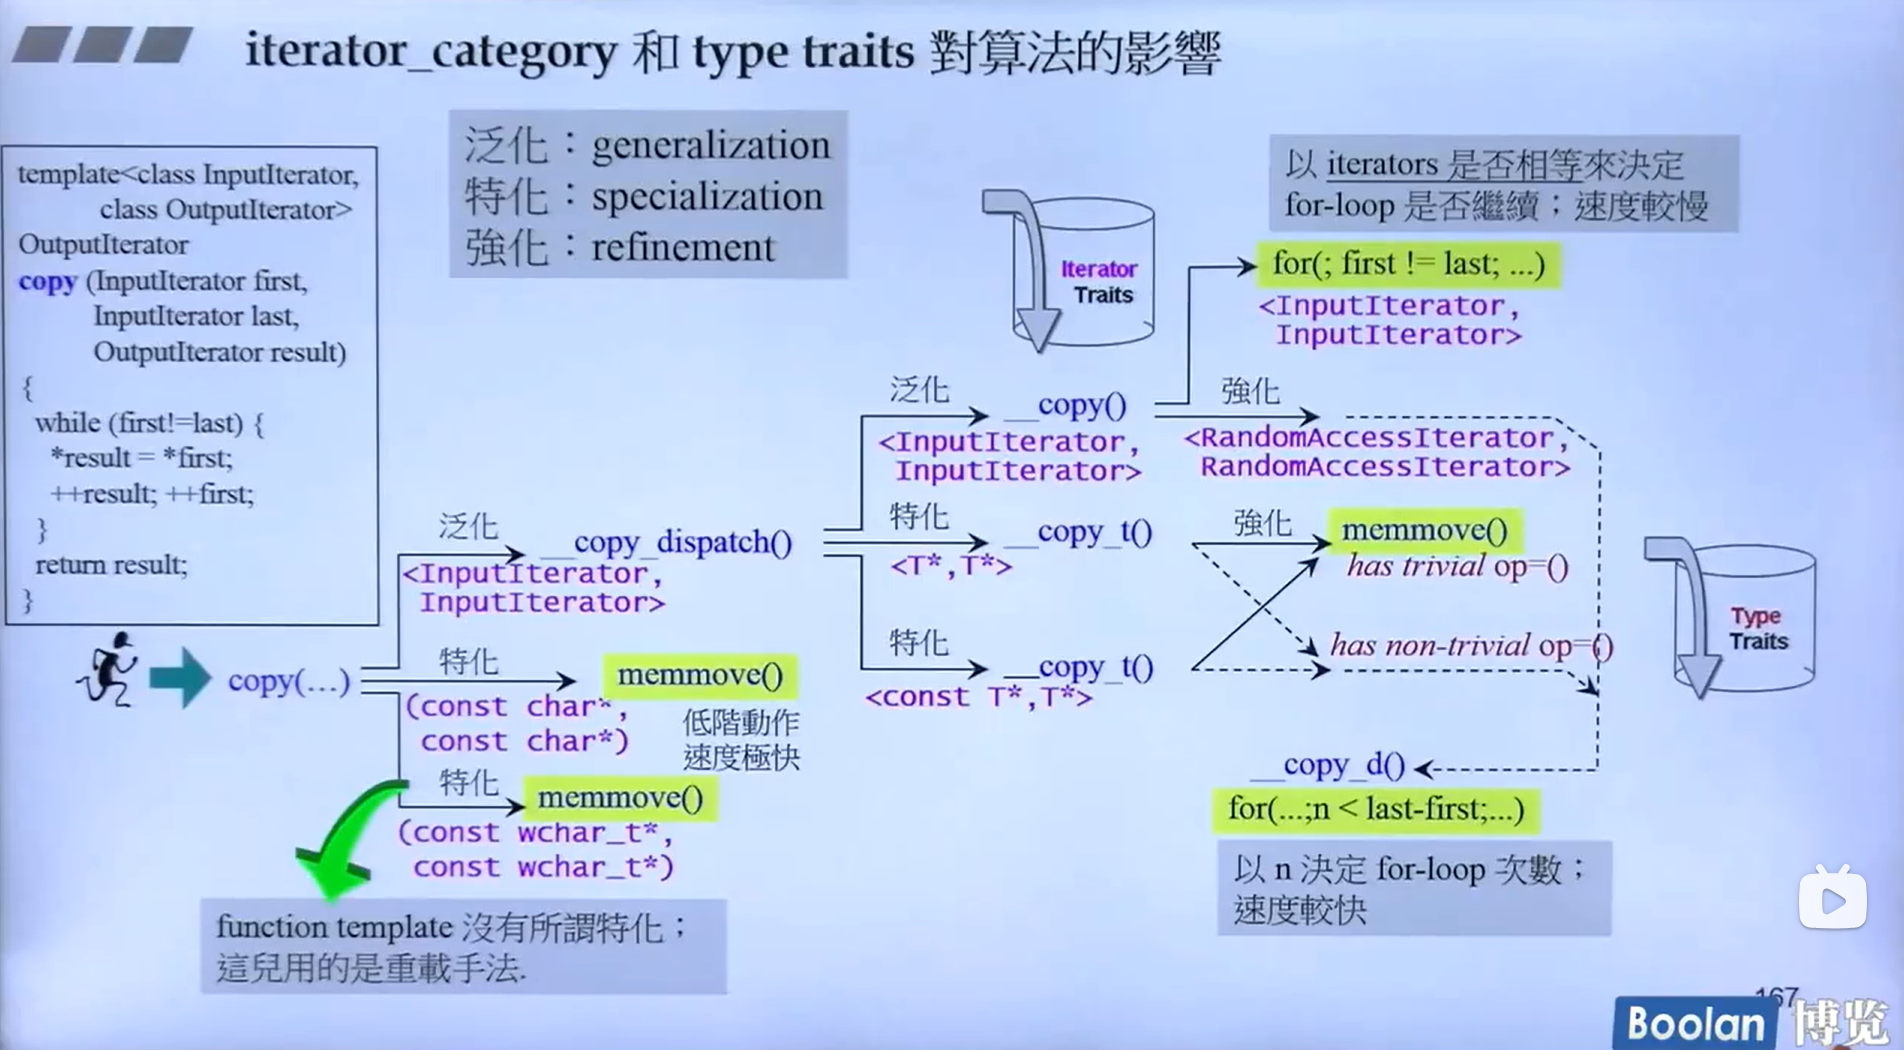
例子2-copy
copy的动作也不仅仅是对迭代器类型的判断,还做了许多特化、偏特化。如下图所示。
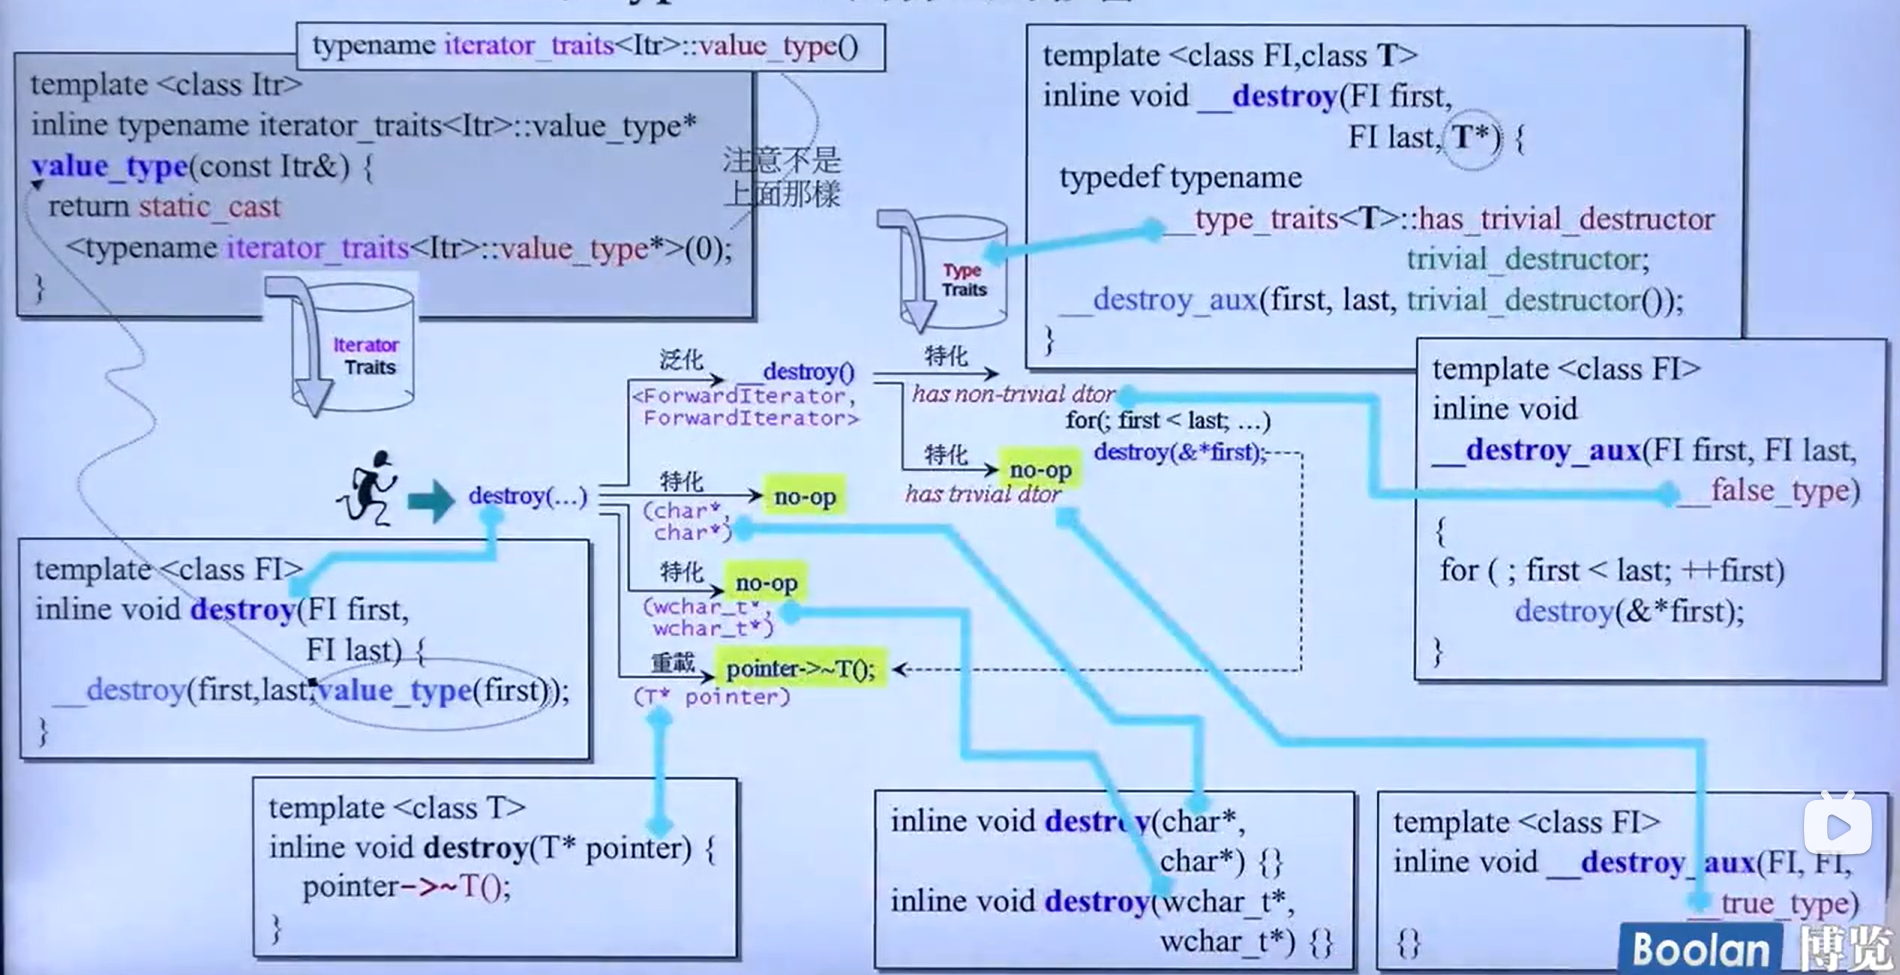
例子3-destroy
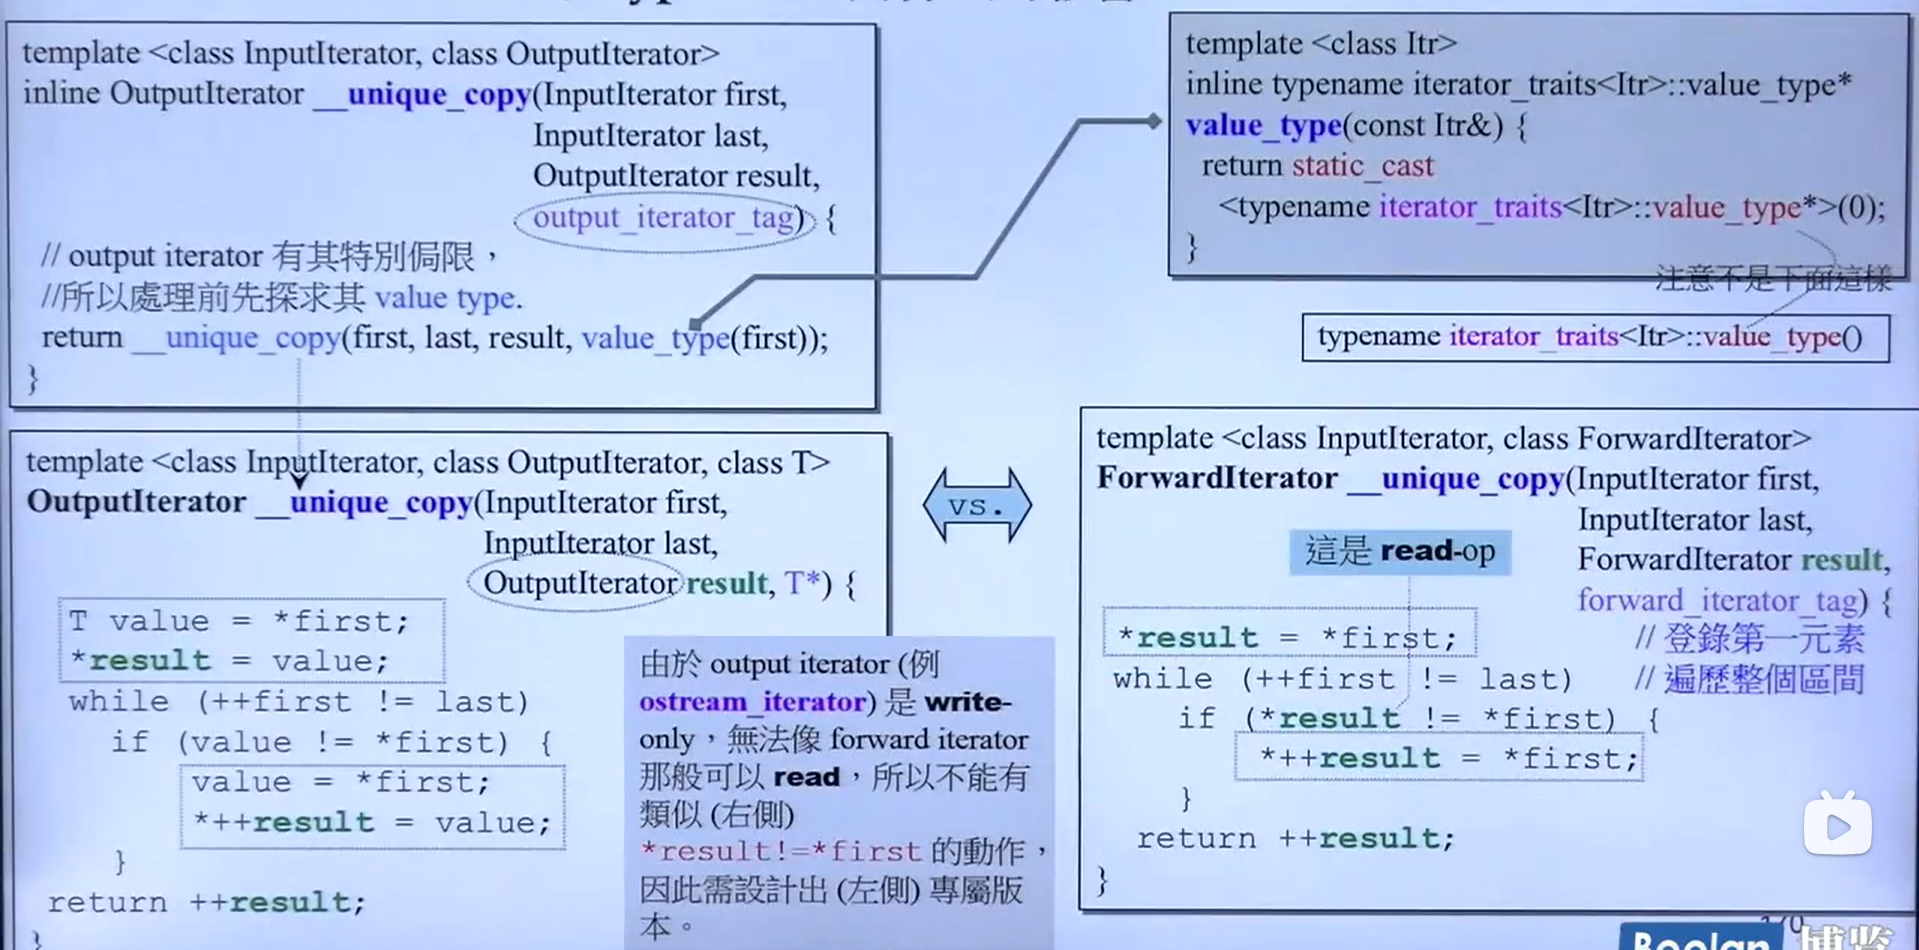
例子4-__unique_copy
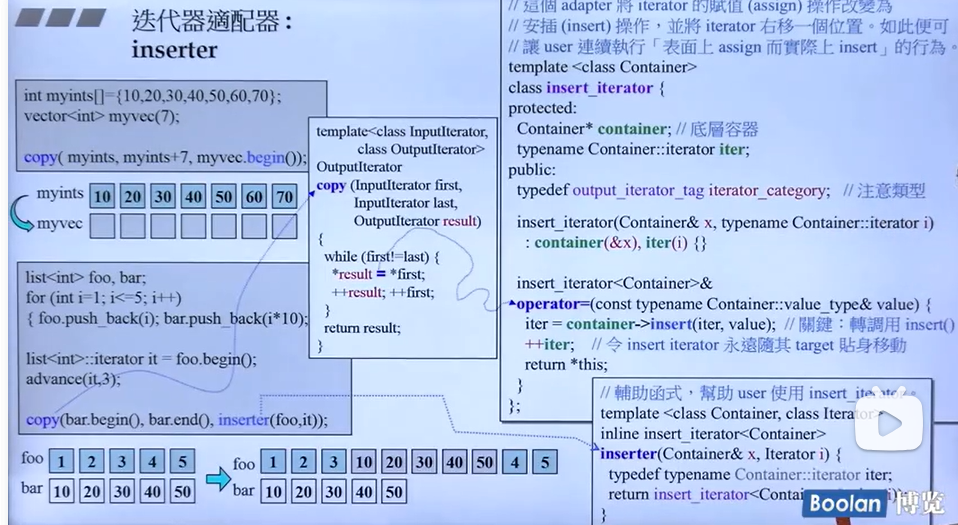
对传入的迭代器类型的暗示
在调用一些需要传入迭代器的函数时,从函数的形参名可以判断传入的迭代器类型,如InputIterator,由于forward_iterator_tag、bidirection_iterator_tag、random_asccess_iterator_tag与input_iterator的继承关系可知,前三者都可以传入,以此类推如果形参是forward_iterator_tag那么除了其本身,bidirection_iterator_tag、random_asccess_iterator_tag也可传入。
算法源码剖析
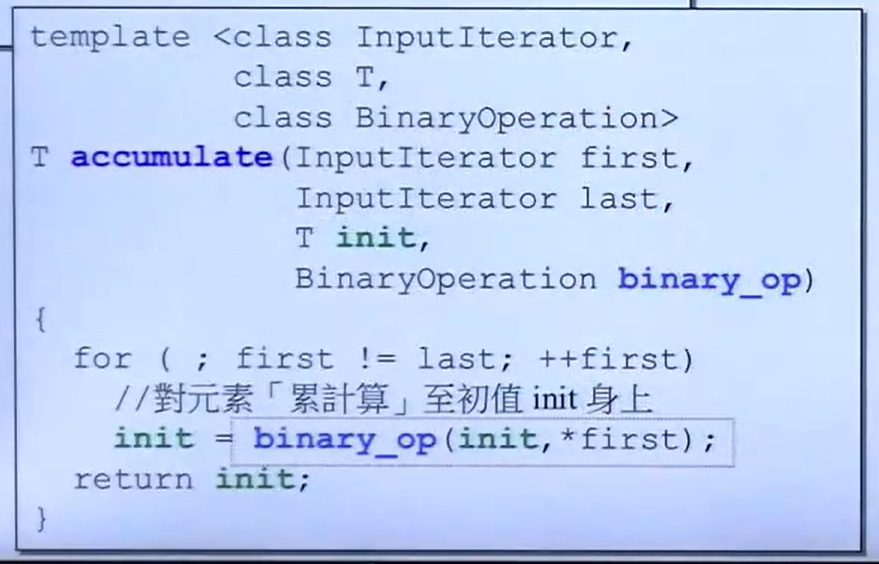
accumulate-累计
测试用例:
#include <functional> //std::minus
#include <numeric> //std::accumulate
namespace test_accumulate
{
int myfcn (int x, int y) { return x + 2 * y; }
struct myclass {
int operator ()(int x, int y) { return x + 3 * y; }
} myobj;
}
void test (){
int init = 10 ;
int nums[] = {10 ,10 ,10 };
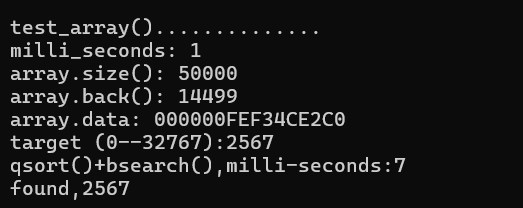
cout << accumulate(nums, nums + 3 , init)<< endl;//40
<< accumulate(nums, nums + 3 , init, test_accumulate:: myfcn)<< endl;//70
<< accumulate(nums, nums + 3 , init, test_accumulate:: myobj) << endl;//100
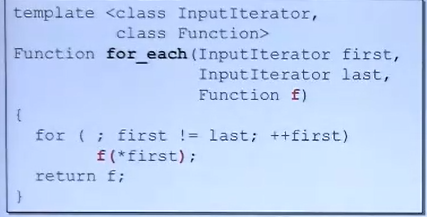
for_each
拿到每一个元素时都对该元素执行某一操作。
测试用例:
namespace test_for_each
{
void myfcn (int i) { cout<< i<< "-" ; }
struct myclass {
void operator ()(int i) { cout << "[" << i<< "] " ; }
} myobj;
void test () {
vector< int > c;
c.push_back(10 );
c.push_back(20 );
c.push_back(30 );
for_each(c.begin(), c.end(), test_for_each:: myfcn);//10-20-30-
<< " \n " ;
for_each(c.begin(), c.end(), test_for_each:: myobj);//[10] [20] [30]
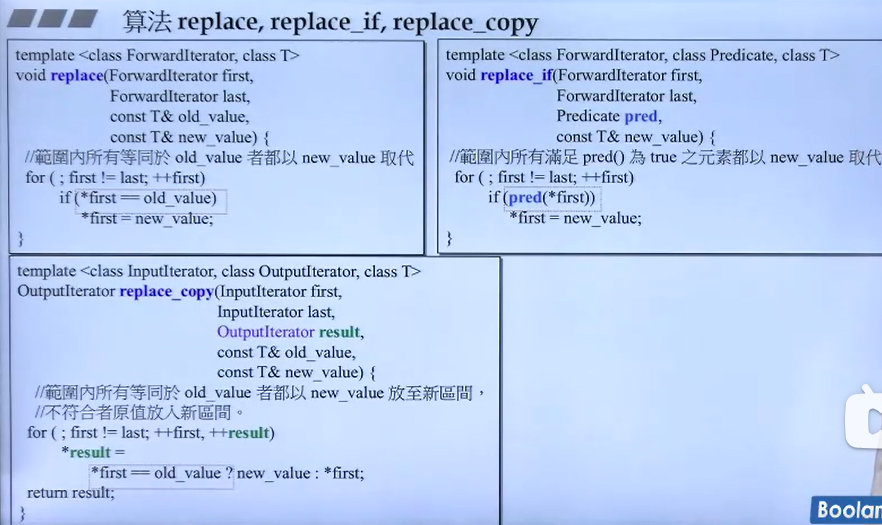
} replace,replace_if,rreplace_copy
replace用于将新值替换为旧值,例如将数组中所有的8替换为9.详细源码如下图所示。
replace、replace_if 和 replace_copy 是 C++ 标准库中的算法,它们用于在容器或数组中替换元素。这些函数属于 <algorithm> 头文件。下面是每个函数的详细介绍和作用:
1. replace
replace 函数用于将容器中所有满足特定条件的元素替换为另一个值。这个函数直接在原容器上操作,不创建新的容器。
函数原型 :
void replace (ForwardIterator first, ForwardIterator last, const T& old_value, const T& new_value);
first, last:定义了要替换元素的范围。old_value:要被替换的值。new_value:替换后的值。
示例 :
vector< int > v = {1 , 2 , 3 , 4 , 3 , 2 };
replace(v.begin(), v.end(), 2 , 5 );
// v 变为 {1, 5, 3, 4, 3, 5}
2. replace_if
replace_if 函数用于将容器中满足特定条件的元素替换为另一个值。与 replace 不同,replace_if 需要一个谓词(条件函数),只有满足这个条件的元素才会被替换。这个函数也直接在原容器上操作。
函数原型 :
void replace_if (ForwardIterator first, ForwardIterator last, Predicate pred, const T& new_value);
first, last:定义了要替换元素的范围。pred:一个谓词函数,返回 true 表示替换,false 表示不替换。new_value:替换后的值。
示例 :
vector< int > v = {1 , 2 , 3 , 4 , 3 , 2 };
replace_if(v.begin(), v.end(), [](int i) { return i == 2 ; }, 5 );
// v 变为 {1, 5, 3, 4, 3, 5}
3. replace_copy
replace_copy 函数用于将容器中所有满足特定条件的元素复制到另一个容器中,并替换为另一个值。这个函数不会改变原容器,而是创建一个新的容器,其中包含替换后的元素。
函数原型 :
template < class InputIterator , class OutputIterator >
OutputIterator replace_copy(InputIterator first, InputIterator last, OutputIterator result, const T& old_value, const T& new_value);
first, last:定义了要替换元素的范围。result:指向目标容器的迭代器,用于存储替换后的元素。old_value:要被替换的值。new_value:替换后的值。
示例 :
vector< int > v = {1 , 2 , 3 , 4 , 3 , 2 };
vector< int > v2(v.size());
replace_copy(v.begin(), v.end(), v2.begin(), 2 , 5 );
// v 保持不变,v2 变为 {1, 5, 3, 4, 3, 5}
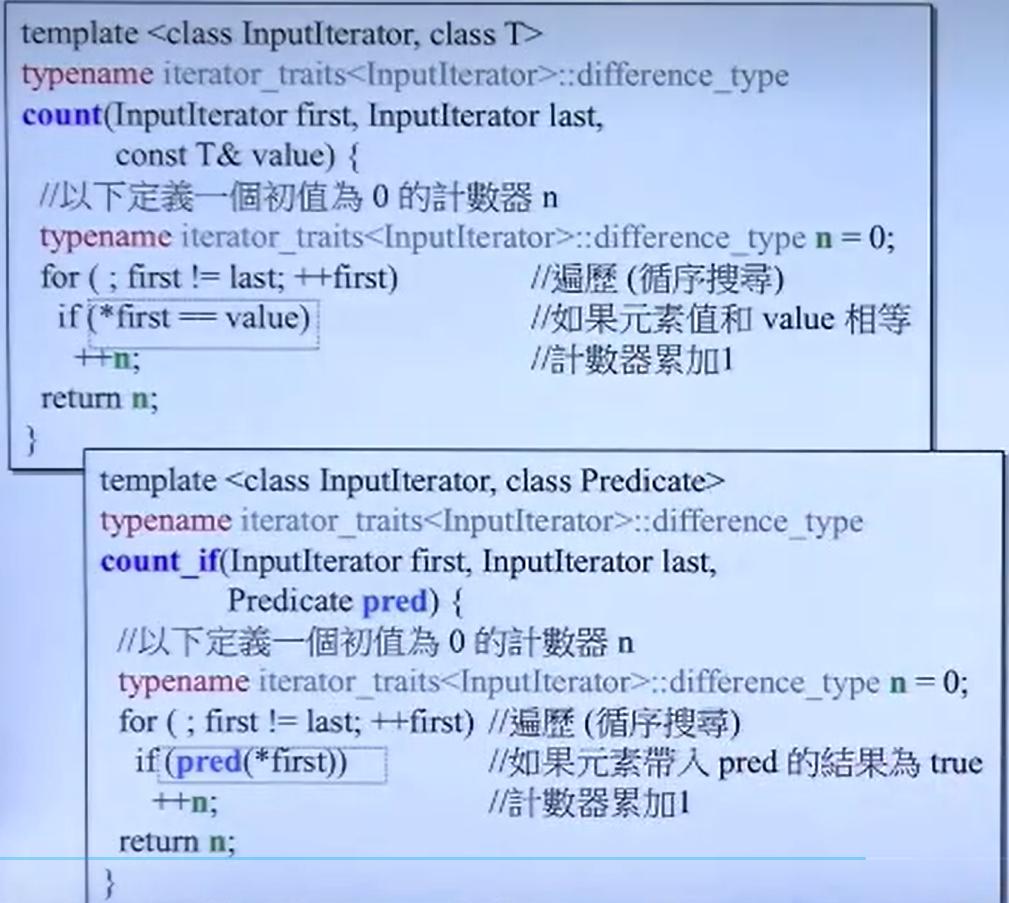
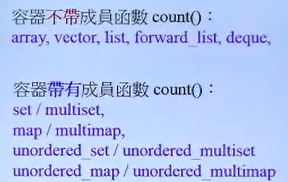
count,count_if
源代码如下:
小结:
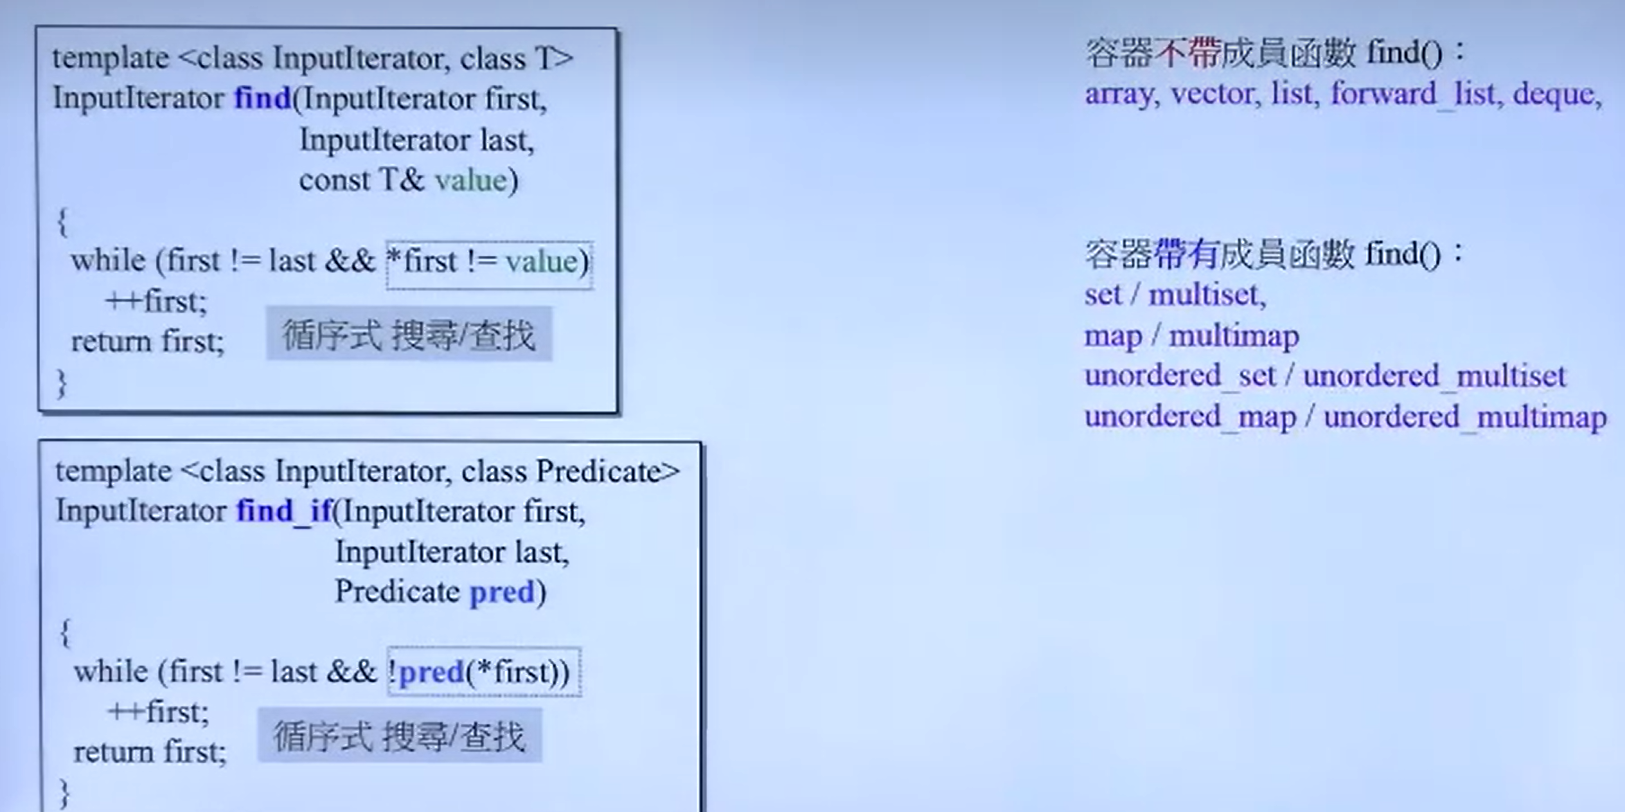
find,find_if
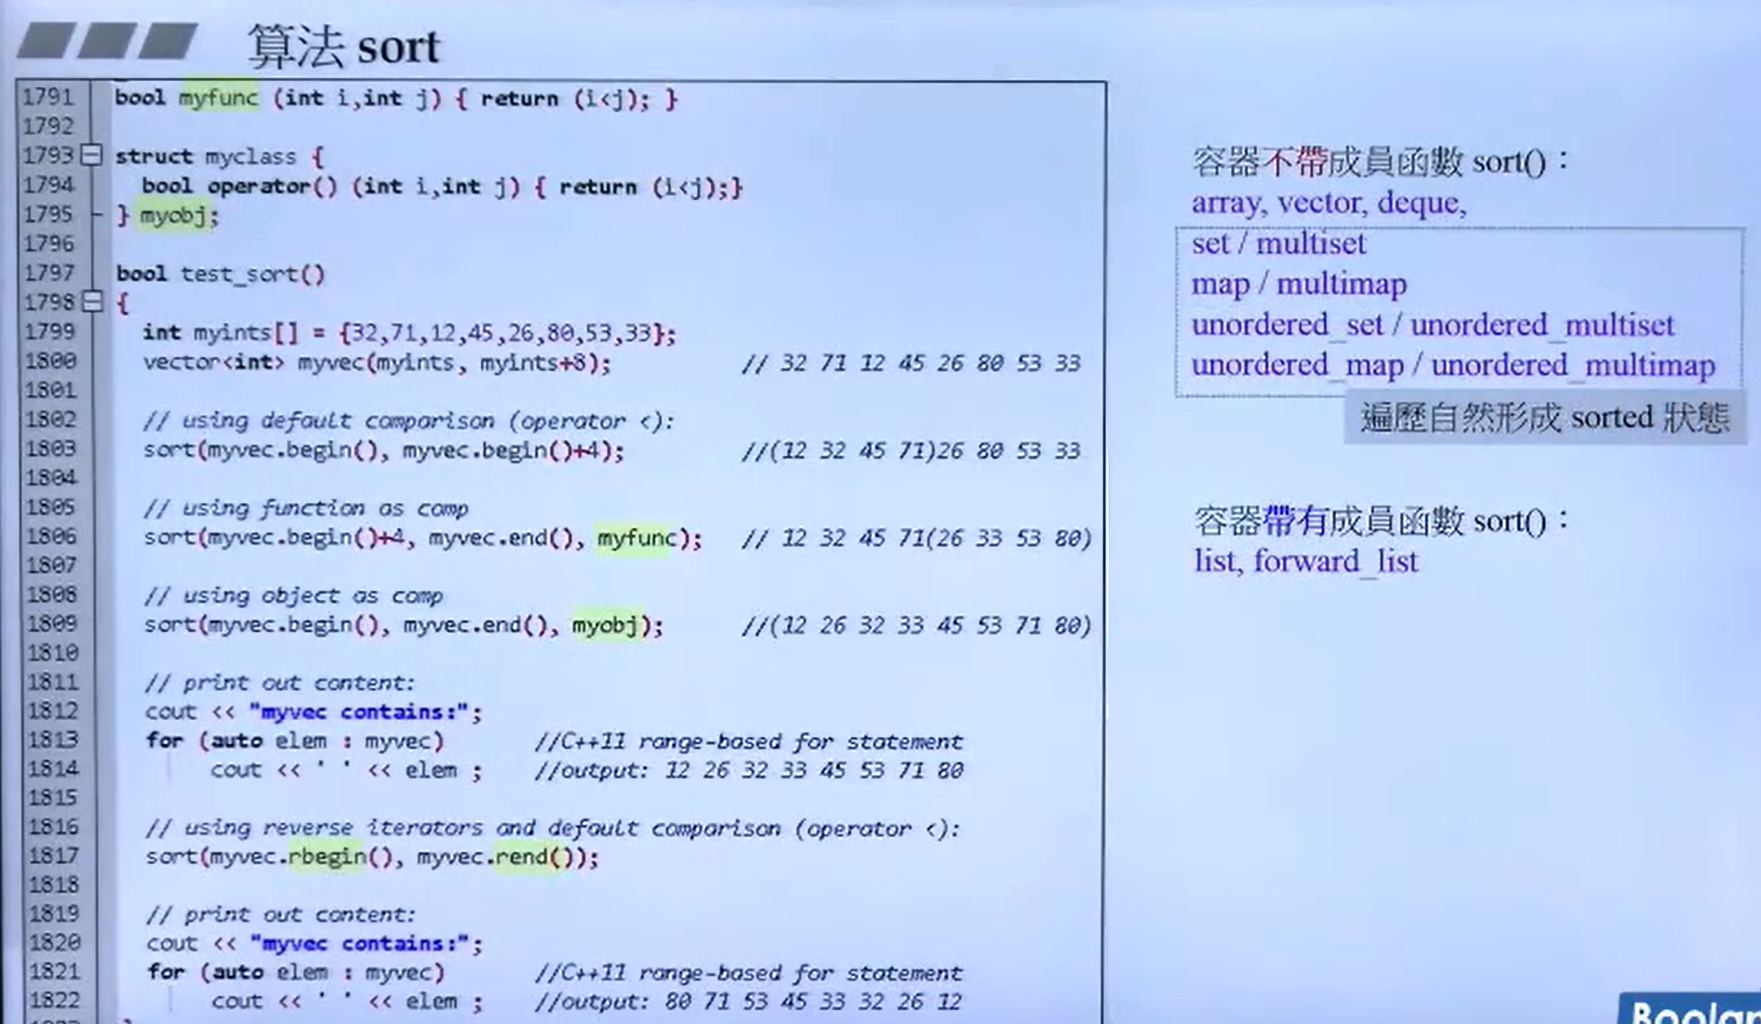
sort
binary_search
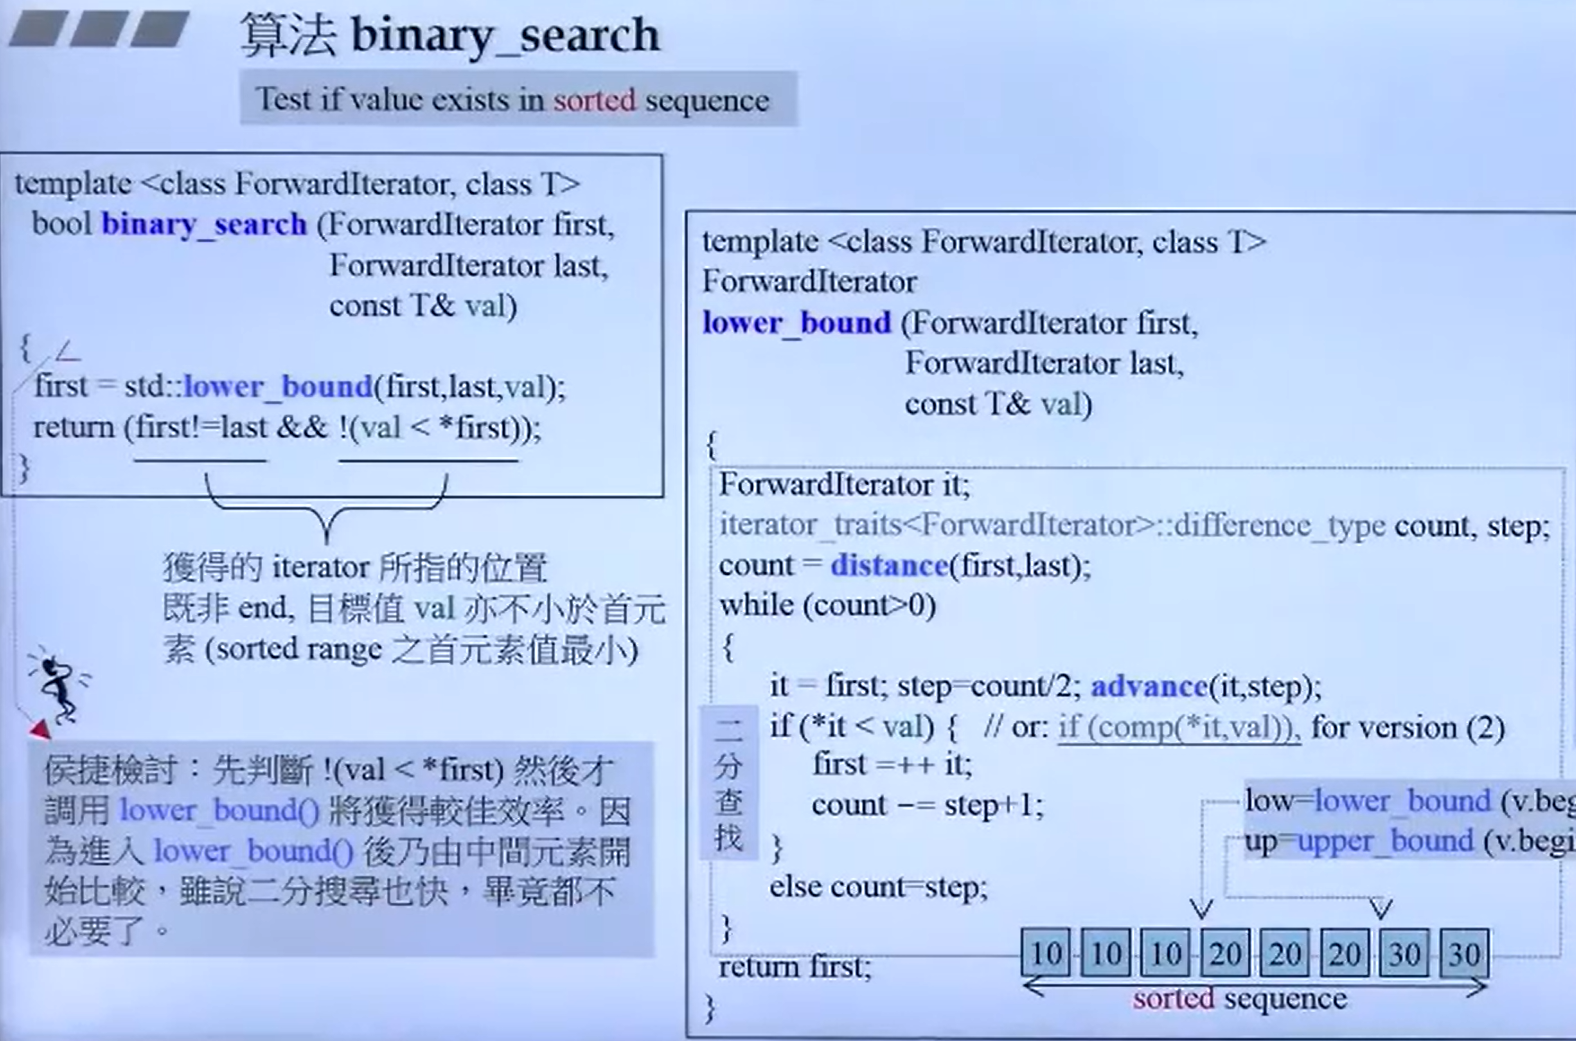
算法原理:
二分查找的基本思想是将一个有序序列分为两半,通过比较中间元素和目标值来缩小搜索范围。如果中间元素正好是目标值,则查找成功;如果目标值小于中间元素,则在序列的左半部分继续查找;如果目标值大于中间元素,则在右半部分继续查找。这个过程不断重复,直到找到目标值或搜索范围为空。
函数原型:
binary_search 的函数原型如下:
template < class ForwardIterator , class T >
bool binary_search(ForwardIterator first,
ForwardIterator last,
const T& value);
first, last:定义了要搜索的范围,first 是序列的开始迭代器,last 是序列的结束迭代器(指向序列末尾的下一个位置)。value:要查找的值。
返回值:
如果在序列中找到 value,则返回 true。
如果没有找到,则返回 false。
示例代码:
#include <algorithm>
#include <vector>
#include <iostream>
int main () {
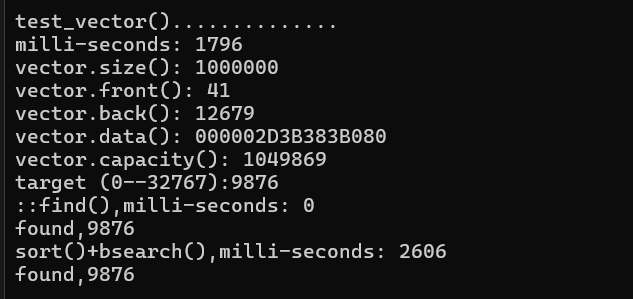
std:: vector< int > data = {1 , 2 , 3 , 4 , 5 , 6 , 7 , 8 , 9 };
int target = 5 ;
bool found = std:: binary_search(data.begin(), data.end(), target);
if (found) {
std:: cout << "Element found in the array." << std:: endl;
} else {
std:: cout << "Element not found in the array." << std:: endl;
}
return 0 ;
} 注意事项:
有序序列 :binary_search 要求序列必须是有序的,否则查找结果将不可预测。效率 :二分查找的时间复杂度为 O(log n),其中 n 是序列中的元素数量。这使得它比线性查找(O(n))更高效,尤其是在大数据集上。稳定性 :如果存在多个相同的目标值,binary_search 将返回第一个匹配的位置。如果需要找到所有匹配项,可能需要使用其他方法。
1.代码编写规范
如何写一个标准的.h文件
以下内容来自B站 。
接下来将以复数的库文件为例来回答这个问题,下面是一段参考复数库文件代码:
class complex
{
private :
/* data */
double re,im;
friend complex& __doapl (complex* ,const complex& );
public :
complex (double r,double i)
: re(r),im(i) //这是一个构造函数,这种写法意思是初始化变量
complex& operator += (complex operator & );
double read () const {return re;} //这里需要加const 意思就是修饰函数的返回值,不允许改变返回值类型
double imag () const {return im;}
}; 构造函数的特性
这一点需要关注下面的代码:
complex (double r,double i)
: re(r),im(i) //这是一个构造函数,这种写法意思是初始化变量
关于const修饰符
如上面说到的,函数返回最好是加const,这样可以应付下面情况的发生。
    double read () const {return re;}
    double imag () const {return im;}
此时做如下两种使用都是正确的
complex com1 (1 ,2 );
cout<< com1.real()<< endl; const complex com1 (1 ,2 );
cout<< com1.real()<< endl;
    double read ()  {return re;}
    double imag ()  {return im;}
此时做如下两种使用只有第一种可以被执行,第二种会报错。
complex com1 (1 ,2 );
cout<< com1.real()<< endl; const complex com1 (1 ,2 );
cout<< com1.real()<< endl;
函数传递和返回值的两种方式
pass by values:传值。在传输的事单字节或者字节数较少的情况下使用,比如传一个字符。
pass by reference:传引用。在C++中引用的底层逻辑就是传指针,也就是类似穿了地址,也就是只传输4个字节,
在这种情况下你可以使用const修饰符,迫使函数不能修改值,如果希望函数对值进行处理则可以不加
void re (const classname& cl){};//加了const
void re (classname cl){};//没有加const
对于返回值,我们可以返回值,也可以返回引用,但什么情况下返回的是引用呢?
在设计类中的函数时,可以先考虑返回类型适不适合引用,如果返回的是已经存在的地址,那么可以选择返回类型为引用,否则不使用。
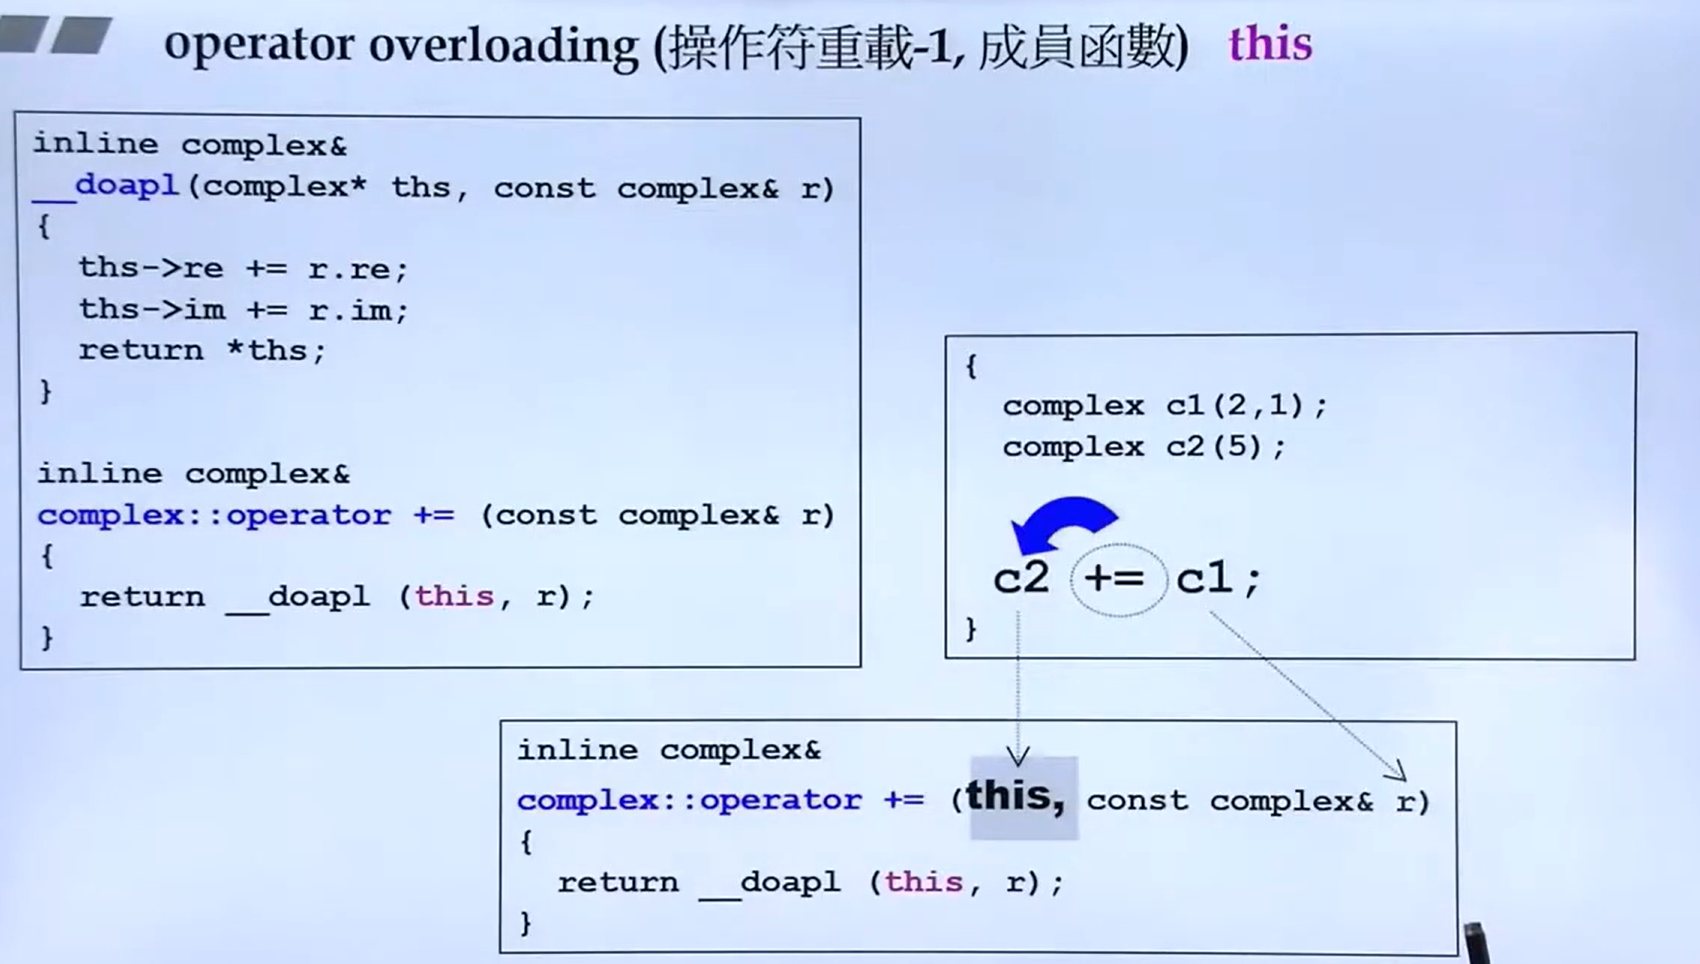
inline complex&
__ap(complex * this ,const complex & c){
this -> re += c.re;
this -> im += c.im;
return * this ;
} 向上面的函数就是使用了引用返回。
操作符重载-1:成员函数
操作符重载-2:非成员函数
假设现在要计算复数的加减,如下:
complex com1 (1 ,0 );
complex com2 (2 ,9 );
complex com3;
com3 = com1 + com2;
com3 = com1 + 2 ;
com3 = 0 + com2;
…… 对于这段代码在库文件中,要对加法做非成员函数重载,以应付 不同的情况。
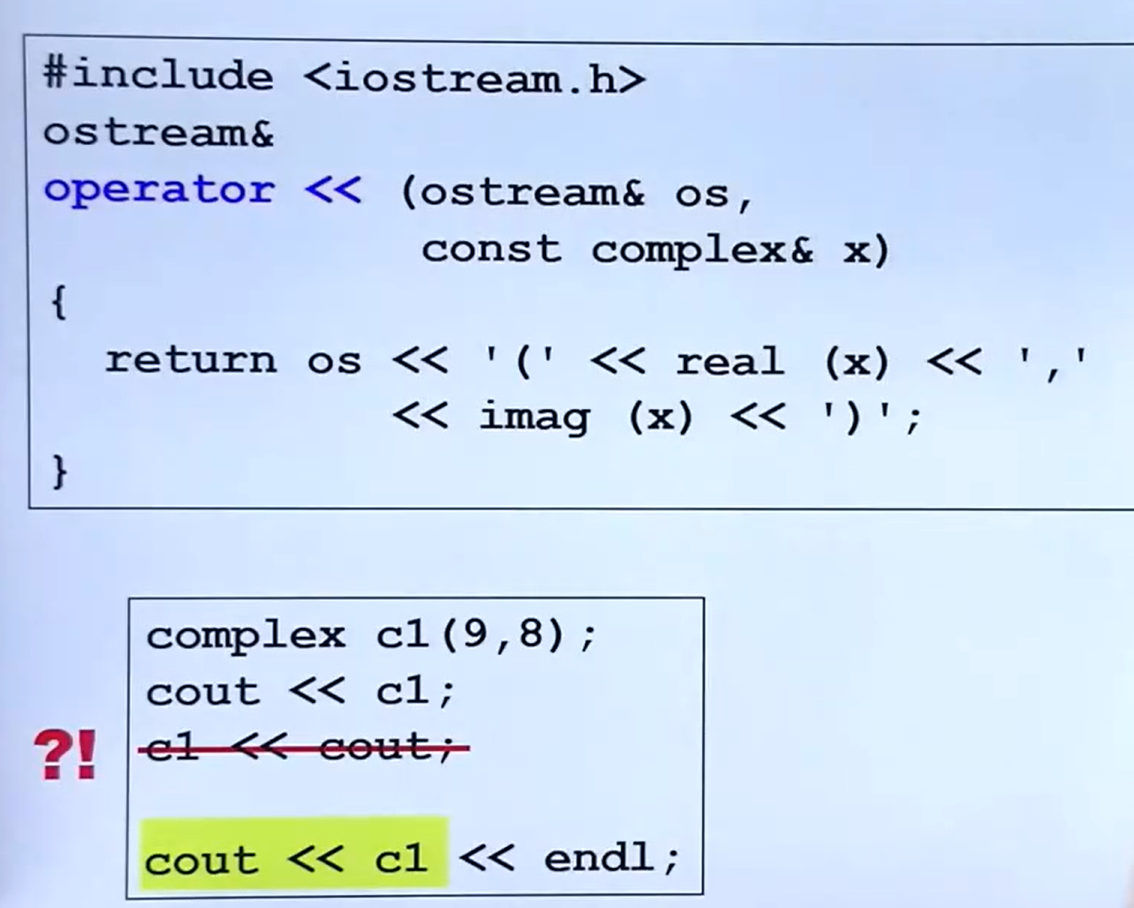
接下来在考虑一个问题,就是如果我们只是做cout<<com1;那么对于«函数返回值可以是void类,但是如果我们做的是cout<<com1<<com2<<endl;
这样的操作返回类型为void类型,那么当运行cout<<com1后就无法运行<<com2<<endl的代码.
很显然要让代码继续运行,我们还需要返回iostream类型,而且使用return by reference返回方法,也就是返回引用。如下图:
小结
通过以上的简单讲解,我们可以总结一下,再写一个类的时候,我们需要注意以下几点:
确定类的数据并写在private中;
对于构造函数要善于使用初始化数据方法;
对于函数要想一想,返回类型是否可以改变,要不要写const;
对于函数类型和返回值,要传值还是传引用,要返回值还是返回引用。
是否返回引用最最好的判断标准就是,值在经过函数运算后存储在函数外,或说是一个以存在的存储地址,否则不返回引用
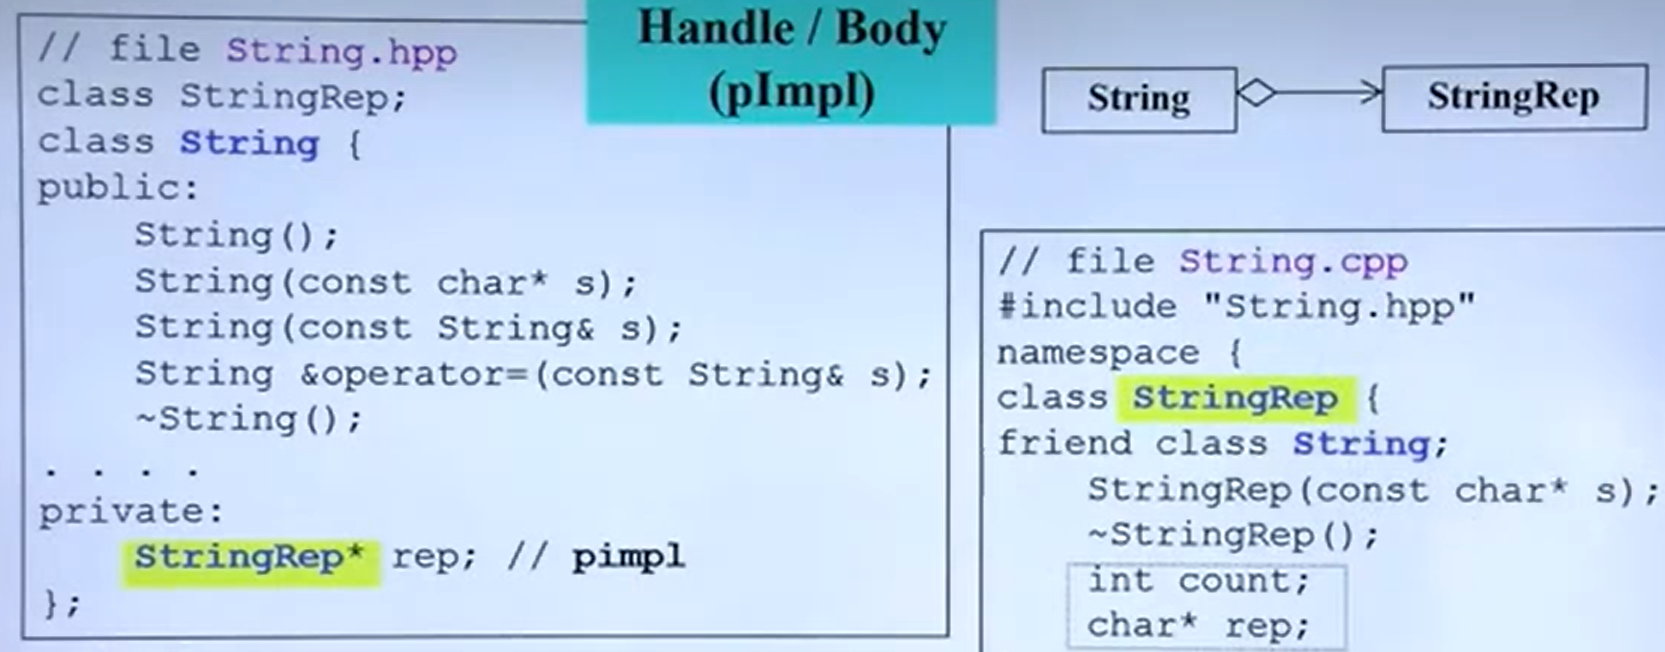
接下来通过学习string.h库,进一步了解指针的使用
一般有指针的类需要写三个特殊函数拷贝构造、拷贝析构、拷贝赋值,
有时候还需要用到new 和 delete。
stack(栈)和heap(堆)
如下代码:
class String {…… };
……
{
String str ("hello" );
String str1 = new String();
……
} 上面的{}内的代码就是存储在stack中,而经过new的变量存在heap中;
stack object 的生命周期
在{}内的代码执行结束后,自动调用析构函数 将变量清理掉,如下代码,
class String {…… };
……
{
String str ("hello" );
……
} static local object 的生命周期
添加关键字static的变量成为静态变量,在作用于如下面代码的{}结束后不会被析构函数清理掉,
变量会存储直到程序结束。
class String {…… };
……
{
static String str ("hello" );
……
} global objects 生命周期
全局变量在程序接收后才会被清理掉。
class String {…… };
String str ("hello" );
……
{
……
} 调用new和delete的过程
在使用new的地方需要使用delete清理内存,防止内存泄露。
调用new过程:
调用delete的过程:
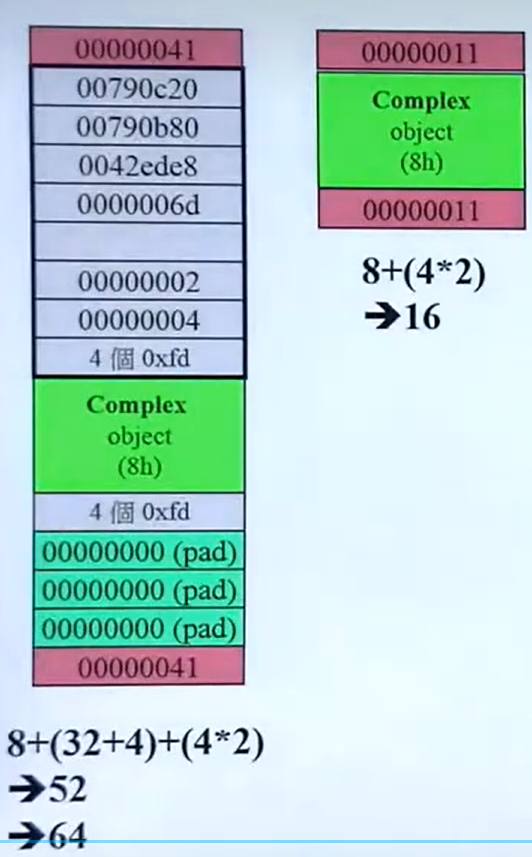
代码 分配内存大小左图是调试模式下的内存分配,右图是非调试模式下分配的内存
new与delete的搭配,在删除数组时需要加上[]否则编译器不知道你要删的是数组:
new和delete的补充
对new和delete的重载,用于设计内存管理,如内存池等操作。
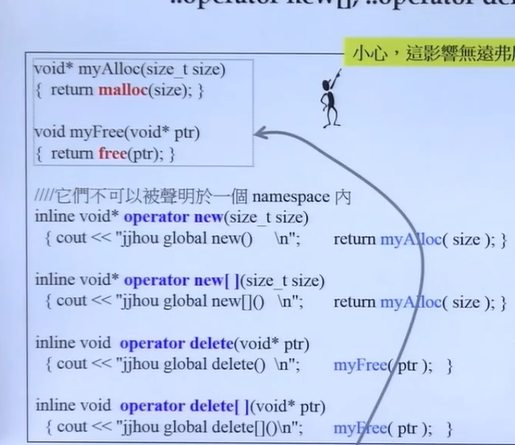
重载::new,::delete
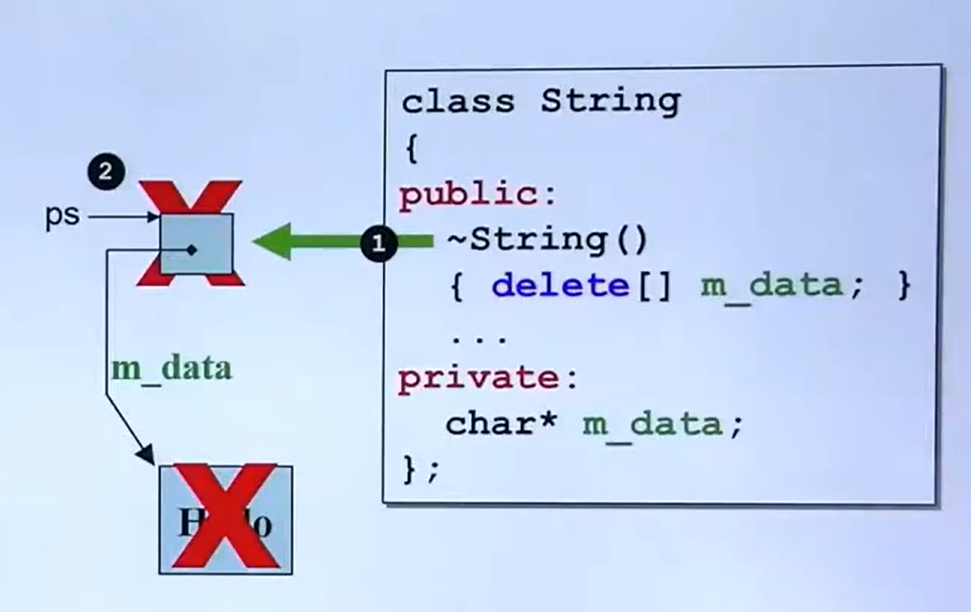
重载的函数中,new操作会接收一个大小,该大小由编译器传入,而delete传入的是一个指针,如下图;
如果不想使用类中的new和delete,可以在二者之前加上:,如::new,::delete,这样在调用函数时就不会调用类设计中的new和delete重载,而是全局的。
类中重载的new和delete
//类
class F {
...
public :
void * operate new (size_t);//1
void operate delete (void * ,size_t);//2,size_t可不写
}
//代码段1的内部操作
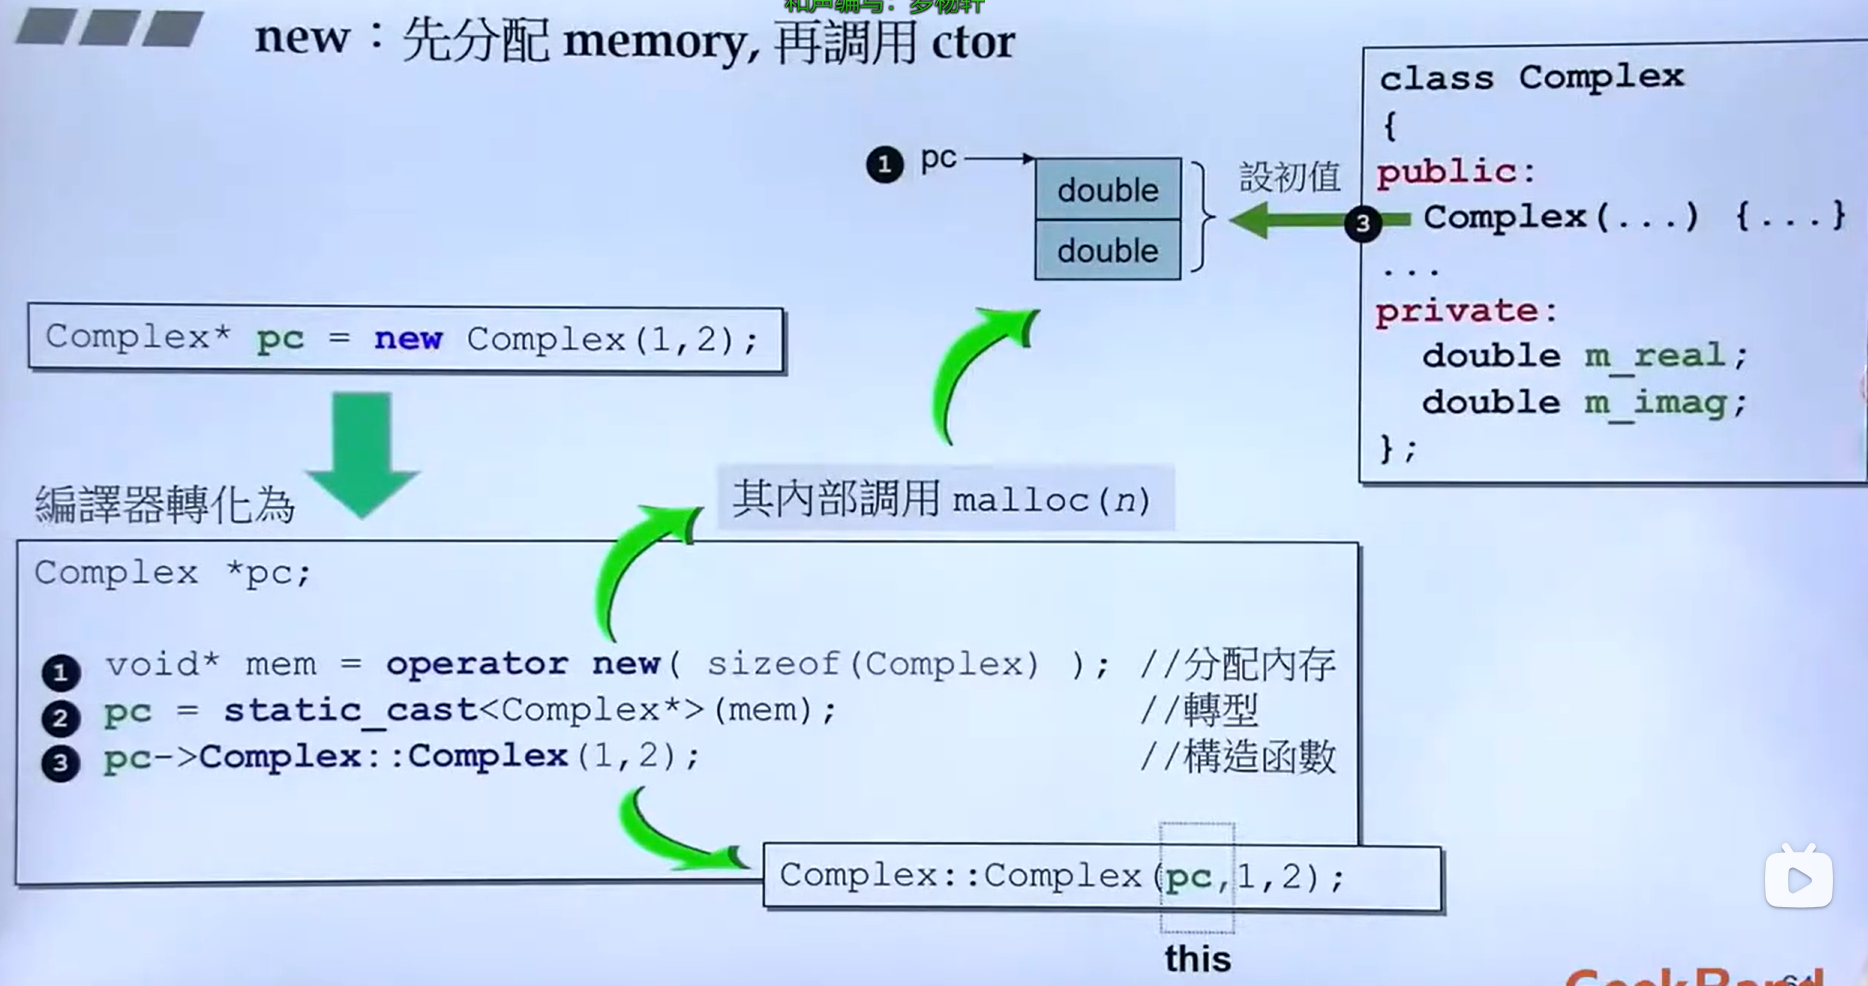
try {
void * mem = operate new (size_t);
p = static_cast < F*> (mem);//类型转换
-> F:: F();//构造函数
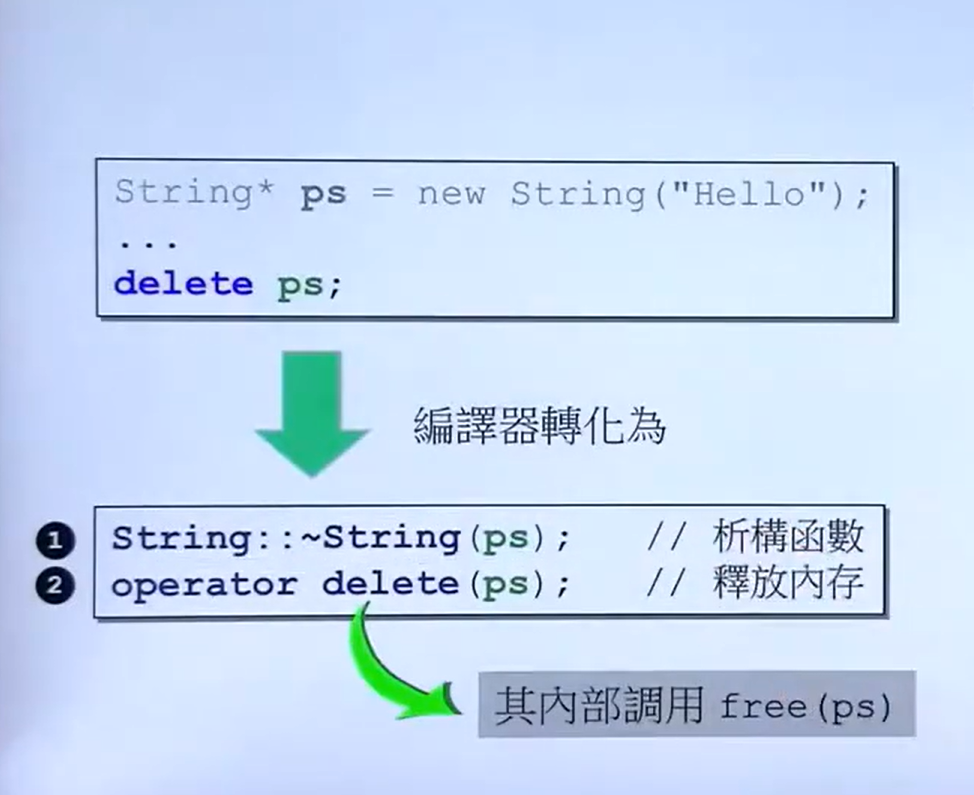
//代码段2的内部操作
->~ F();
operate delete (p);
// main函数调用示例
F* p = new F();
...
delete p;
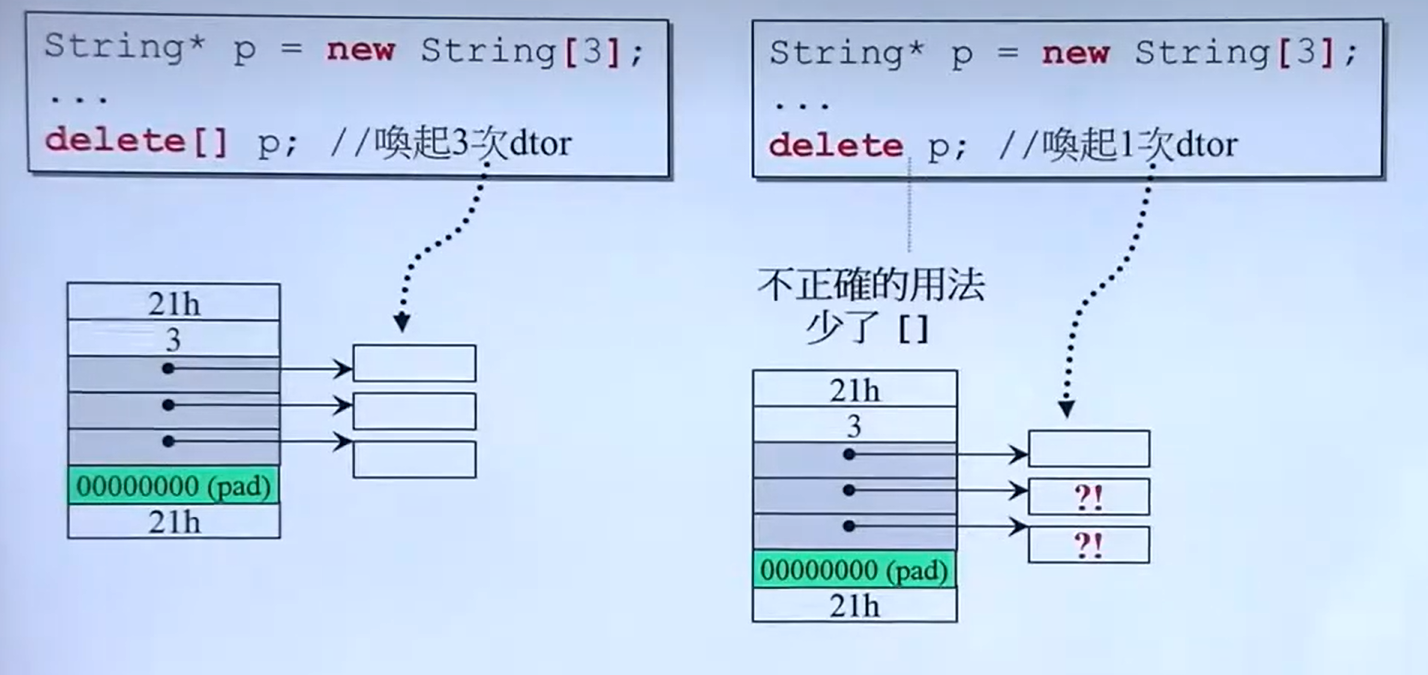
} 类中重载的new[]和delete[]
代码整体流程与上一个情况类似,区别在于new[]是申请数组内存,在销毁的时候如果不使用delete[]释放内存,delete只会执行一次,导致内存没有完全释放,详细代码如下:
//类
class F {
...
public :
void * operate new (size_t);//1
void operate delete (void * ,size_t);//2,size_t可不写
}
//代码段1的内部操作
try {
void * mem = operate new (size_t* N + 4 );//指针占4个字节
= static_cast < F*> (mem);//类型转换
-> F:: F();//构造函数
//代码段2的内部操作
->~ F();//析构函数
delete (p);
// main函数调用示例
F* p = new F[N];
...
delete [] p;
} new,delete使用示例
using namespace std;
class Foo
{
private :
int _id;//4个字节
long _data;//4个字节
//40个字节
public :
Foo() : _id(0 ) { cout << "default ctor.this = " << this << "id: " << _id << endl; };
Foo(int i) : _id(i) { cout << "ctor.this = " << this << "id: " << _id << endl; };
~ Foo() { cout << "dtor.this = " << this << "id: " << _id << endl; };
static void * operator new (size_t size);
static void operator delete (void * p, size_t size);
static void * operator new [](size_t size);
static void operator delete [](void * p, size_t size);
};
void * Foo:: operator new (size_t size)
{
Foo* p = (Foo* )malloc(size);
cout << "new size = " << size << endl;
return p;
}
void Foo:: operator delete (void * p, size_t size)
{
cout << "delete size = " << size << endl;
free(p);
}
void * Foo:: operator new [](size_t size)
{
Foo* p = (Foo* )malloc(size);
cout << "new[] size = " << size << endl;
return p;
}
void Foo:: operator delete [](void * p, size_t size)
{
cout << "delete[] size = " << size << endl;
free(p);
} 运行结果如下:
new size = 48
default ctor.this = 000001 91 EC67A460id: 0
dtor.this = 000001 91 EC67A460id: 0
delete size = 48
_____________________________________________
new[] size = 104
default ctor.this = 000001 91 EC673438id: 0
default ctor.this = 000001 91 EC673468id: 0
dtor.this = 000001 91 EC673468id: 0
dtor.this = 000001 91 EC673438id: 0
delete[] size = 104 为什么new[]操作会多出8个字节呢?
我看课程视频,老师说new[]分配的内存块会在最前面存储计数量,占用4个字节,表示数组大小,但是我在电脑上运行会多出8个字节,查阅资料可能与系统、对齐方式、编译器等有关。
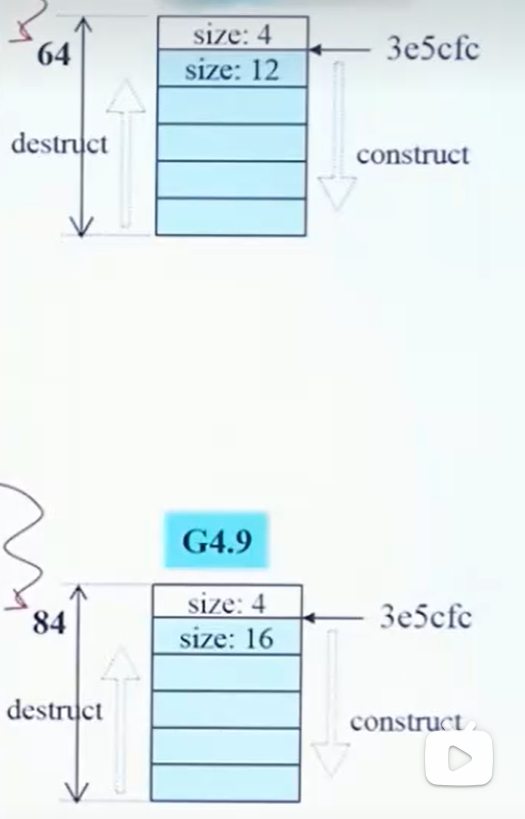
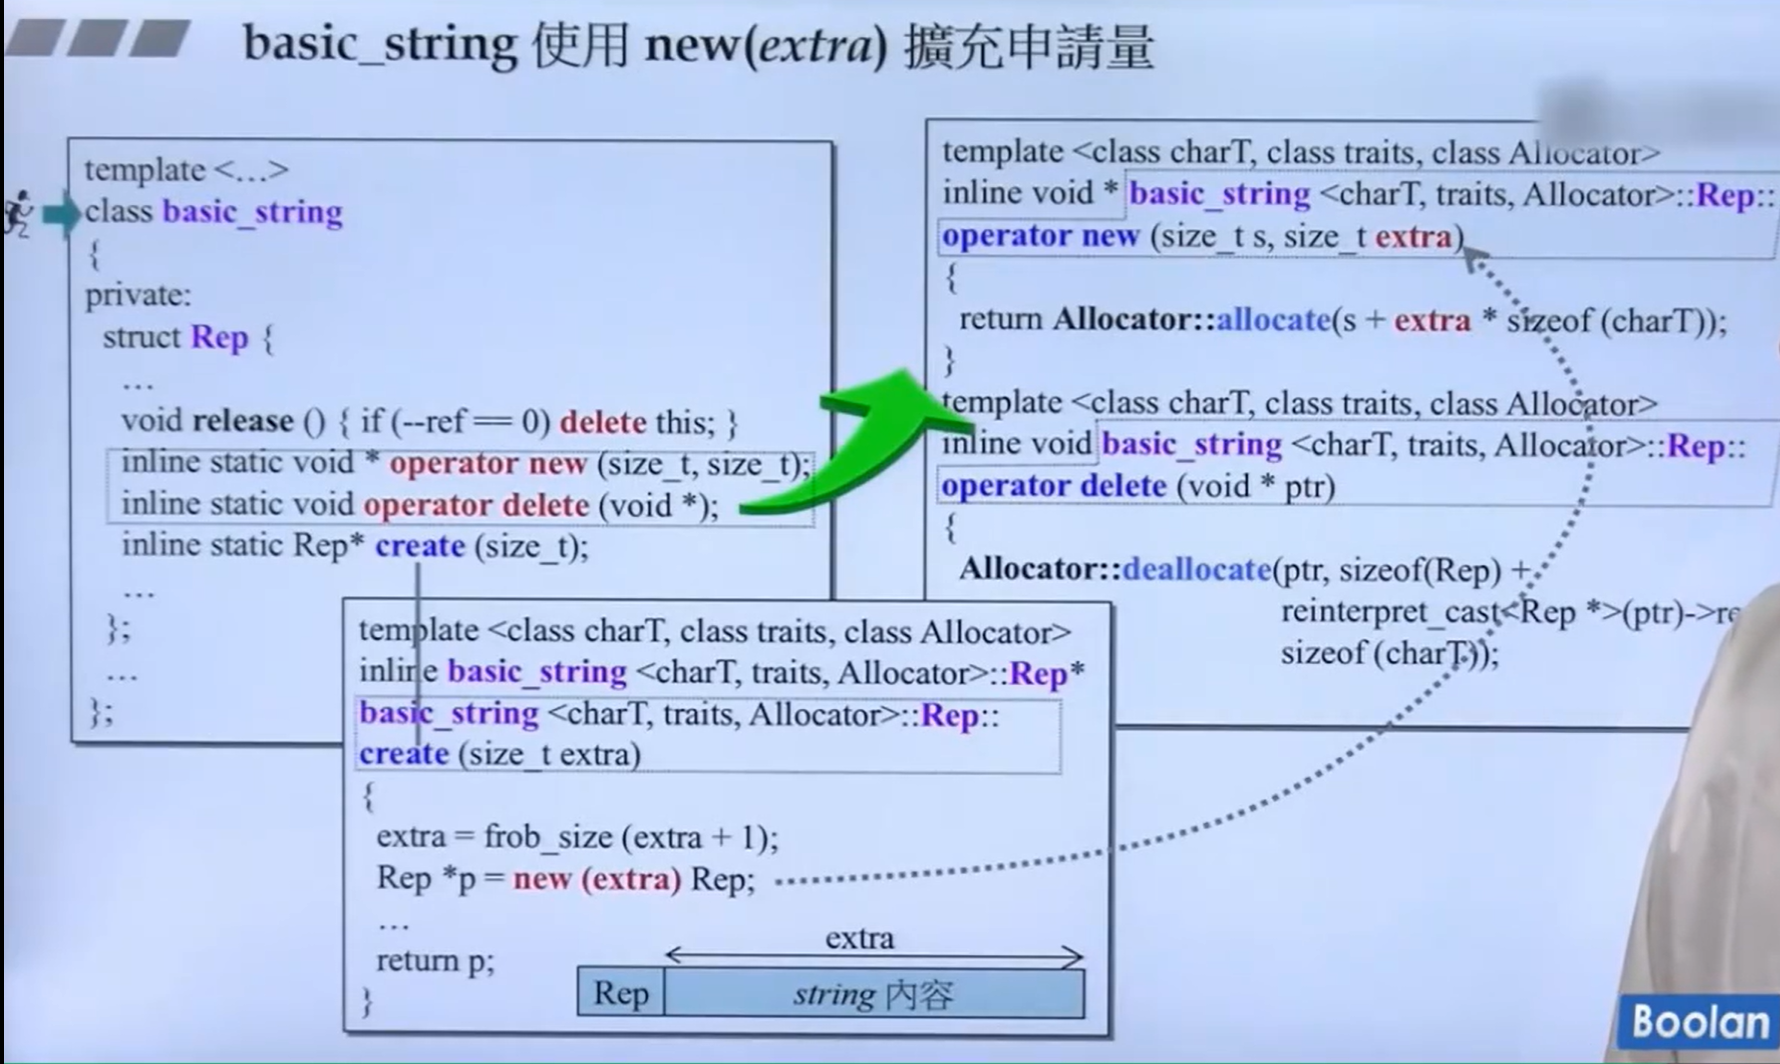
对new的分配额外内存
假设分配内存的同时需要额外分配一定的内存,可以参考下面的代码:
小结
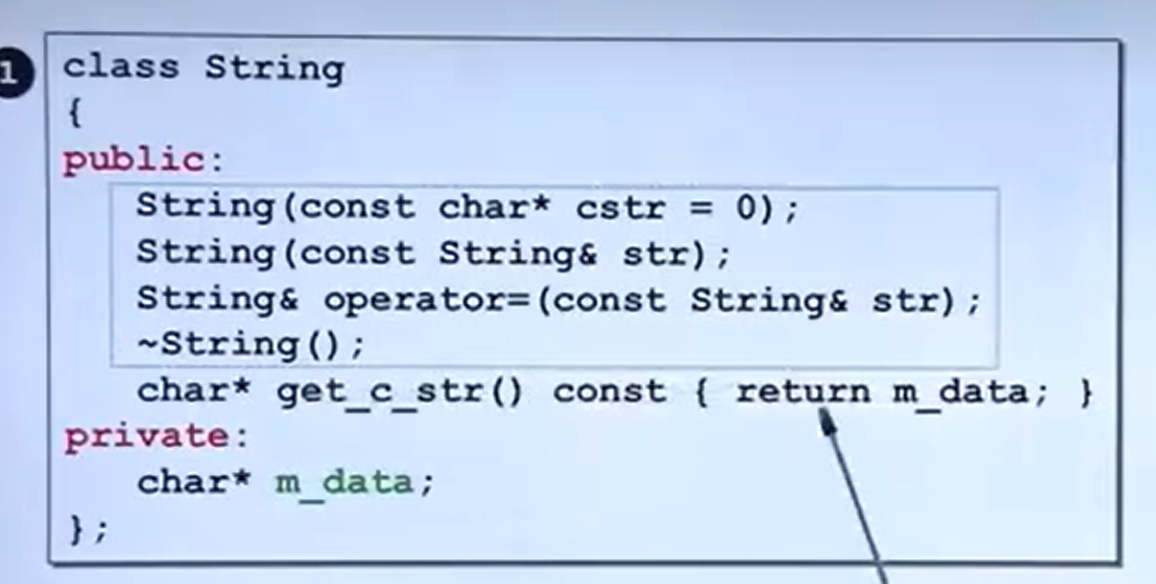
对于包含有指针的类,在必要时写上拷贝构造、拷贝赋值、析构函数,如下代码
class String
{
private :
char * m_data;
public :
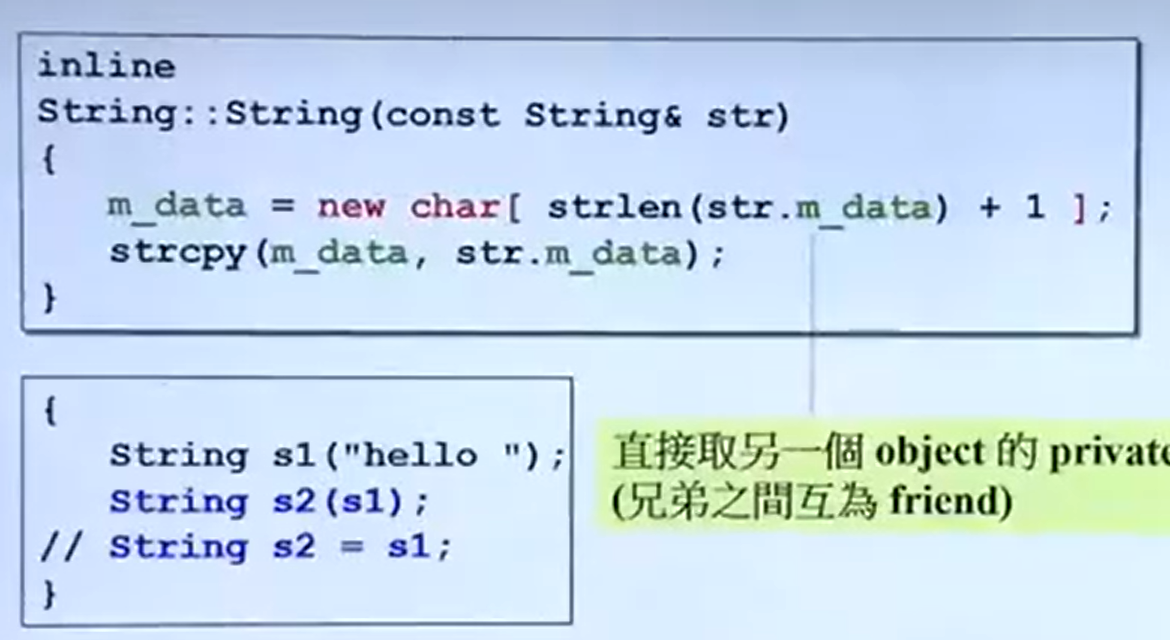
String(const char * cstr = 0 ); //构造函数
const String& str); //拷贝构造函数
& operator = (const String& str); //拷贝赋值函数
~ String(); //析构函数
char * get_c_str () const {return m_data;}
};
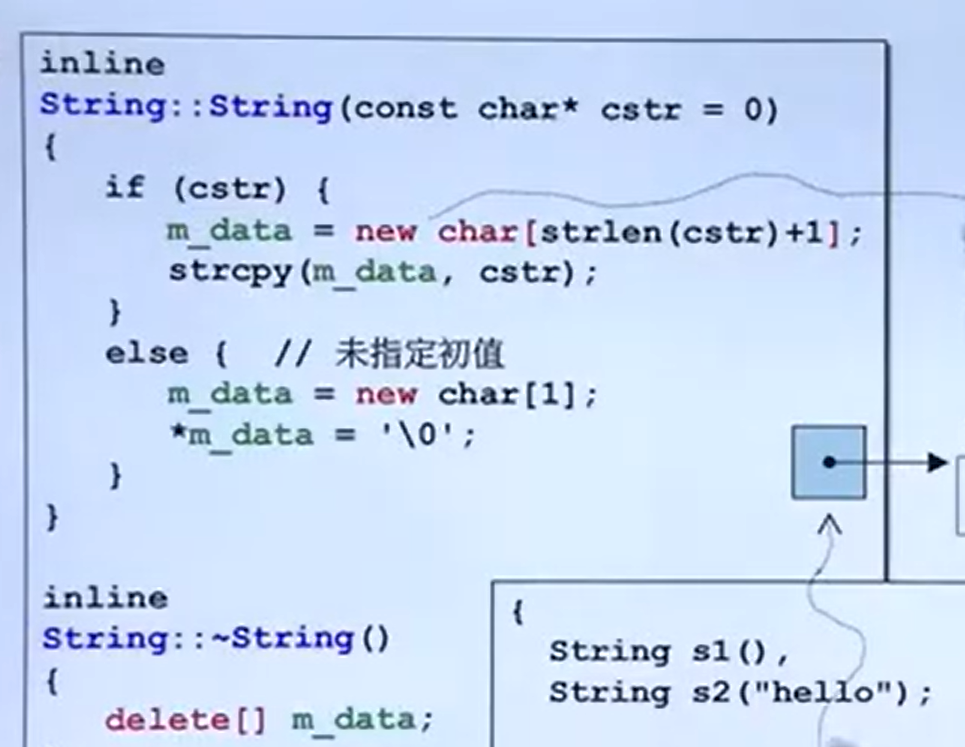
String::~ String()
{
delete [] m_data;
}
inline
String:: String(const char * cstr = 0 )
{
if (cstr)
{
m_data = new char [strlen(cstr)+ 1 ];
strcpy(m_data, cstr);
}else {
m_data = new char [1 ];
strcpy(m_data,'\0' );
}
}
inline
String:: String(const String& cstr){
m_data = new char [strlen(cstr.m_data) + 1 ];
strcpy(m_data, cstr);
}
inline
String& String:: operator = (const String& str)
{
if (this == & str)
return * this ;
delete [] m_data;
m_data = new char [strlen(str.m_data) + 1 ];
strcpy(m_data, str);
return * this ;
}
补充内容static
static在private中的使用例子
class template
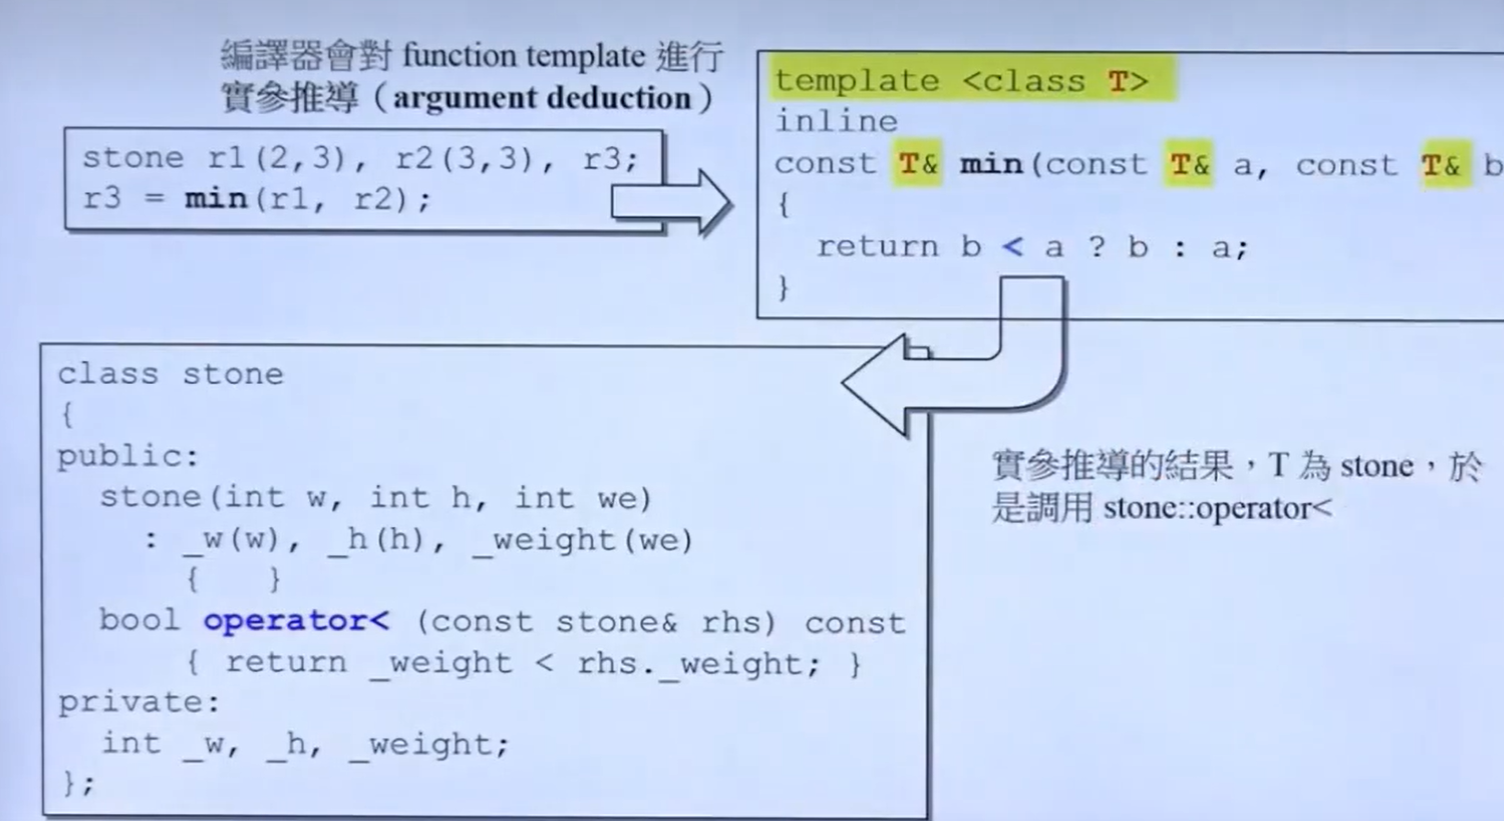
function template
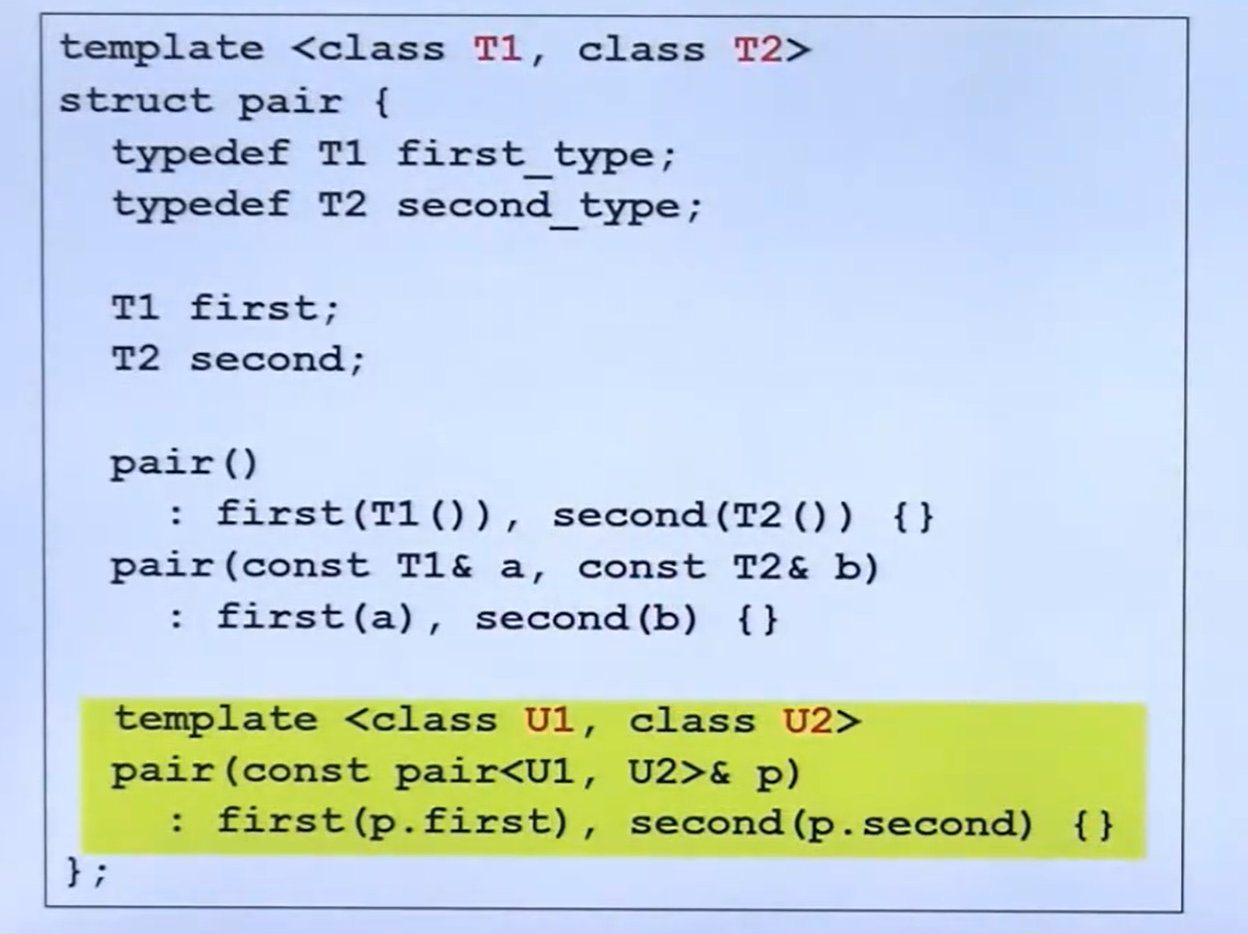
member template 成员模板
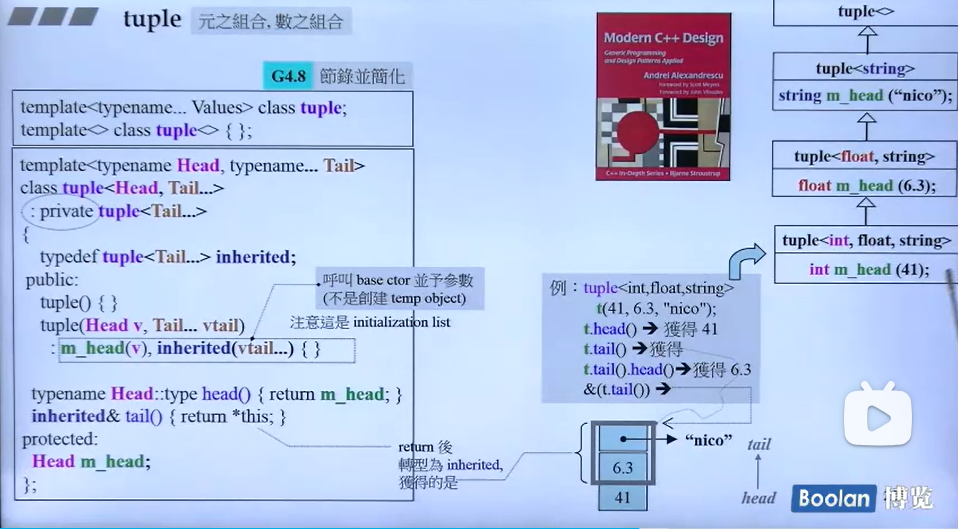
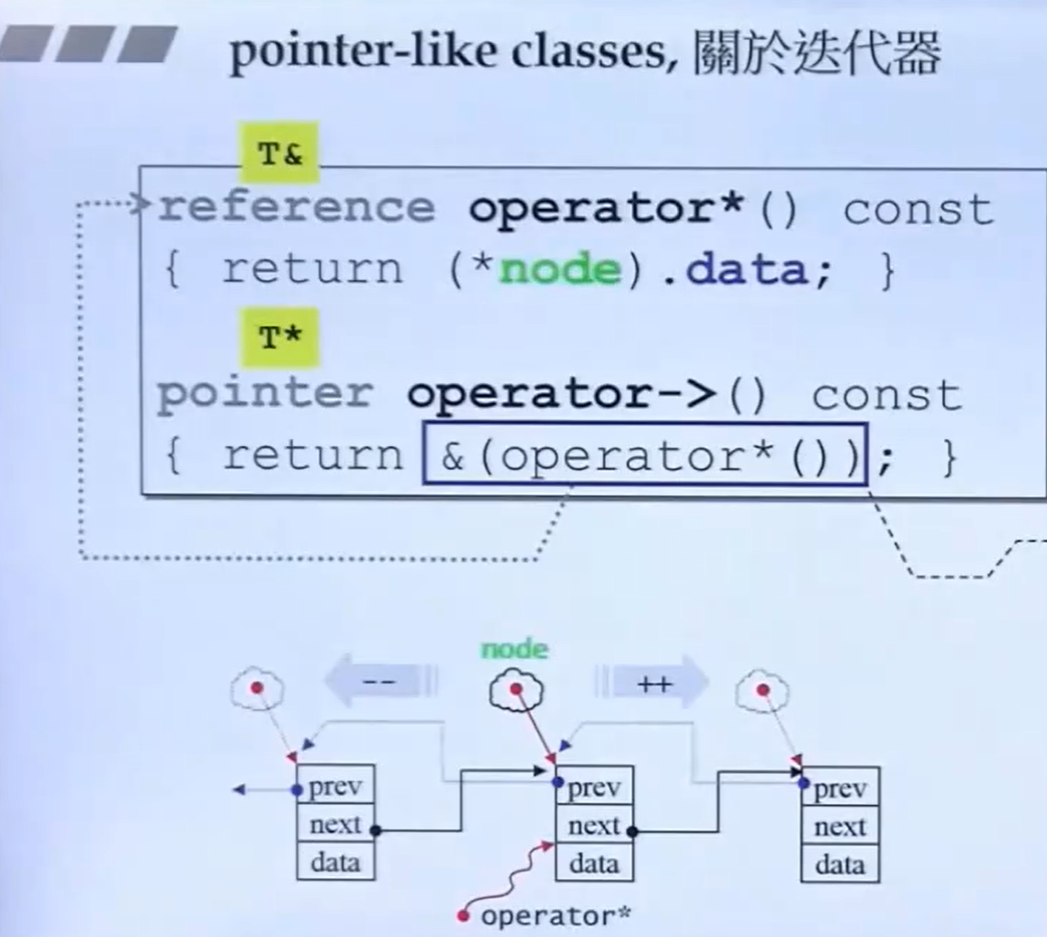
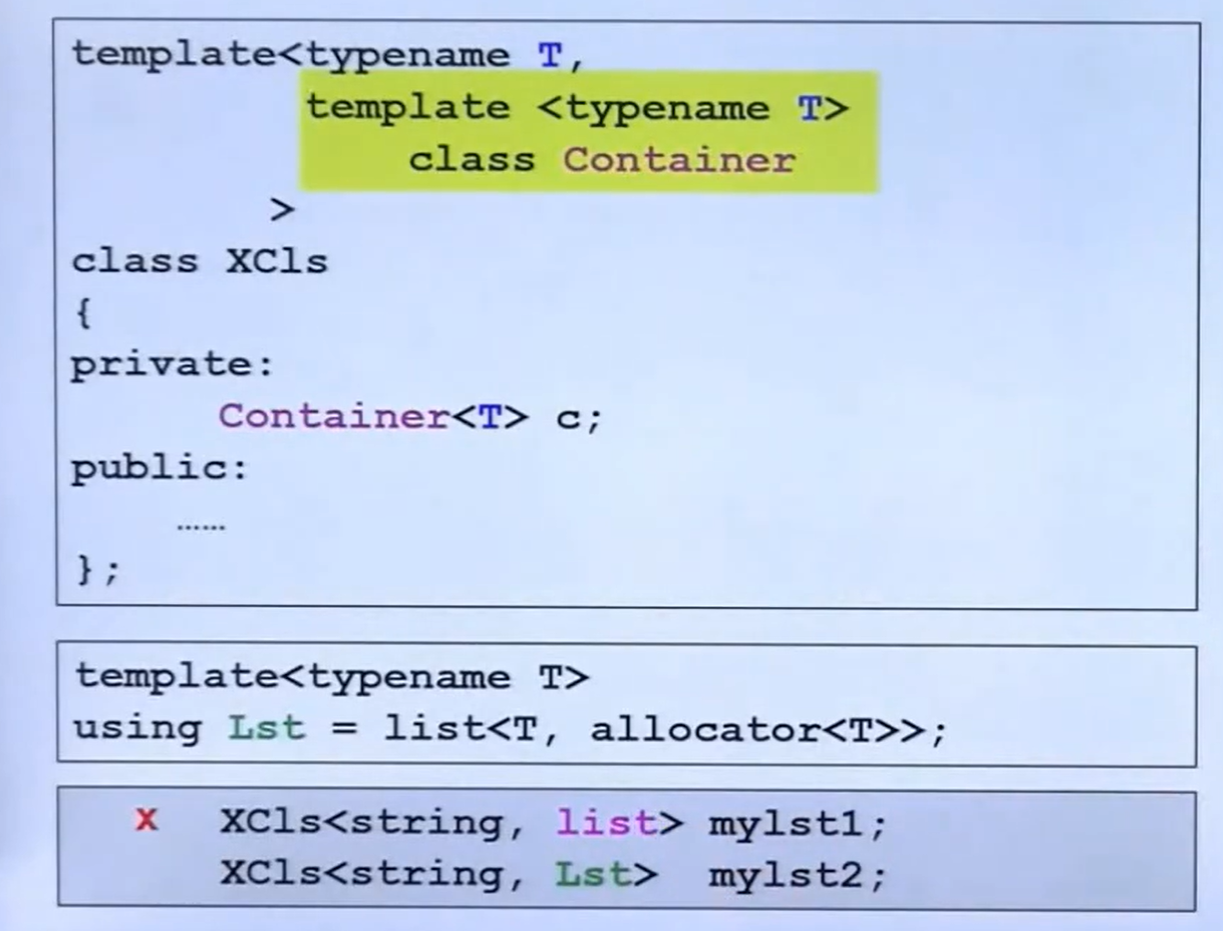
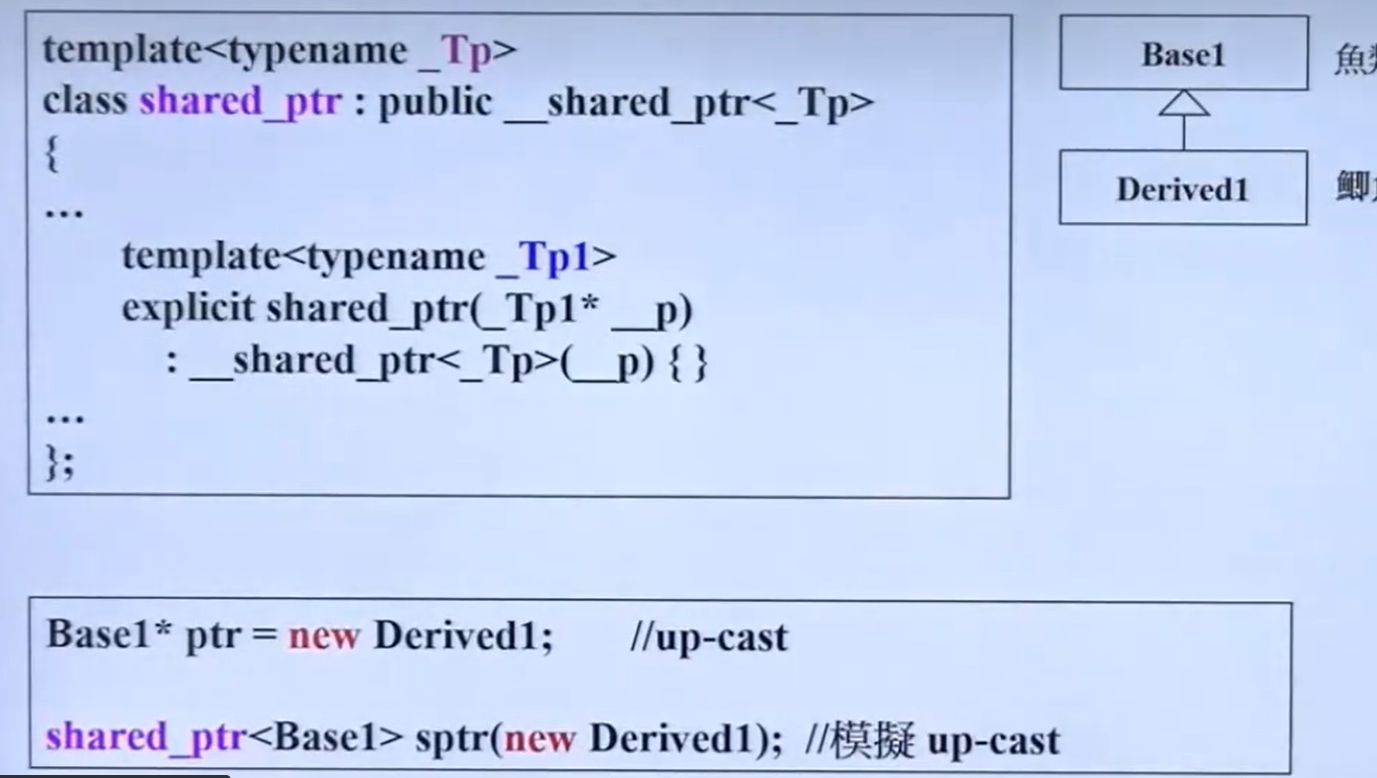
类模板中,还有类模板,通常是对构造函数的操作,如下图:
如下图代码
用意就是当一个指针指向父类时,初始化让他指向子类,那么此时需要实现上图类中的代码。
namespace(命令空间)
使用示例:
    using namespace std;
    {
        ……
    }
使用方法:
#include <iostream>
using namespace std;
int main ()
{
cout<< …… ;
cin<< …… ;
return 0 ;
}
#include <iostream>
using std:: cout;
int main ()
{
cout<< …… ;
std:: cin<< …… ;
return 0 ;
} 或者
#include <iostream>
int main ()
{
std:: cout<< …… ;
std:: cin<< …… ;
return 0 ;
}